
- Oct 30, 2012
- 155
- 0
- 10,710


Hello,
If any of you guys use Linux and were thinking about setting up software RAID, but the command line seems daunting, or you are just looking for a little guidance in the matter then you've come to the right place. In this tutorial I am going to run through the basics of RAID and how to set up the different levels under Linux (I will be using Debian, but the principals are mostly the same on all Linux distros).
What is RAID?
First things first, what is RAID? RAID stands for 'redundant array of independent disks', the idea being that you combine the storage of several similar disks to gain both extra storage and redundancy.
There are loads of types of RAID out there, but I'm just going the talk about RAID 0, RAID 1 and RAID 5 in this tutorial, each of which offering distinct advantages over each other.
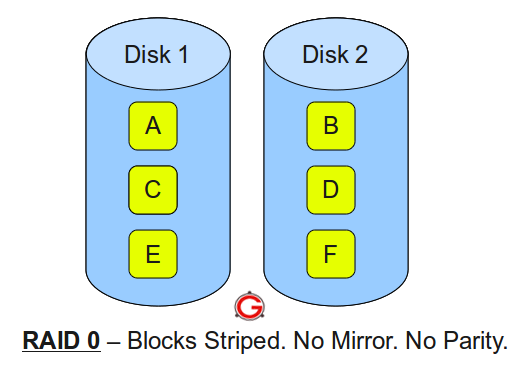
RAID 0 - What this does is splits your data evenly across two or more drives (striping), it offers no redundancy, but is a very easy way to store a large amount of data. The advantage of this is that the write speed is very fast, as it's not having to write parity to the drive (I'll tell you about that in a minute).
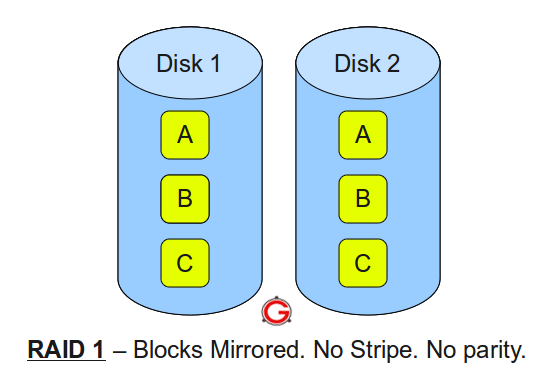
RAID 1 - What RAID 1 does is mirror your data between two or more drives, the benefit of this is very good redundancy, one thing that you do have to remember is that this in itself is not a backup. One of the most common reasons for failure in a RAID system is a power supply malfunction, it is therefore important that anything you consider a backup to have a separate power supply. There are two main drawbacks for using this level of RAID, the first being that the write speeds are much slower than that of RAID 0 because you are writing all of the data twice. The second is that it will cost you a lot more $$ in hard drives.
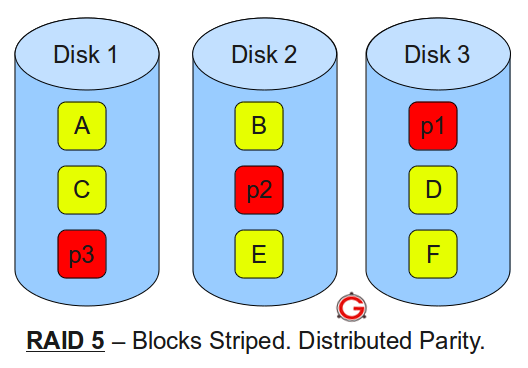
RAID 5 – Think of this RAID level as a compromise between the other two. This uses 3 or more hard drives of the same size to create a striped array with parity. What that means is that when you write data to a disk, the sum of that data is stored in a block called parity (a detailed explanation can be found here: http://www.scottklarr.com/topic/23/how-raid-5-really-works/). The effect of this is that you loose one drives worth of data for backup and you can tolerate any one drive failing. The benefits of this are that you get some redundancy, with faster write speeds than RAID 1 and it will cost you less in hard drives.
Now that that is explained you can choose which RAID level you wish to use and we will proceed to the next section: 'Creating the Array'.
Creating the Array
OK, I am going to do my best to explain each command as we go along, to give you a better understanding of what you are doing.
First you need to install the software, we will be using mdadm, most operating systems come with this installed, to make sure you need to run:
$ sudo apt-get install mdadm
After that’s done you need to find out what your drives are called, to do this run
$ sudo fdisk -l
Find the hard drives you want to use for your array from the list, they should be called something like /dev/sda. Once you have found your drives you need to properly format them, so run the below command (substituting /dev/sda with the name of your drive):
$ sudo fdisk /dev/sda
Delete all partitions by typing;
$ d
Create a new partition by typing:
$ n
You want to create a new primary partition for the full drive size, hit 'ENTER' through the four options for default values. Then you need to tell fdisk that these drives will be used for RAID, to do this type:
$ t
Then:
$ fd
And finally write out your changes:
$ w
Repeat this process for all drives wanted for RIAD e.g. dev/sdb, dev/sdc
Once you've done that for all of your drives it's time to create the array, what you do below depends on which level of RAID that you are going to use, how many drives and what they are called. You need to change the level= to the level of RAID you want, the raid-devices= to the number of drives you will use and /dev/sda etc. to your drives:
$ sudo mdadm --create /dev/md0 --level=0 --raid-devices=3 /dev/sda1 /dev/sdb1 /dev/sdc1
Once you've done that, if you were creating RAID 0 it will have assembled your array, if you are creating a different level of RIAD check your sync progress with:
$ cat /proc/mdstat
Mdstat should be re syncing hard drives if you are using RAID 1 or 5. Once that is done you will need to create a directory to manually mount the hard drive to, as standard use /mnt:
$ sudo mkdir /mnt/raid
Then you want to give your user ownership of the folder so that you don't have to be root to access it, substitute USER for your user name:
$ sudo chown USER /mnt/raid
Now we are going to make the array automatically mount when the computer is booted, so we need to edit the fstab file:
$ sudo nano /etc/fstab
Add the following line to the bottom of the file:
$ /dev/md0 /mnt/raid ext3 relatime,acl,errors=remount-ro
Now we will edit our mdadm config file:
$ sudo mdadm –examine –scan
Highlight and copy the whole output text, then go into your mdadm.conf file:
$ sudo nano /etc/mdadm/mdadm.conf
Add the following lines, remembering to substitute your drives in place of the ones that I have used:
DEVICE /dev/sda1 /dev/sdb1 /dev/sdc1
(add the copied output of the mdadm scan)
If you are creating RAID 1 or 5 check on progress of resync with:
$ watch cat /proc/mdstat
Wait until resync is finished before performing next step. We now need to create a files system on the array (like when you format a drive in windows):
$ sudo mkfs.ext3 /dev/md0
Now we will mount it to the directory we created earlier:
$ mount /dev/md0 /mnt/raid
And that’s it, your array is now ready to use. If for any reason you want to reformat or take the array down temporarily you need to unmount it and then stop mdadm:
$ sudo umount /dev/md0
$ sudo mdadm --stop /dev/md0
And then to reassemble run:
$ sudo mdadm --assemble /dev/md0 /dev/sda /dev/sdb /dev/sdc.
If that's all the information you needed then feel free to stop reading, but if like me you've created your array and are now wondering “well that's great but how do I run backups” then carry on reading.
Backing Up
It is actually much more complicated than you would think to backup a large RAID array, I have come across 3 viable options:
- The first is to use external drives to back up either just the critical data, or all of with a simple copy and paste. There are two things wrong with this, the first being that you can't automate it and the second being that it's pretty annoying to split the data up between your drives manually.
- The second option is to invest in some online cloud storage to use as backup, the problem with this is that it costs a fortune for anything over a terabyte, so unless you are Mr moneybags I would suggest the third option, which is what I chose.
- The third option, you can use external drives or internal drive for this (I went with external because I already had them). You can create a second RAID array to use as backup. If you buy a large NAS storage device it will be exactly the same thing as what we are going to do now, it will just cost you quite a bit more.
I have 4x 2TB hard drives in a RAID 5 array, so what I did was use 4x 2TB external drives, turn them into a RAID 5 array on my home machine and use rsync to backup to them. To do this what you need to do is follow my instructions for creating a RAID array again, but substitute /dev/md0 for /dev/md1 and make the directory name /mnt/raid_backup (or something similar). When you get to the point where you need to update the mdadm.conf file you will want to run the commands as follows:
$ mdadm –detail /dev/md0
Copy UUID and put in ARRAY /dev/md/1 metadata=1.2 UUID='output of UUID' name='name above the UUID'
e.g. ARRAY /dev/md/1 metadata=1.2 UUID=b6b38490:a3573bbe:40aa40cc:55689ffe name=desktop-rich:1
$ sudo nano /etc/mdadm/mdadm.conf
And add the lines the same way you did before. Now onto the actual backup; there are loads of backup tools for Linux, but I believe in simple=effective, so I think the best one to use is rsync. To get rsync just run:
$ sudo apt-get install rsync
Once it is installed all you need to do to run the backup is enter the following command:
$ sudo rsync -avz /mnt/raid/ /mnt/raid_backup
The -a tells rsync to archive the backups, the -v tells rsync to run in verbose mode, which means it will tell you what it is doing and the -z tells rsync to compress the files (saving space). It will take a while for this first backup to run, but the beauty of rsync is that it will automatically do incremental backups the next time you run it. This means that it will only copy over the files that have changed since the last backup. You can also tell rsync to automatically delete the files in the backup that you have deleted from your array (be careful with this, if you accidentally delete something it will remove it from the backup next time you run rsync), to do this run:
$ sudo rsync -avz --delete /mnt/raid/ /mnt/raid_backup
The idea of this is to keep an exact copy of the array. Well that's everything, thanks for reading and I hope I have been helpful.
Rich.
If any of you guys use Linux and were thinking about setting up software RAID, but the command line seems daunting, or you are just looking for a little guidance in the matter then you've come to the right place. In this tutorial I am going to run through the basics of RAID and how to set up the different levels under Linux (I will be using Debian, but the principals are mostly the same on all Linux distros).
What is RAID?
First things first, what is RAID? RAID stands for 'redundant array of independent disks', the idea being that you combine the storage of several similar disks to gain both extra storage and redundancy.
There are loads of types of RAID out there, but I'm just going the talk about RAID 0, RAID 1 and RAID 5 in this tutorial, each of which offering distinct advantages over each other.
RAID 0 - What this does is splits your data evenly across two or more drives (striping), it offers no redundancy, but is a very easy way to store a large amount of data. The advantage of this is that the write speed is very fast, as it's not having to write parity to the drive (I'll tell you about that in a minute).
RAID 1 - What RAID 1 does is mirror your data between two or more drives, the benefit of this is very good redundancy, one thing that you do have to remember is that this in itself is not a backup. One of the most common reasons for failure in a RAID system is a power supply malfunction, it is therefore important that anything you consider a backup to have a separate power supply. There are two main drawbacks for using this level of RAID, the first being that the write speeds are much slower than that of RAID 0 because you are writing all of the data twice. The second is that it will cost you a lot more $$ in hard drives.
RAID 5 – Think of this RAID level as a compromise between the other two. This uses 3 or more hard drives of the same size to create a striped array with parity. What that means is that when you write data to a disk, the sum of that data is stored in a block called parity (a detailed explanation can be found here: http://www.scottklarr.com/topic/23/how-raid-5-really-works/). The effect of this is that you loose one drives worth of data for backup and you can tolerate any one drive failing. The benefits of this are that you get some redundancy, with faster write speeds than RAID 1 and it will cost you less in hard drives.
Now that that is explained you can choose which RAID level you wish to use and we will proceed to the next section: 'Creating the Array'.
Creating the Array
OK, I am going to do my best to explain each command as we go along, to give you a better understanding of what you are doing.
First you need to install the software, we will be using mdadm, most operating systems come with this installed, to make sure you need to run:
$ sudo apt-get install mdadm
After that’s done you need to find out what your drives are called, to do this run
$ sudo fdisk -l
Find the hard drives you want to use for your array from the list, they should be called something like /dev/sda. Once you have found your drives you need to properly format them, so run the below command (substituting /dev/sda with the name of your drive):
$ sudo fdisk /dev/sda
Delete all partitions by typing;
$ d
Create a new partition by typing:
$ n
You want to create a new primary partition for the full drive size, hit 'ENTER' through the four options for default values. Then you need to tell fdisk that these drives will be used for RAID, to do this type:
$ t
Then:
$ fd
And finally write out your changes:
$ w
Repeat this process for all drives wanted for RIAD e.g. dev/sdb, dev/sdc
Once you've done that for all of your drives it's time to create the array, what you do below depends on which level of RAID that you are going to use, how many drives and what they are called. You need to change the level= to the level of RAID you want, the raid-devices= to the number of drives you will use and /dev/sda etc. to your drives:
$ sudo mdadm --create /dev/md0 --level=0 --raid-devices=3 /dev/sda1 /dev/sdb1 /dev/sdc1
Once you've done that, if you were creating RAID 0 it will have assembled your array, if you are creating a different level of RIAD check your sync progress with:
$ cat /proc/mdstat
Mdstat should be re syncing hard drives if you are using RAID 1 or 5. Once that is done you will need to create a directory to manually mount the hard drive to, as standard use /mnt:
$ sudo mkdir /mnt/raid
Then you want to give your user ownership of the folder so that you don't have to be root to access it, substitute USER for your user name:
$ sudo chown USER /mnt/raid
Now we are going to make the array automatically mount when the computer is booted, so we need to edit the fstab file:
$ sudo nano /etc/fstab
Add the following line to the bottom of the file:
$ /dev/md0 /mnt/raid ext3 relatime,acl,errors=remount-ro
Now we will edit our mdadm config file:
$ sudo mdadm –examine –scan
Highlight and copy the whole output text, then go into your mdadm.conf file:
$ sudo nano /etc/mdadm/mdadm.conf
Add the following lines, remembering to substitute your drives in place of the ones that I have used:
DEVICE /dev/sda1 /dev/sdb1 /dev/sdc1
(add the copied output of the mdadm scan)
If you are creating RAID 1 or 5 check on progress of resync with:
$ watch cat /proc/mdstat
Wait until resync is finished before performing next step. We now need to create a files system on the array (like when you format a drive in windows):
$ sudo mkfs.ext3 /dev/md0
Now we will mount it to the directory we created earlier:
$ mount /dev/md0 /mnt/raid
And that’s it, your array is now ready to use. If for any reason you want to reformat or take the array down temporarily you need to unmount it and then stop mdadm:
$ sudo umount /dev/md0
$ sudo mdadm --stop /dev/md0
And then to reassemble run:
$ sudo mdadm --assemble /dev/md0 /dev/sda /dev/sdb /dev/sdc.
If that's all the information you needed then feel free to stop reading, but if like me you've created your array and are now wondering “well that's great but how do I run backups” then carry on reading.
Backing Up
It is actually much more complicated than you would think to backup a large RAID array, I have come across 3 viable options:
- The first is to use external drives to back up either just the critical data, or all of with a simple copy and paste. There are two things wrong with this, the first being that you can't automate it and the second being that it's pretty annoying to split the data up between your drives manually.
- The second option is to invest in some online cloud storage to use as backup, the problem with this is that it costs a fortune for anything over a terabyte, so unless you are Mr moneybags I would suggest the third option, which is what I chose.
- The third option, you can use external drives or internal drive for this (I went with external because I already had them). You can create a second RAID array to use as backup. If you buy a large NAS storage device it will be exactly the same thing as what we are going to do now, it will just cost you quite a bit more.
I have 4x 2TB hard drives in a RAID 5 array, so what I did was use 4x 2TB external drives, turn them into a RAID 5 array on my home machine and use rsync to backup to them. To do this what you need to do is follow my instructions for creating a RAID array again, but substitute /dev/md0 for /dev/md1 and make the directory name /mnt/raid_backup (or something similar). When you get to the point where you need to update the mdadm.conf file you will want to run the commands as follows:
$ mdadm –detail /dev/md0
Copy UUID and put in ARRAY /dev/md/1 metadata=1.2 UUID='output of UUID' name='name above the UUID'
e.g. ARRAY /dev/md/1 metadata=1.2 UUID=b6b38490:a3573bbe:40aa40cc:55689ffe name=desktop-rich:1
$ sudo nano /etc/mdadm/mdadm.conf
And add the lines the same way you did before. Now onto the actual backup; there are loads of backup tools for Linux, but I believe in simple=effective, so I think the best one to use is rsync. To get rsync just run:
$ sudo apt-get install rsync
Once it is installed all you need to do to run the backup is enter the following command:
$ sudo rsync -avz /mnt/raid/ /mnt/raid_backup
The -a tells rsync to archive the backups, the -v tells rsync to run in verbose mode, which means it will tell you what it is doing and the -z tells rsync to compress the files (saving space). It will take a while for this first backup to run, but the beauty of rsync is that it will automatically do incremental backups the next time you run it. This means that it will only copy over the files that have changed since the last backup. You can also tell rsync to automatically delete the files in the backup that you have deleted from your array (be careful with this, if you accidentally delete something it will remove it from the backup next time you run rsync), to do this run:
$ sudo rsync -avz --delete /mnt/raid/ /mnt/raid_backup
The idea of this is to keep an exact copy of the array. Well that's everything, thanks for reading and I hope I have been helpful.
Rich.