I have purchased a SATA/IDE to USB 2.0 adapter to connect the hard drive from my IBM NetVista Windows XP to my new PC. Before I do that I have to remove the hard drive. At the moment there are two connections on it. One with red, blue and yellow wires and the other is a gray "band". How do I remove them?
[SOLVED] Hard drive and the SATA/IDE to USB 2.0 adapter
- Thread starter destroyed
- Start date
You are using an out of date browser. It may not display this or other websites correctly.
You should upgrade or use an alternative browser.
You should upgrade or use an alternative browser.
hang-the-9
Titan
Drive would have two connections, power and data. Pull them from the drive, they should come out easily, the power is likely to take a bit more force. Try to pull from the connector not the cable if you can, and of course make sure computer is shut off. There may be clips on them, so look it over.
the power (connector) is likely to take a bit more force. Try to pull from the connector not the cable if you can
This is no joke. I've run into some of the old molex connectors on drives that I really had to struggle with to get them to come out. Wiggle, pull, pull harder, go back easy, wiggle it about again, etc.
Depending on a bit of luck, some patience is going to be required on that. The IDE ribbon cable, on the other hand, generally comes off pretty easily.
The drive has been disconnected. I am looking at the adapter manual and there are three possibilities for installing the adapter:
1: to 3.5"/5.25" (PATA) IDE Drive
2: to 2.5"/3.5"/5.25" SATA Drive
3: to 2.5" (PATA) IDE Drive
How will I know which drive I have?
1: to 3.5"/5.25" (PATA) IDE Drive
2: to 2.5"/3.5"/5.25" SATA Drive
3: to 2.5" (PATA) IDE Drive
How will I know which drive I have?
The type of connector: IDE/PATA has a 40-pin connector, and a ribbon cable, and a 4-pin molex power connector, whereas SATA has two L-shaped connectors, different sizes, with the larger being power and the smaller being data.
AND
The physical width of the drive.
AND
The physical width of the drive.
Before I get to the important things, should I remove the blue plastic tabs on either side of the drive, and do I put the screws back into the drive once the tabs are off?
It is not the SATA connection as you said sine the DATA cable does not attach to the drive. SO which PATA connection do I use?
The first (3.5"/5.25" IDE Drive) uses the power adapter, power converter, power cable with Molex power connector, and the adapter.
It does say Molex on the drive, and the instruction say to change the jumper setting on the drive to Master Single Drive Mode and that I can find info for changing drive mode on the label of the drive. There is something on the label under the heading "Jumpers". The drive appears to be on "enable cable select" instead of "master". How would I change the setting? There are eight pins, with tiny plastic squares around two pins with a sliver of metal from one square to the other.
The second (2.5" IDE Drive) just requires the adapter. The instructions say there are two sets of pins on the interface. One set with 44 pins, one missing, and another set with four pins, separated by a gap. My drive does not have the gap, but eight pins separating the other two sets of pins.
You mentioned the physical width of the drive. Just measure with a ruler or is the width found printed on the label?
With what I have mentioned here, can you decide which connection I should use? If you need any other info on the drive label just tell me.
Just measure with a ruler.
Also, the 3.5" drive uses a 40-pin connector. The 2.5" uses a 44-pin connector, which was for laptops, with the extra 4 pins providing power.
This page also has some info. Actually, probably way more info than you need, but some of the photos and descriptions may be helpful.
Also, the 3.5" drive uses a 40-pin connector. The 2.5" uses a 44-pin connector, which was for laptops, with the extra 4 pins providing power.
This page also has some info. Actually, probably way more info than you need, but some of the photos and descriptions may be helpful.
This is what I hope will be the final question, and this will finally be solved.
In the instructions it says: Check and change the jumper settings on
your drive to Master Single Drive Mode (the information for changing
drive mode is located on the label of your drive).
If you could explain this procedure I would appreciate it.
In the instructions it says: Check and change the jumper settings on
your drive to Master Single Drive Mode (the information for changing
drive mode is located on the label of your drive).
If you could explain this procedure I would appreciate it.
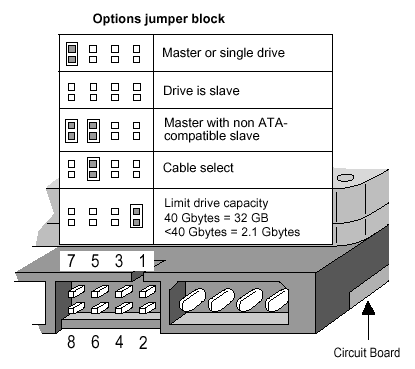
It's been a while, but as I recall, because two drives could be on a single cable, most IDE/PATA drives had a set of pins, with a jumper on two of the pins, to designate whether the drive was:
I believe some drives used the same jumper setting for Master and Single Drive, but others didn't. In any case, it seems like whatever would be Single Drive (whether it's the same as Master, or not) is what you would need.
The following image is an example, but not all drives used the same number of pins or positioning for this.

- Master
- Slave
- Cable Select
- Single Drive
I believe some drives used the same jumper setting for Master and Single Drive, but others didn't. In any case, it seems like whatever would be Single Drive (whether it's the same as Master, or not) is what you would need.
The following image is an example, but not all drives used the same number of pins or positioning for this.

You would pull the jumper off whatever pins it's currently on, and put it so that it's bridging the two pins that are indicated for Single Drive... look at the label on your HDD to see how.
Example 1 (this appears to have the jumpers set incorrectly, not matching anything in the diagram for the drive)

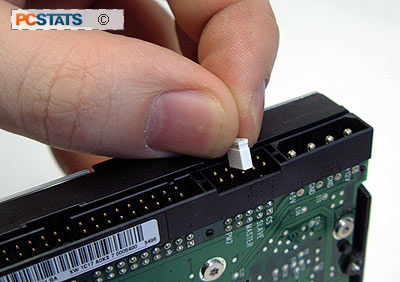
This is someone setting it up for Master (judging by the lettering on the circuit board):

Example 1 (this appears to have the jumpers set incorrectly, not matching anything in the diagram for the drive)

This is someone setting it up for Master (judging by the lettering on the circuit board):

Are you certain the drive partition hasn't been deleted?
With everything connected, right click the Start Menu, hit Windows+X, and choose Disk Management. See if the disk shows up there.
I learned that the hard way when I forgot that a drive I connected through a similar device had had its partitions deleted earlier. Nothing shows up in File Explorer, but the disk did show up in Disk Management.
It is possible that it'll be a little slow to bring things up the first time, as well. This is the particular adapter I used.
I owe you all an apology for my previous post. Due to how some people treated me when I was young I developed a hatred of myself, and when I when I lose my temper I get foul mouthed and sometimes inflict punishment on myself. I realize the problem and I am trying to stop.
TRENDING THREADS
-
-
Question Effect of USB 3 cable length at high speed
- Started by Pimpom
- Replies: 5
-
-
Discussion What's your favourite video game you've been playing?
- Started by amdfangirl
- Replies: 4K
-

Space.com is part of Future plc, an international media group and leading digital publisher. Visit our corporate site.
© Future Publishing Limited Quay House, The Ambury, Bath BA1 1UA. All rights reserved. England and Wales company registration number 2008885.
