You have a very good list of parts.
You need change nothing.
Some thoughts:
The case comes with two 120mm fans.
You included 3 noctua fans; how do you plan on using them?
I might buy two 140mm fans for the front intakes instead.
140mm fans move more air quietly than three 120mm fans.
Keep one 120mm for rear exhaust, mainly to direct airflow past the cpu cooler, motherboard and graphics card.
Top fans may be counterproductive, diverting cooling air up and out of the case before doing anything good.
You will not be overclocking the cpu with a H670 chipset.
And, you really do not want to.
12th gen does best for gaming by using the turbo mechanism to boost a couple of cores past what an all core OC can do.
One requirement for turbo is to have cpu temperatures under control.
The AF34 will work. It is 158mm high, and the case allows 180mm.
If you like Noctua, as I do, look at the NH-D15s.
It costs less and is a bigger, more competent cooler.
https://www.newegg.com/noctua-nh-d15s/p/N82E16835608072
It comes with LGA1700 mounting.
I have no problem with overprovisioning a psu.
The unit you picked is a good one with a 10 year warranty.
On the motherboard, H670 is not a common purchase.
But, it should work.
I think I would up the budget a bit for a Z690 based motherboard which can do turbo a bit better and include wifi.
You will also get a better sound chip.
If you like ASUS, here is one:
https://www.newegg.com/p/N82E16813119510?Item=9SIA2W0H6F2533&quicklink=true
I use this MSI Z690 A pro DDR4 wifi:
https://www.newegg.com/p/N82E16813144488?Item=N82E16813144488
Lastly, as a first time builder:
MY build process:
Before anything, while waiting for your parts to be delivered, download
and read, cover to cover your case and motherboard manual.
Buy a long #2 magnetic tip philips screwdriver.
A small led flashlight is also useful.
I find it handy to buy a power switch like this for testing.
https://www.newegg.com/p/N82E16812119009?Description=power switch&cm_re=power_switch--12-119-009--Product&quicklink=true
1. I assemble the critical parts outside of the case.
That lets me test them for functionality easily.
A wood table or cardboard is fine.
2. Plug in only the necessary parts at first. Ram, cpu, cooler, psu.
Do not force anything. Parts fit only one way.
Attach a monitor to the integrated motherboard adapter if you have one, otherwise to the graphics card.
- If your motherboard does not have a PWR button, momentarily touch the two pwr front panel pins with a flat blade screwdriver.
- Repeatedly hit F2 or DEL, and that should get you into the bios display.
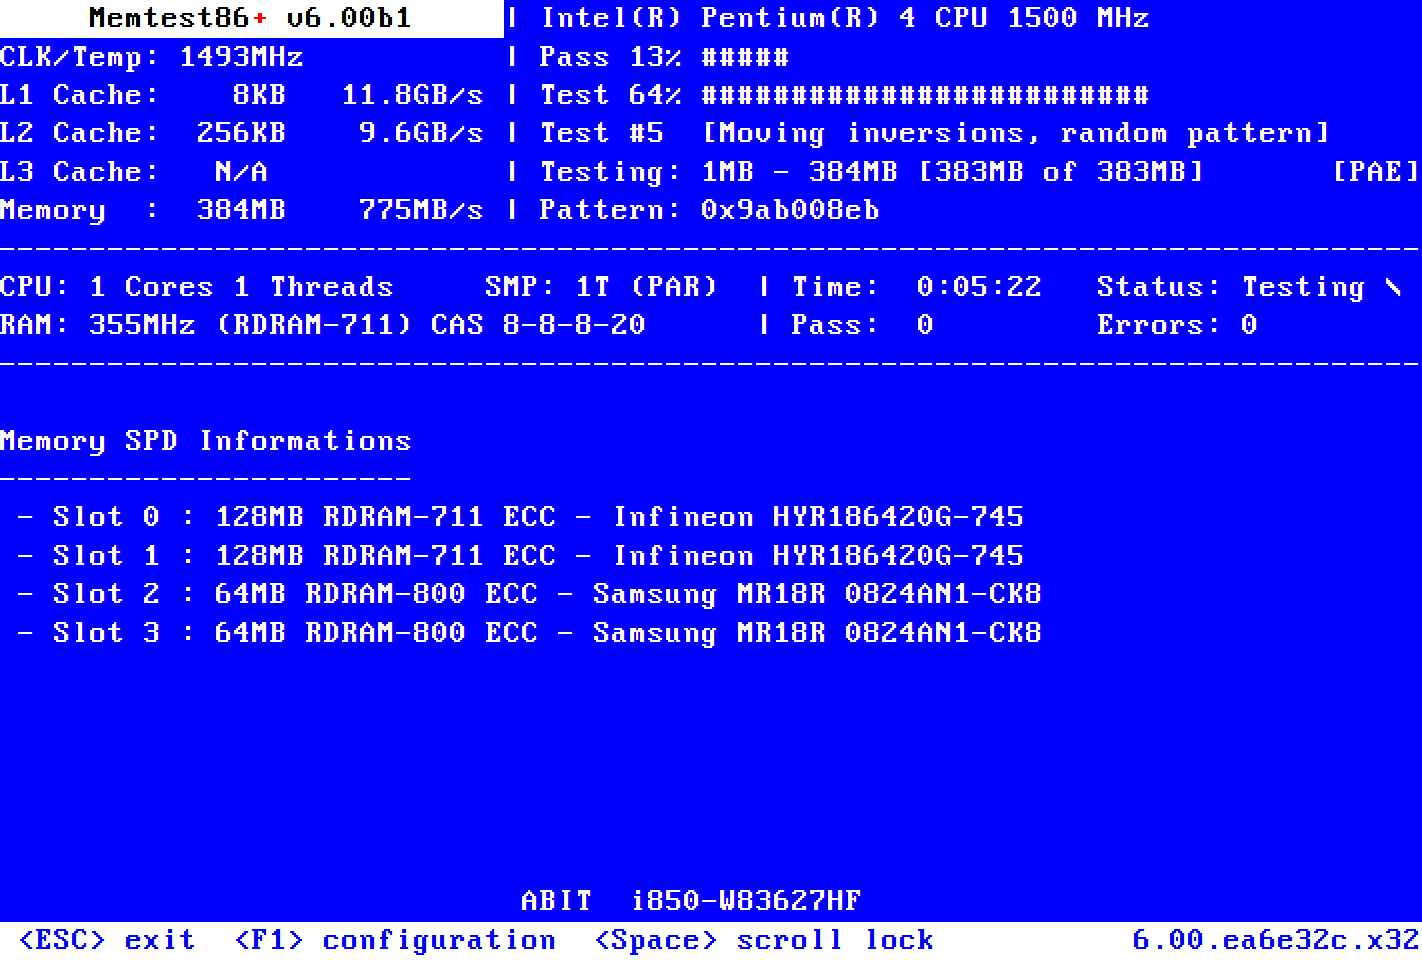
- Boot from a cd or usb stick with memtest86 on it. memtest will exercise your ram and cpu functionality.
They boot from a usb stick and do not use windows.
You can download them here:
MemTest86 is the original self booting memory testing software for x86 and ARM computers. Supporting both BIOS and UEFI, with options to boot from USB.
www.memtest86.com
Memtest86+ is an advanced, free, open-source, stand-alone memory tester for 32- and 64-bit computers (UEFI & BIOS supported)

www.memtest.org
If you can run a full pass with NO errors, your ram should be ok.
Running several more passes will sometimes uncover an issue, but it takes more time.
Probably not worth it unless you really suspect a ram issue.
Normally, one does not update a bios unless there is a fix for something that is impacting you. I violate this rule on a new build and will update to currency up front.
If there is a severe problem, the impact is small.
- Install windows.
- Install the motherboard cd drivers. Particularly the lan drivers so you can access the internet.
Do not select the easy install option, or you will get a bunch of utilities and trialware that you don't want. Drivers only.
- Connect to the internet and install an antivirus program. Microsoft defender is free, easy, and unobtrusive.
- Install your graphics card and driver if you tested with integrated graphics.
You will need to remove the graphics card later to install your motherboard in the case.
As a tip when screwing the motherboard into the posts, give the screw a small counterclockwise turn until you feel a click.
That lets you know that the screw will engage properly.
Make a note of how the graphics card latches into the pcie slot.
The mechanism will be hidden under the card and may be difficult to work if you have not previously checked how.
- Update windows to currency.
- Only now do I take apart what I need to and install it in the case.
- Now is the time to reinstall your graphics card.
- Opinions vary on updating the bios. On a new build, I will update to currency right away. My thought is that I have no big loss if
I encounter a problem. Use the usb option, not the windows option.