
Question Just ordered the parts to my first pc
- Thread starter Munke
- Start date
You are using an out of date browser. It may not display this or other websites correctly.
You should upgrade or use an alternative browser.
You should upgrade or use an alternative browser.


Yeah got some thermal paste included with the cooler as well as the adapter.Hope you've got some thermal paste and the right adapter for the cooler on that 1700 socket.
geofelt
Titan
- Oct 9, 2006
- 54,249
- 4,124
- 174,240


Reasonable choices.
It is good to ask BEFORE you buy.
What class of gpu do you anticipate?
current gen cards can have very high transient power spikes and 750w may not be enough. 850 or even 950w may be better.
What model corsair are you talking about RMx is good with a 10 year warranty.
Good coolers will need 160mm headroom.
See that the case you pick can handle that.
The one you listed does come with paste.
I might suggest the Noctua NH-D15s:
https://www.newegg.com/noctua-nh-d15s/p/N82E16835608072?Item=9SIAADY44C6096
It comes in black also.
Last edited:
Reasonable choices.
It is good to ask BEFORE you buy.
What class of gpu do you anticipate?
current gen cards can have very high transient power spikes and 750w may not be enough. 850 or even 950w may be better.
What model corsair are you talking about RMx is good with a 10 year warranty.
Good coolers will need 160mm headroom.
See that the case you pick can handle that.
The one you listed does come with paste, but it does not advertise lga1700 mounting capability.
I might suggest the Noctua NH-D15s:
https://www.newegg.com/noctua-nh-d15s/p/N82E16835608072?Item=9SIAADY44C6096
It comes in black also.
General I am targeting a 3000 series Nvidia card. I am aware about the noctua cooler but the thermal right right was amazing for the price.


You might consider assembling it outside the case to confirm all parts are OK...rather than finding that out later and having to pry stuff out of the case.
Take your time. Expect some frustration and indecision at certain points. Front panel connectors are usually annoying. Cable management can be testy, but no need to go hog wild on it.
Get some cable ties or Velcro wraps.
Magnetic screwdriver unless you want to drop a screw inside your power supply.
I wouldn't get in a lather over the nuances of thermal paste application. Just get a bottle of alcohol and maybe some Q-tips. Some paste is like mayonnaise and easily managed while others can be extremely tacky.
Might try drives in all possible ports to ensure the ports all work.
Download drivers from motherboard site before you start.
Decide if you are going to update the BIOS.
You might consider assembling it outside the case to confirm all parts are OK...rather than finding that out later and having to pry stuff out of the case.
Take your time. Expect some frustration and indecision at certain points. Front panel connectors are usually annoying. Cable management can be testy, but no need to go hog wild on it.
Get some cable ties or Velcro wraps.
Magnetic screwdriver unless you want to drop a screw inside your power supply.
I wouldn't get in a lather over the nuances of thermal paste application. Just get a bottle of alcohol and maybe some Q-tips. Some paste is like mayonnaise and easily managed while others can be extremely tacky.
Might try drives in all possible ports to ensure the ports all work.
Download drivers from motherboard site before you start.
Decide if you are going to update the BIOS.
Yeah I got the corsair 4000d which comes with a lot of cable ties and velcro. And my cpu came with an intel screwdriver so thats nice.


geofelt
Titan
- Oct 9, 2006
- 54,249
- 4,124
- 174,240
Here is my stock advice for building a pc:That could work, this is my 1st pc build some I'm pretty new to this. Is their any mistakes I could make that could be pretty bad?
MY build process:
Before anything, while waiting for your parts to be delivered, download
and read, cover to cover your case and motherboard manual.
Buy a long #2 magnetic tip philips screwdriver.
A small led flashlight is also useful.
I find it handy to buy a power switch like this for testing.
https://www.newegg.com/p/N82E168121..._switch-_-12-119-009-_-Product&quicklink=true
1. I assemble the critical parts outside of the case.
That lets me test them for functionality easily.
A wood table or cardboard is fine.
2. Plug in only the necessary parts at first. Ram, cpu, cooler, psu.
Do not force anything. Parts fit only one way.
Attach a monitor to the integrated motherboard adapter if you have one, otherwise to the graphics card.
- If your motherboard does not have a PWR button, momentarily touch the two pwr front panel pins with a flat blade screwdriver.
- Repeatedly hit F2 or DEL, and that should get you into the bios display.
- Boot from a cd or usb stick with memtest86 on it. memtest will exercise your ram and cpu functionality.
You can download them here:

MemTest86 - Official Site of the x86 Memory Testing Tool
MemTest86 is the original self booting memory testing software for x86 and ARM computers. Supporting both BIOS and UEFI, with options to boot from USB.
www.memtest86.com
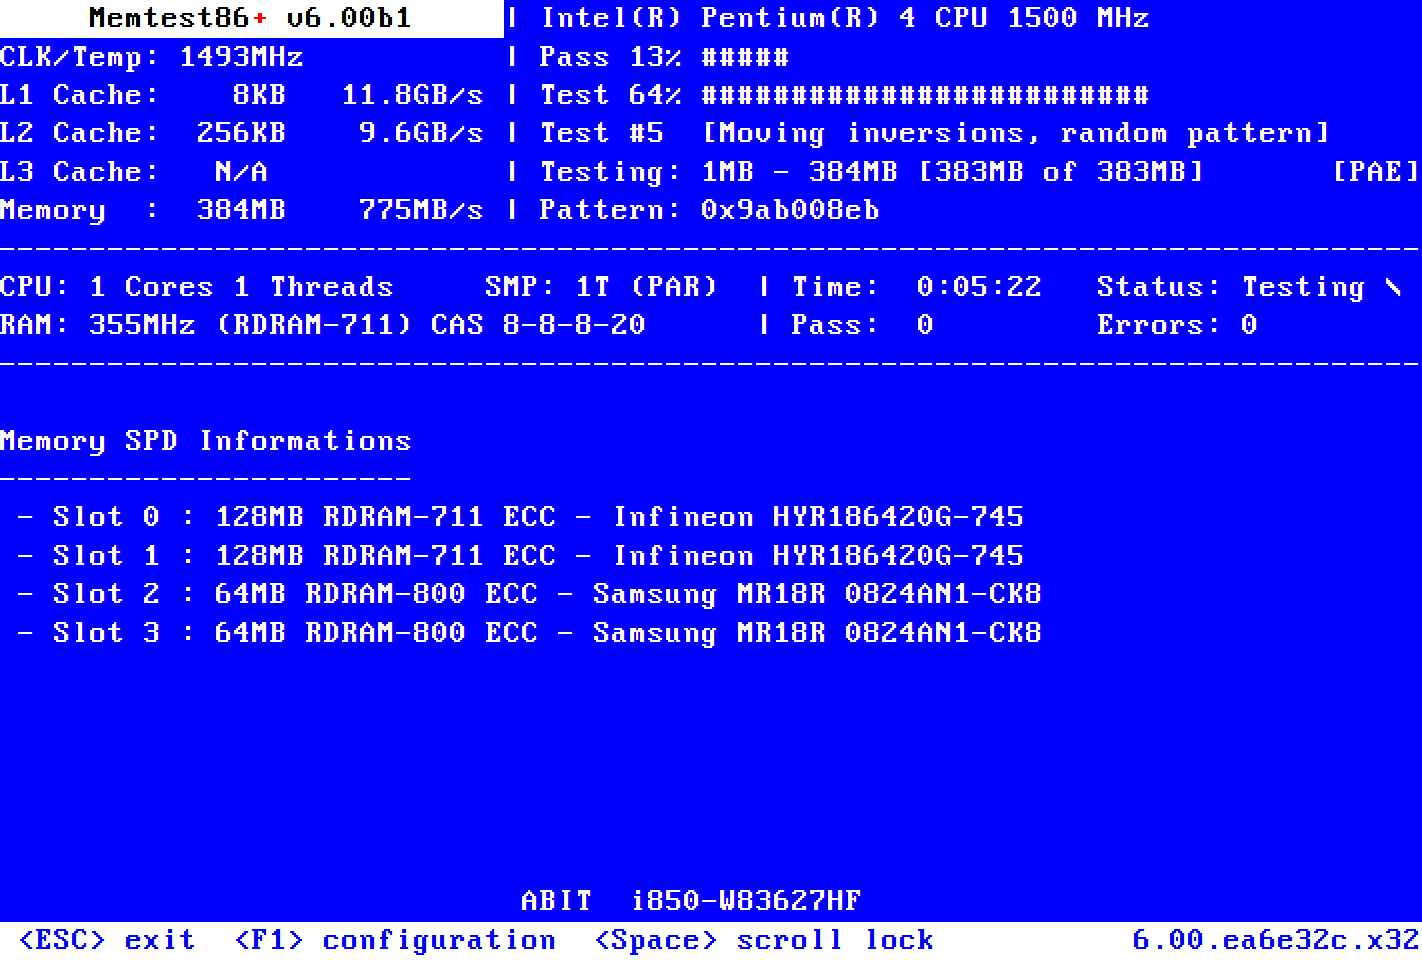
Memtest86+ | The Open-Source Memory Testing Tool
Memtest86+ is an advanced, free, open-source, stand-alone memory tester for 32- and 64-bit computers (UEFI & BIOS supported)
Running several more passes will sometimes uncover an issue, but it takes more time.
Probably not worth it unless you really suspect a ram issue.
Normally, one does not update a bios unless there is a fix for something that is impacting you. I violate this rule on a new build and will update to currency up front.
If there is a severe problem, the impact is small.
- Install windows.
- Install the motherboard cd drivers. Particularly the lan drivers so you can access the internet.
- Connect to the internet and install an antivirus program. Microsoft defender is free, easy, and unobtrusive.
- Install your graphics card and driver if you tested with integrated graphics.
As a tip when screwing the motherboard into the posts, give the screw a small counterclockwise turn until you feel a click.
That lets you know that the screw will engage properly.
Make a note of how the graphics card latches into the pcie slot.
The mechanism will be hidden under the card and may be difficult to work if you have not previously checked how.
- Update windows to currency.
- Only now do I take apart what I need to and install it in the case.
- Now is the time to reinstall your graphics card.
- Opinions vary on updating the bios. On a new build, I will update to currency right away. My thought is that I have no big loss if
Yeah I was planning on using the usb optionHere is my stock advice for building a pc:
MY build process:
Before anything, while waiting for your parts to be delivered, download
and read, cover to cover your case and motherboard manual.
Buy a long #2 magnetic tip philips screwdriver.
A small led flashlight is also useful.
I find it handy to buy a power switch like this for testing.
https://www.newegg.com/p/N82E16812119009?Description=power switch&cm_re=power_switch--12-119-009--Product&quicklink=true
1. I assemble the critical parts outside of the case.
That lets me test them for functionality easily.
A wood table or cardboard is fine.
2. Plug in only the necessary parts at first. Ram, cpu, cooler, psu.
Do not force anything. Parts fit only one way.
Attach a monitor to the integrated motherboard adapter if you have one, otherwise to the graphics card.
They boot from a usb stick and do not use windows.
- If your motherboard does not have a PWR button, momentarily touch the two pwr front panel pins with a flat blade screwdriver.
- Repeatedly hit F2 or DEL, and that should get you into the bios display.
- Boot from a cd or usb stick with memtest86 on it. memtest will exercise your ram and cpu functionality.
You can download them here:
MemTest86 - Official Site of the x86 Memory Testing Tool
MemTest86 is the original self booting memory testing software for x86 and ARM computers. Supporting both BIOS and UEFI, with options to boot from USB.www.memtest86.comIf you can run a full pass with NO errors, your ram should be ok.Memtest86+ | The Open-Source Memory Testing Tool
Memtest86+ is an advanced, free, open-source, stand-alone memory tester for 32- and 64-bit computers (UEFI & BIOS supported)www.memtest.org
Running several more passes will sometimes uncover an issue, but it takes more time.
Probably not worth it unless you really suspect a ram issue.
Normally, one does not update a bios unless there is a fix for something that is impacting you. I violate this rule on a new build and will update to currency up front.
If there is a severe problem, the impact is small.
Do not select the easy install option, or you will get a bunch of utilities and trialware that you don't want. Drivers only.
- Install windows.
- Install the motherboard cd drivers. Particularly the lan drivers so you can access the internet.
You will need to remove the graphics card later to install your motherboard in the case.
- Connect to the internet and install an antivirus program. Microsoft defender is free, easy, and unobtrusive.
- Install your graphics card and driver if you tested with integrated graphics.
As a tip when screwing the motherboard into the posts, give the screw a small counterclockwise turn until you feel a click.
That lets you know that the screw will engage properly.
Make a note of how the graphics card latches into the pcie slot.
The mechanism will be hidden under the card and may be difficult to work if you have not previously checked how.
I encounter a problem. Use the usb option, not the windows option.
- Update windows to currency.
- Only now do I take apart what I need to and install it in the case.
- Now is the time to reinstall your graphics card.
- Opinions vary on updating the bios. On a new build, I will update to currency right away. My thought is that I have no big loss if
TRENDING THREADS
-
-
Question How can i reactivate my windows 10 after changing my motherboard?
- Started by eziowar
- Replies: 1
-
 Discussion What's your favourite video game you've been playing?
- Started by amdfangirl
- Replies: 3K
-
Question Window 10 Keeps sending me back to download screen
- Started by fern213
- Replies: 4
Tom's Hardware is part of Future plc, an international media group and leading digital publisher. Visit our corporate site.
© Future Publishing Limited Quay House, The Ambury, Bath BA1 1UA. All rights reserved. England and Wales company registration number 2008885.