- Jan 12, 2007
- 16,707
- 660
- 60,190


-Preface-
***Notice: This guide is now retired. Please use the new Watercooling Sticky v2.0 linked below***
Tom's HW Watercooling Sticky v2.0***
This guide is meant for those looking to get into watercooling or considering it as a cooling option and hobby. There is an incredible amount of information around the web and I am going to make an effort to consolidate as much as I can to help provide an encompassing guide to help as much as possible.
This guide is updated as needed; please reference the update notes (link) for additional details.
#----------------------------------------------------------------------------------------------------------------------------------------#
-Introduction-
Watercooling isn't simply just a cooling solution; it's just as much of a hobby for most. The concept of adding water into a box full of electronics seems foolish for most, uncertain for many, and for the rest of us who do watercool...we often think we wouldn't consider any other cooling solution. Watercooling works very similar to the cooling system in your car; the water pump circulates the water through the channels to various components that are producing heat. Water absorbs heat and moves to the radiator where air is forced through, cooling the water. The water is then recirculated back into the loop for the process to continue. The main difference is that the water in your waterloop is typically running only 10-12C higher than ambient air temperatures vs. near boiling like in a car.
Watercoolers typically classify water or liquid cooling into 2 major subcategories of watercooling solutions:
-'Real' watercooling, consisting of a pump, waterblocks, tubing, radiator and often a reservoir; all of which can be mixed and matched with any other components to create a loop for your specific application. The pump is the metaphorical 'heart' of your loop and typically all other components are chosen around this single choice. We will cover pump info later.
-The introduction of the all-in-one liquid coolers over the past few years like the Corsair H50/H60/H70, CoolIt products and other similarly designed pump/block/rad combos that are aimed at the novice who simply wants a simple, decent performing compact cooler with the added benefit of containing liquid coolant.
Now, on to some commonly asked questions, important information and must-reads.
#----------------------------------------------------------------------------------------------------------------------------------------#
-Budget-
Budget- Deciding on watercooling appeals to many people, but most aren't aware of the costs of getting started. Depending on expectations, you might determine it's not something that is needed. Here is how we typically determine budget/performance needs:
Less than $100 budget- Your best bet will likely be a good air cooler for your CPU. There are times when you can find the H70 for less than $100; but you should also consider some good fans for the radiator; it has a dense fin pattern (FPI- fins per inch) which requires some pretty decent CFM fans with good static pressure.
More than $100, less that $200- The XSPC Rasa and EK kits are some of the best values for the cost for a novice watercooler. They start in the $130 price range on most e-tailer sites and offer considerable performance for the cost.
There is a lot of information on this OverClock.net XSPC Rasa owners thread (link) that contains a lot of information and discussions from users who own this kit. The EK kits are fairly new, but offer some good value; they have been used, but not adopted quite to the level of the Rasa kits.
#----------------------------------------------------------------------------------------------------------------------------------------#
-Components-
Pumps-
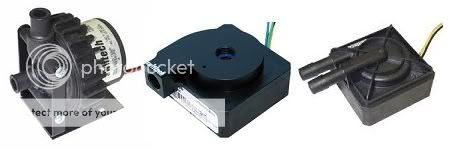
The heart of your loop; it's what makes everything move. Without it, you're dead in the water. The most comprehensive testing is done by Skinnee and Martin; remember their names, you'll see them pop up in almost every major watercooling circle as the God's of tests and benchmarks of watercooling gear. Consider giving this Watercooling Pump guide (link) a lot of reading to determine the performance of many common brands of pumps. Also, make sure to read up as much as possible on Skinneelabs' pump breakdown and reviews Skinneelabs.com Pump reviews (link)
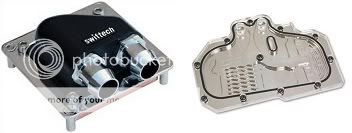
Most people use Laing rebranded pumps: the Swiftech MCP350 (link) MCP355 (link) and MCP35x (link) are all different versions of the Laing DDC line of pumps.
The Swiftech MCP655 (link) is the Laing D5 or D5 vario (variable speed).
Jingway (link) pumps are often used in the EK kits as well as some of the DangerDen kits; they are typically a square 'box' looking pump.
There other pumps as well; this is only a short list of most commonly used pumps.
Depending on flow rates, loop restriction, loop complexity, desired delta-T and calculating pressure drop, you can use the following thread to help identify considerations when choosing the right pump for your loop;
Choosing the Correct Water Cooling Pump by charliehorse55 on Overclock.net
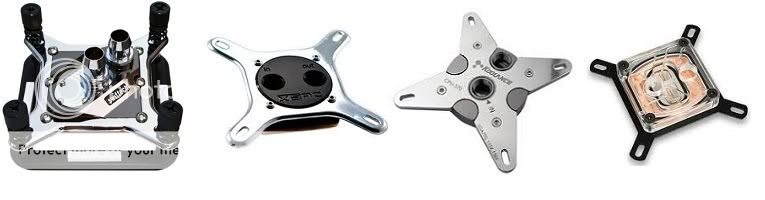
CPU Blocks
The CPU block is milled chunk of (usually) copper with inner channels and pin matrixes to allow heat to pass from the block into the water loop as effeciently as possible. The most comprehensive testing and comparison is being done by Skinneelabs (yep, told you that you'd hear these names a lot) over on his site: Skinneelabs.com CPU block comparisons (link). There are several links on the page as well as on the top and right; comparisons are listed typically by year and block types. Take your time and browse around...there is a lot of good info here. Also, consider giving this thread a look: 22 CPU Waterblocks tested - Roundup (link)
Most CPU blocks are good performers, with some doing margainally better than others. Revisions typically improve minor features which then, in turn improve temperatures which include flow rate, impingement jets, matrix pins, convex/concavity to match blocks and even base thickness.

Radiators
The radiator is the heat exchanger for the water loop; water passes into its thin channels which run parallel down and back with small fins to help dissipate the heat. They are typically rectangular and match fan sizes commonly for 120mm and 140mm fans, but there are others to match 200mm fans sizes as well. Most radiators used are the 2x, 3x or 4x of these 120-140mm versions, but there are large radiators that also use 4, 6 or 9x 120mm fan-size in a grid pattern for a very large rad. There are also 180mm and 200mm rad sizes out there for several different fan placements and mounts for newer cases with larger footprint fans.
Radiators are typically listed and classified with FPI or 'Fins Per Inch'; this means that for every 1", there are 'X amount' of heat dissipating fins. Common low FPI rads are 7-11 FPI, while high FPI models are 20-30 FPI. This is important to understand as it directly relates to the radiator's performance (more FPI = higher cooling potential), but take note: this also means higher CFM fans with very good static pressure to move air over the densely packed fins. Higher CFM and static pressure fans are often more costly than lower speed fans that can be used for lower FPI rads. While the FPI-to-expensive-loud-fast-fan concept is a good rule of thumb to maximize performance of a 30 FPI rad, there isn't anything that says you have to run these kinds of fans on them.
Again, Skinneelabs has a very good radiator comparison and benchmark (link); triples are the most commonly implemented radiators, but they are also mainly used to keep an apples-to-apples comparison among the tested radiators. Once you start talking radiators, you start talking Deltas; or the difference in temperatures in comparison to ambient room temperatures and the water inside your loop. Most folks run a modest 10-12 degree delta or even slightly more. Once you get below 10-8 degrees of Delta, you are getting your water temps closer to ambient. While I'm not a thermodynamic fluid engineer, there are some fairly easy-to-read explanations on Deltas. This Guide to Delta-t in Watercooling (link) on Overclockers.com was made by one of our resident forum members, Conumdrum, who typically is over at Overclockers.com Watercooling forum (link) and XtremeSystems Watercooling forum (link).
When considering radiators, fans and mounting of both, be sure to check the correct screw and thread size (as well as length, depending on application) for the radiator(s) you are using in your loop:

GPU Blocks
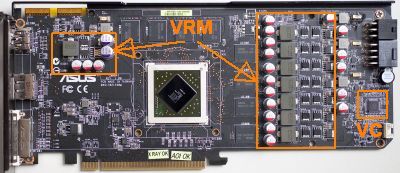
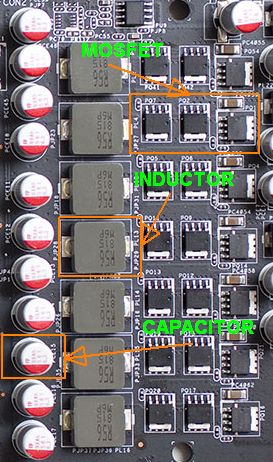
Whether you are looking for a full-cover GPU block or a universal block to use on several cards for future builds, the GPU block is one of the best ways to keep your graphic cards cool and quiet at the same time. Most nVidia and AMD cards these days run incredibly hot and this in turn requires louder fans. There just isn't any way around it unless you put a waterblock on them. Most of these cards are designed to run at temps up to 100C, but most run at load temps of 70-85C depending on chip and airflow. With watercooling, it's typical to see these cards often run 30-40C cooler at load. If you go the route of a universal block, you'll definitely want to consider RAMsinks to affix to your vRAM modules since they will be sitting naked, without the ability to dissipate heat very well. Please see additional considerations when considering universal GPU blocks below:
Universal GPU blocks - Additional cooling considerations by lunaticwoda

Tubing and Fittings
Tubing can be as generic as the hardware store vinyl tubing at your local Ace Hardware or as complex as the Feser, Primochill, Masterkleer or Tygon. All of these brands are very flexible and come in most commonly used ID and OD tubing sizes for watercooling. If you are needing some good bends made, consider getting good tubing, but understand most is upwards of $1.50-$2.50 per linear foot.
Fittings are one that cause a lot of confusion for most newcomers. Here is a simple way to understand the terminology that accompanys each:
I.D. - Inside diameter, most commonly referring to the ID of the tubing to be used. 1/2"ID means that wall to wall, the inside of the tubing measures 1/2" (metric is also used and is measured in millimeters or mm)
O.D.- Outside diameter, similar to the ID, the OD simply is the measurement of the tubing through the cross-section from one side of the outer wall to the other.
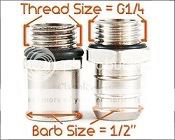
G1/4" - This is the one that confuses the most people. This refers to the threaded fitting standard that is used by almost all waterblocks and radiators. It is the end of the fitting that gets screwed into the block or rad; the other end of this same fitting is measured with the I.D. standard for tubing size.
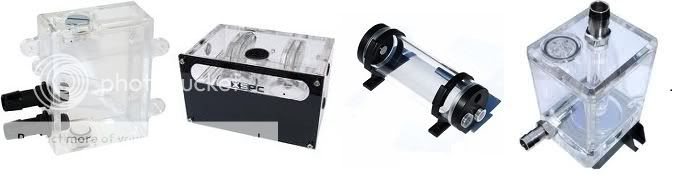
Reservoirs
A reservoir or res, as it is commonly called, really does a couple of things. First, it holds excess water for your loop which can make it easier for you to fill your loop. Typically we recommend that the reservoir feed into your pump for this purpose; it keeps air from entering the pump which can damage the bearings as well as keep air from collecting in your blocks and radiators further along in the loop. Secondly, it allows a place for air bubbles to collect and disperse out of the loop. This is important when filling and priming your loop; you don't want air hiding out in your radiator or getting sucked in large masses back through your pump. Remember, air is a poor conductor of heat compared to water and air in your radiators can cause you to lose the cooling ability for the volume of air trapped in your radiators.
Also, this is a wise time to consider additives for your water. Almost all seasoned watercooling veterans will tell you to use only distilled water and either a biocide (such as PTNuke or similar) or a KillCoil...or both. A killcoil is a coil of .9999 pure silver that you drop into your reservoir to inhibit growth of algae and other critters. Most will highly advise against using premixes; some of these even precipitate out and can clog your blocks. See this example here (link) and here (link)
One thing to note-
Per EK's support notes regarding their nickel plated blocks:
This also is loosely applied to using a killcoil and PTNuke (copper sulfate solution)- these can cause unwanted chipping, staining or corrosion when used with EK nickel plated blocks. While this typically infers the older versions (newer versions 'shouldn't' have the corrosion problems), they generally have been concluding that silver killcoils and PTNuke Cu solution in distilled is causing some of these issues. This, however, cannot be completely confirmed. Just a bit of info for everyone. This will also be listed with loop filling and cleaning procedures.

#----------------------------------------------------------------------------------------------------------------------------------------#
Installation and Filling your Loop
When you get all your new components, take some time to inspect and rinse all components; you'd be surprised how much debris, flux, gunk, etc that gets left inside components. A little time now can save you headaches later due to a piece of plastic or metal that might get lodged somewhere it shouldn't. Hot water and soap can help clean all your goodies; rinse VERY well with clean tap water- final rinse (or 2) with distilled. Hot water and vinegar can be used, but typically vinegar soaks are reserved for your teardown and inspections to remove oxidation or any other gunk that might be present.
You'll need to install your blocks by following the directions that came with each component. For the most part, if you've come this far, you already have an idea of your loop layout, understanding of how to install and where. If not, ask or Google your case with watercooling...you'll find a lot of examples. Also, YouTube is an excellent place to see step-by-step videos on how to do stuff. Give it a few minutes and see what you find. Most CPU and GPU blocks have a walkthru on how to remove the stock cooler and install the waterblock.
When installing fittings- do not over-tighten! Almost all fittings use O-rings, so you should only need to get them finger tight. No tools, or you might end up with some micro-fissure cracks...not good, especially in acrylic reservoirs.
Assemble your blocks with fittings and then begin to route your tubing. Give yourself some room and don't sell yourself short. It's better to trim a couple inches of tubing than have to order all new tubing because you cut it all too short. You want easy bends, if at all possible. If that isn't possible, you have a few options. 1. Rotary fittings or different connector fittings to make bends. 2. You can get the bends to stay at permanent tighter bends by filling the tubing with something that doesn't allow it to kink or flatten when making the bend. Salt, a large spring, smaller diameter tubing...these all work. Simply insert into your tubing and bend...then dip into boiling water for several seconds. Then dip into ice water and repeat a handful of times. Once done, your tubing should be set in a tighter bend without a kink. This takes a little practice.
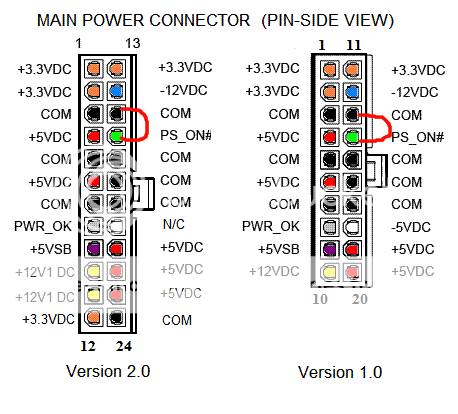
Once tubing is routed, make sure all fittings and clamps are tight. Begin filling your reservoir with water and cycle the pump via power. Most people unplug the ATX plug from their board (highly recommended) and jumper any green to black wire with a paperclip. You can also buy some specialized power supplies that provide minimal power to a single molex, these also work great. Regardless, you don't want any power going to anything other than your pump, if possible. Your fans might spin up, but that's fine. Cycle power on until the pump sucks the water almost all the way down, power off. Refill the res, repeat as necessary.
Make sure to note the location of the ATX tab in relation to each wire. Jumper the green wire (ATX tab up, 4th from the left) with any black wire. Personally, I jumper the adjacent black wire (ATX tab up, 3rd from the left) since it's closest, but green to any black will work:
Once you have the loop filled, you'll want to let it run in the above manner for several hours, checking every 15 minutes or so for the first hour. Overnight running would be good once you are sure there are no immediate leaks. Keep paper towels handy and around fitting areas...check for dampness. If none and you've leak tested for at least a few hours, you are likely good to go.
As for draining and refilling, it depends. Most people will say every 6-9 months you should drain and refill your loop, but this depends. Many people run the same distilled and biocide/killcoil for a year or more without issues. Some even 2-3, so it depends. If you decide to run a premix solution, consider sticking to the 6 month interval to make sure you aren't getting gunked up blocks. When you drain your loop, give yourself a Saturday or Sunday...or both to do so. Take your blocks out, remove fittings, inspect for corrosion, etc. Take your CPU block apart and clean it with a toothbrush. If it looks gunked up, scrub with a toothbrush and ketchup. The acidicy in the ketchup does wonders...trust me on this. Even if they don't need to be scrubbed, a soak in a distilled water + vinegar solution (50/50) should help clean up the rest. Rinse out your radiators in the same manner as when you first got them. Reassemble and refill your loop as before.
Again, to state from EK on their nickel plated blocks:
Take care when cleaning nickel plated blocks. As mentioned in the reservoir section- be aware that PTNuke Cu solution and silver killcoils *may* cause some nickel corrosion on some EK block models.
Good video from DazMode on filling a Watercooling loop (link)
Just an example of what you can find...there are 100's more by many people.
#----------------------------------------------------------------------------------------------------------------------------------------#
Common Questions- And test-result-driven answers
Until now, we've discussed the basics of how a watercooling loop works and the main components. Below are some excellent links to answer many questions you might have:
How many radiators (and what kind?) do I need for my loop?
When it comes to figuring out how much radiator you need for your specific loop, you have to start doing some math. I know that we all have been building a loop and thought, ‘how many and what kind of radiators do I need for this loop to stay cool like I want?’
First tip: Google is your best friend.
Finding out what the TDP or your CPU or GPU is can be as simple as doing some searches by searching for ‘i7 2600k TDP, ‘GTX 580 TDP’, or ‘AMD 6970 TDP’. Remember to account for all components…if you run a multi-card graphics setup, you need to include the TDP values for all cards in the total. For example, our i7 2600k has a stock TDP of about 95 watts at 100% load (estimated). If we have a 2x SLI setup of GTX 580’s, we are looking at about 244 watts at 100% load, per card. Total? About 583 watts in heat that these three components can potentially produce when at 100% load, simultaneously. (This also translates very closely to wattage when you need to consider a power supply for your system, but you need to account for the remaining components: motherboard, fans, hard drives, DVD drives, etc. To help calculate a full system TDP, you can use a tool like the Extreme PSU Calculator (link)). In short, when calculating loop TDP, simply add up the total values for components being cooled in the loop...if you have more than one video card, make sure you add in TDP for each one.
Once you have calculated your total loop TDP potential, you need to consider radiators that dissipate heat in watts depending on flow rate of your loop and fans being used and their speeds/power. For this task, we almost always refer to Skinneelabs.com/radiators (link) for all of this crucial information, graphs and comparisons.
For example, I am going to reference the XSPC RX360 radiator for this loop. Given the total TDP of 583 watts, I want to know if this single radiator is enough for my loop, or if I should consider another radiator.
Skinnee Labs RX360 chart (link)
Looking at this chart, we can see that the maximum amount of heat this radiator can dissipate is around 555 watts using 2800 rpm fans (very fast, very loud). You could get better results in a push/pull scenario, but that’s even louder; you may be able to live with a 15-20° delta and loud fans if you went this route. Remember the link above on Delta-T? Basically, it’s a mathematical derivative of your ambient room temperature, flow rate, heat to be dissipated (in watts) and the ability of your radiator to dissipate heat (in watts) depending on fans used. You’ll notice this chart has a listing of different fans in the upper-left corner: this determines the angle of the graph and the temperature delta on the left side of the graph. Lower fan speeds correlate to a higher delta-T as you add more heat in watts to the loop. The more heat you produce, the more important it is to remove it from the loop; and fans help accomplish this goal. If you notice the actual temperatures on the lines of the graph at the determined points (around 300 watts of load and around 555 watts), you’ll see that the fan speed allows the heat dissipation to be rather normalized. However, the further to the right (and up the graph you go), you’ll also notice that your delta-T rises. Below a 5° is incredibly good, 10° is still very good and even 15° deltas are very much the norm. If we wanted to run this loop at a 10° delta, we would need to run two of these RX360 radiators to keep the heat load in watts below 300 watts dissipated per radiator with fans of 600-2800 rpm (in a single-fan setup; push/pull would allow some leniency here…perhaps a RX360 and an RX240, instead).
Granted, TDP and determining our delta-T isn’t an exact science, but it gets us pretty close. It’s somewhat more difficult when overclocking, but again…Google should be your first place to search. However, I’ve found a couple of great calculations to help CPU overclocking and estimated TDP:
OC Wattage = TDP * ( OC MHz / Stock MHz) * ( OC Vcore / Stock Vcore )^2 (Thanks to GL on the guru3d.com forums for this info) (link) It’s a few years old, but the concepts still apply.
How do I know if I need watercooling or air cooler upgrade?
-or-
My temps seem to be hot on my CPU and/or GPU!!...I need a new cooler!
Not so fast. I’m not trying to discourage anyone from going out and contributing to the economy by spending their money on a new cooler or full-fledged watercooling loop. However, here is a simple way to test whether or not your cooler needs updating or if you simply have poor case airflow, in which a cooler upgrade would still have little effect (watercooling loop would still provide improvement, but still dependent upon ambient temps and radiator placement/airflow).
Remove the side panel of your case. Take a house or desk fan- turn on HIGH and blow air into your case. Run your benchmarks, game, Fold, encode video, etc…see what your temps are. Compare with the temps you get with your case side on, and no fan. If the temps drop 5C or more, you have a case airflow issue inside your case that should be addressed before ever replacing an air cooler with another air cooler. Watercooling might help, but depending on your desired temp ranges and budget, updating/adding fans might be the only thing you need to improve to get temps where you want them. If your temps remain the same or within 1-3C, you might have a minor airflow issue (or ambient temps are different than when you ran your baseline test without the fan). If you still are unhappy with your temps, this is when considering a cooling upgrade is a good decision.
Flow Rates- Pump/Radiator/Block flow and performance estimation tool from Martin of MartinsLiquidLab.org (link)
Martin's Liquid Lab Pump/Radiator Optimizer Worksheet
You'll need to download one of the linked Excel sheets to use and input your various watercooling loop components to help determine flow and performance expectations for your loop. While this is not 100% accurate or fool-proof, it does provide an excellent performance baseline of your loop in terms of flow rates and ultimately, calculating your delta-T based on radiators used, flow rates and ambient temps as well as other variables for your specific setup.
Using Universal GPU blocks instead of full-cover blocks
There are some important considerations when deciding to use universal blocks on GPUs. Lunaticwoda has written up some information that I have linked below in the sticky, available here:
Universal GPU blocks - Additional cooling considerations
What about fans? Good question. Below are a couple of fan comparisons and tests; I can/will add more as we find them. I know there are some out there by Martin and Skinnee that should also be considered and linked here as well.
Other FAQ's
Galvanic Corrosion Explored: Martin of MartinsLiquidLab.org
Do premixes/additives cool better than plain water? Skinnee does some research on this frequently asked question. Water wins.
PC Water Coolant Chemistry - Part 1 Thermal properties of water, various metals and various processes to purify water.
PC Water Coolant Chemistry - Part 2 Galvanic corrosion (in depth), additives and comparison.
Does loop order really matter? No, but read on if you'd like to see some excellent research to prove why.
Does tubing size really matter...3/8"ID vs. 1/2"ID Not really; incredibly small margain of difference...negligible.
Which pump should I choose? Most current pumps perform rather well, but if you aren't sure what you are looking at...ask.
Are dual loops better at cooling than single loops? No real benefit; better off running all in serial. Details and tests inside to support this finding.
Don't mix Copper and Aluminum: A Galvanic Corrosion nightmare
Can I put my radiator/PC into a refrigerator to keep it really cool? No...no...no. This article explains why...and also would include your typical basement deepfreeze.
...And many, many more.
#----------------------------------------------------------------------------------------------------------------------------------------#
Fan Tests, Comparisons and Reviews
Cooling Fan Roundup 2012 by 4ryan6
XtremeSystems fan roundup #1
XtremeSystems fan roundup #2
Xbit Labs 120mm Fan Roundup, Part 1 [< 1350 rpm]
Xbit Labs 120mm Fan Roundup, Part 2 [> 1350 rpm]
#----------------------------------------------------------------------------------------------------------------------------------------#
Information on commonly-used first-time LCS/Watercooling Solutions:
Things to know about using Corsair H20 coolers - by Tom's HW member Omi3D (info also applies to most LCS systems)
H50 vs. Air Coolers Comparison
H70 vs. Air Coolers Comparison
XSPC Rasa RS240 Review/Comparison
Corsair H-Series/Antec Kuhler/Cool-It Eco Round-up
#----------------------------------------------------------------------------------------------------------------------------------------#
E-tailers/Online Stores for Watercooling Gear
FrozenCPU.com
Jab-Tech.com
PetrasTechShop.com
Aquatuning.us
CrazyPC.com
Performance-PCs.com
SidewinderComputers.com
PCCaseGear.com
Many will ship internationally, check out their page or contact them directly before ordering.
#----------------------------------------------------------------------------------------------------------------------------------------#
Great Ideas, concepts and Build Logs
Tom's Hardware Watercooling Build Logs
Tom's Hardware Watercooling Gallery
XtremeSystems.com Watercooling case builds
TheBestCaseScenario.com Case mods
Million-Dollar-PC.com/
MountainMods.com
XtremeSystems WC Cases
Overclock.net Watercooling Forum Build-logs posted with threads
#----------------------------------------------------------------------------------------------------------------------------------------#
Stickies
Tom's HW Watercooling Sticky
Overclock.net Watercooling Sticky
Xtremesystems.com Watercooling Info
Great Beginner Guide to Watercooling
OverClockers.com Watercooling Sticky
ExtremeOverclocking Forum Water Cooling Sticky
ExtremeOverclocking Forum Water Cooling Parts Guide (2011)
Mineral Oil Cooling/Submersion Q/A Links
***Notice: This guide is now retired. Please use the new Watercooling Sticky v2.0 linked below***
Tom's HW Watercooling Sticky v2.0***
This guide is meant for those looking to get into watercooling or considering it as a cooling option and hobby. There is an incredible amount of information around the web and I am going to make an effort to consolidate as much as I can to help provide an encompassing guide to help as much as possible.
This guide is updated as needed; please reference the update notes (link) for additional details.
#----------------------------------------------------------------------------------------------------------------------------------------#
-Introduction-
Watercooling isn't simply just a cooling solution; it's just as much of a hobby for most. The concept of adding water into a box full of electronics seems foolish for most, uncertain for many, and for the rest of us who do watercool...we often think we wouldn't consider any other cooling solution. Watercooling works very similar to the cooling system in your car; the water pump circulates the water through the channels to various components that are producing heat. Water absorbs heat and moves to the radiator where air is forced through, cooling the water. The water is then recirculated back into the loop for the process to continue. The main difference is that the water in your waterloop is typically running only 10-12C higher than ambient air temperatures vs. near boiling like in a car.
Watercoolers typically classify water or liquid cooling into 2 major subcategories of watercooling solutions:
-'Real' watercooling, consisting of a pump, waterblocks, tubing, radiator and often a reservoir; all of which can be mixed and matched with any other components to create a loop for your specific application. The pump is the metaphorical 'heart' of your loop and typically all other components are chosen around this single choice. We will cover pump info later.
-The introduction of the all-in-one liquid coolers over the past few years like the Corsair H50/H60/H70, CoolIt products and other similarly designed pump/block/rad combos that are aimed at the novice who simply wants a simple, decent performing compact cooler with the added benefit of containing liquid coolant.
Now, on to some commonly asked questions, important information and must-reads.
#----------------------------------------------------------------------------------------------------------------------------------------#
-Budget-
Budget- Deciding on watercooling appeals to many people, but most aren't aware of the costs of getting started. Depending on expectations, you might determine it's not something that is needed. Here is how we typically determine budget/performance needs:
Less than $100 budget- Your best bet will likely be a good air cooler for your CPU. There are times when you can find the H70 for less than $100; but you should also consider some good fans for the radiator; it has a dense fin pattern (FPI- fins per inch) which requires some pretty decent CFM fans with good static pressure.
More than $100, less that $200- The XSPC Rasa and EK kits are some of the best values for the cost for a novice watercooler. They start in the $130 price range on most e-tailer sites and offer considerable performance for the cost.
There is a lot of information on this OverClock.net XSPC Rasa owners thread (link) that contains a lot of information and discussions from users who own this kit. The EK kits are fairly new, but offer some good value; they have been used, but not adopted quite to the level of the Rasa kits.
#----------------------------------------------------------------------------------------------------------------------------------------#
-Components-
Pumps-
The heart of your loop; it's what makes everything move. Without it, you're dead in the water. The most comprehensive testing is done by Skinnee and Martin; remember their names, you'll see them pop up in almost every major watercooling circle as the God's of tests and benchmarks of watercooling gear. Consider giving this Watercooling Pump guide (link) a lot of reading to determine the performance of many common brands of pumps. Also, make sure to read up as much as possible on Skinneelabs' pump breakdown and reviews Skinneelabs.com Pump reviews (link)
Most people use Laing rebranded pumps: the Swiftech MCP350 (link) MCP355 (link) and MCP35x (link) are all different versions of the Laing DDC line of pumps.
The Swiftech MCP655 (link) is the Laing D5 or D5 vario (variable speed).
Jingway (link) pumps are often used in the EK kits as well as some of the DangerDen kits; they are typically a square 'box' looking pump.
There other pumps as well; this is only a short list of most commonly used pumps.
Depending on flow rates, loop restriction, loop complexity, desired delta-T and calculating pressure drop, you can use the following thread to help identify considerations when choosing the right pump for your loop;
Choosing the Correct Water Cooling Pump by charliehorse55 on Overclock.net
CPU Blocks
The CPU block is milled chunk of (usually) copper with inner channels and pin matrixes to allow heat to pass from the block into the water loop as effeciently as possible. The most comprehensive testing and comparison is being done by Skinneelabs (yep, told you that you'd hear these names a lot) over on his site: Skinneelabs.com CPU block comparisons (link). There are several links on the page as well as on the top and right; comparisons are listed typically by year and block types. Take your time and browse around...there is a lot of good info here. Also, consider giving this thread a look: 22 CPU Waterblocks tested - Roundup (link)
Most CPU blocks are good performers, with some doing margainally better than others. Revisions typically improve minor features which then, in turn improve temperatures which include flow rate, impingement jets, matrix pins, convex/concavity to match blocks and even base thickness.
Radiators
The radiator is the heat exchanger for the water loop; water passes into its thin channels which run parallel down and back with small fins to help dissipate the heat. They are typically rectangular and match fan sizes commonly for 120mm and 140mm fans, but there are others to match 200mm fans sizes as well. Most radiators used are the 2x, 3x or 4x of these 120-140mm versions, but there are large radiators that also use 4, 6 or 9x 120mm fan-size in a grid pattern for a very large rad. There are also 180mm and 200mm rad sizes out there for several different fan placements and mounts for newer cases with larger footprint fans.
Radiators are typically listed and classified with FPI or 'Fins Per Inch'; this means that for every 1", there are 'X amount' of heat dissipating fins. Common low FPI rads are 7-11 FPI, while high FPI models are 20-30 FPI. This is important to understand as it directly relates to the radiator's performance (more FPI = higher cooling potential), but take note: this also means higher CFM fans with very good static pressure to move air over the densely packed fins. Higher CFM and static pressure fans are often more costly than lower speed fans that can be used for lower FPI rads. While the FPI-to-expensive-loud-fast-fan concept is a good rule of thumb to maximize performance of a 30 FPI rad, there isn't anything that says you have to run these kinds of fans on them.
Again, Skinneelabs has a very good radiator comparison and benchmark (link); triples are the most commonly implemented radiators, but they are also mainly used to keep an apples-to-apples comparison among the tested radiators. Once you start talking radiators, you start talking Deltas; or the difference in temperatures in comparison to ambient room temperatures and the water inside your loop. Most folks run a modest 10-12 degree delta or even slightly more. Once you get below 10-8 degrees of Delta, you are getting your water temps closer to ambient. While I'm not a thermodynamic fluid engineer, there are some fairly easy-to-read explanations on Deltas. This Guide to Delta-t in Watercooling (link) on Overclockers.com was made by one of our resident forum members, Conumdrum, who typically is over at Overclockers.com Watercooling forum (link) and XtremeSystems Watercooling forum (link).
When considering radiators, fans and mounting of both, be sure to check the correct screw and thread size (as well as length, depending on application) for the radiator(s) you are using in your loop:
GPU Blocks
Whether you are looking for a full-cover GPU block or a universal block to use on several cards for future builds, the GPU block is one of the best ways to keep your graphic cards cool and quiet at the same time. Most nVidia and AMD cards these days run incredibly hot and this in turn requires louder fans. There just isn't any way around it unless you put a waterblock on them. Most of these cards are designed to run at temps up to 100C, but most run at load temps of 70-85C depending on chip and airflow. With watercooling, it's typical to see these cards often run 30-40C cooler at load. If you go the route of a universal block, you'll definitely want to consider RAMsinks to affix to your vRAM modules since they will be sitting naked, without the ability to dissipate heat very well. Please see additional considerations when considering universal GPU blocks below:
Universal GPU blocks - Additional cooling considerations by lunaticwoda
Tubing and Fittings
Tubing can be as generic as the hardware store vinyl tubing at your local Ace Hardware or as complex as the Feser, Primochill, Masterkleer or Tygon. All of these brands are very flexible and come in most commonly used ID and OD tubing sizes for watercooling. If you are needing some good bends made, consider getting good tubing, but understand most is upwards of $1.50-$2.50 per linear foot.
Fittings are one that cause a lot of confusion for most newcomers. Here is a simple way to understand the terminology that accompanys each:
I.D. - Inside diameter, most commonly referring to the ID of the tubing to be used. 1/2"ID means that wall to wall, the inside of the tubing measures 1/2" (metric is also used and is measured in millimeters or mm)
O.D.- Outside diameter, similar to the ID, the OD simply is the measurement of the tubing through the cross-section from one side of the outer wall to the other.
G1/4" - This is the one that confuses the most people. This refers to the threaded fitting standard that is used by almost all waterblocks and radiators. It is the end of the fitting that gets screwed into the block or rad; the other end of this same fitting is measured with the I.D. standard for tubing size.
Reservoirs
A reservoir or res, as it is commonly called, really does a couple of things. First, it holds excess water for your loop which can make it easier for you to fill your loop. Typically we recommend that the reservoir feed into your pump for this purpose; it keeps air from entering the pump which can damage the bearings as well as keep air from collecting in your blocks and radiators further along in the loop. Secondly, it allows a place for air bubbles to collect and disperse out of the loop. This is important when filling and priming your loop; you don't want air hiding out in your radiator or getting sucked in large masses back through your pump. Remember, air is a poor conductor of heat compared to water and air in your radiators can cause you to lose the cooling ability for the volume of air trapped in your radiators.
Also, this is a wise time to consider additives for your water. Almost all seasoned watercooling veterans will tell you to use only distilled water and either a biocide (such as PTNuke or similar) or a KillCoil...or both. A killcoil is a coil of .9999 pure silver that you drop into your reservoir to inhibit growth of algae and other critters. Most will highly advise against using premixes; some of these even precipitate out and can clog your blocks. See this example here (link) and here (link)
One thing to note-
Per EK's support notes regarding their nickel plated blocks:
-thanks to Lutfij for the statement info from EK.All blocks bases are made of electrolytic copper.
Nickel plated blocks are milled of copper and then plated with fine thin layer of nickel.
When cleaning blocks please do not use any aggressive chemicals (neither vinegar) or rough materials as you may damage block and void warranty.
Using corrosion inhibitors is highly recommended as nickel plating does not prevent corrosion of metals when environment for galvanic effect is created (mixed metal,...).
Please note also that due to presence of UV additives and other chemicals nickel layer may also become discolored/stained over time period.
This also is loosely applied to using a killcoil and PTNuke (copper sulfate solution)- these can cause unwanted chipping, staining or corrosion when used with EK nickel plated blocks. While this typically infers the older versions (newer versions 'shouldn't' have the corrosion problems), they generally have been concluding that silver killcoils and PTNuke Cu solution in distilled is causing some of these issues. This, however, cannot be completely confirmed. Just a bit of info for everyone. This will also be listed with loop filling and cleaning procedures.
#----------------------------------------------------------------------------------------------------------------------------------------#
Installation and Filling your Loop
When you get all your new components, take some time to inspect and rinse all components; you'd be surprised how much debris, flux, gunk, etc that gets left inside components. A little time now can save you headaches later due to a piece of plastic or metal that might get lodged somewhere it shouldn't. Hot water and soap can help clean all your goodies; rinse VERY well with clean tap water- final rinse (or 2) with distilled. Hot water and vinegar can be used, but typically vinegar soaks are reserved for your teardown and inspections to remove oxidation or any other gunk that might be present.
You'll need to install your blocks by following the directions that came with each component. For the most part, if you've come this far, you already have an idea of your loop layout, understanding of how to install and where. If not, ask or Google your case with watercooling...you'll find a lot of examples. Also, YouTube is an excellent place to see step-by-step videos on how to do stuff. Give it a few minutes and see what you find. Most CPU and GPU blocks have a walkthru on how to remove the stock cooler and install the waterblock.
When installing fittings- do not over-tighten! Almost all fittings use O-rings, so you should only need to get them finger tight. No tools, or you might end up with some micro-fissure cracks...not good, especially in acrylic reservoirs.
Assemble your blocks with fittings and then begin to route your tubing. Give yourself some room and don't sell yourself short. It's better to trim a couple inches of tubing than have to order all new tubing because you cut it all too short. You want easy bends, if at all possible. If that isn't possible, you have a few options. 1. Rotary fittings or different connector fittings to make bends. 2. You can get the bends to stay at permanent tighter bends by filling the tubing with something that doesn't allow it to kink or flatten when making the bend. Salt, a large spring, smaller diameter tubing...these all work. Simply insert into your tubing and bend...then dip into boiling water for several seconds. Then dip into ice water and repeat a handful of times. Once done, your tubing should be set in a tighter bend without a kink. This takes a little practice.
Once tubing is routed, make sure all fittings and clamps are tight. Begin filling your reservoir with water and cycle the pump via power. Most people unplug the ATX plug from their board (highly recommended) and jumper any green to black wire with a paperclip. You can also buy some specialized power supplies that provide minimal power to a single molex, these also work great. Regardless, you don't want any power going to anything other than your pump, if possible. Your fans might spin up, but that's fine. Cycle power on until the pump sucks the water almost all the way down, power off. Refill the res, repeat as necessary.
Make sure to note the location of the ATX tab in relation to each wire. Jumper the green wire (ATX tab up, 4th from the left) with any black wire. Personally, I jumper the adjacent black wire (ATX tab up, 3rd from the left) since it's closest, but green to any black will work:
Once you have the loop filled, you'll want to let it run in the above manner for several hours, checking every 15 minutes or so for the first hour. Overnight running would be good once you are sure there are no immediate leaks. Keep paper towels handy and around fitting areas...check for dampness. If none and you've leak tested for at least a few hours, you are likely good to go.
As for draining and refilling, it depends. Most people will say every 6-9 months you should drain and refill your loop, but this depends. Many people run the same distilled and biocide/killcoil for a year or more without issues. Some even 2-3, so it depends. If you decide to run a premix solution, consider sticking to the 6 month interval to make sure you aren't getting gunked up blocks. When you drain your loop, give yourself a Saturday or Sunday...or both to do so. Take your blocks out, remove fittings, inspect for corrosion, etc. Take your CPU block apart and clean it with a toothbrush. If it looks gunked up, scrub with a toothbrush and ketchup. The acidicy in the ketchup does wonders...trust me on this. Even if they don't need to be scrubbed, a soak in a distilled water + vinegar solution (50/50) should help clean up the rest. Rinse out your radiators in the same manner as when you first got them. Reassemble and refill your loop as before.
Again, to state from EK on their nickel plated blocks:
All blocks bases are made of electrolytic copper.
Nickel plated blocks are milled of copper and then plated with fine thin layer of nickel.
When cleaning blocks please do not use any aggressive chemicals (neither vinegar) or rough materials as you may damage block and void warranty.
Using corrosion inhibitors is highly recommended as nickel plating does not prevent corrosion of metals when environment for galvanic effect is created (mixed metal,...).
Please note also that due to presence of UV additives and other chemicals nickel layer may also become discolored/stained over time period.
Take care when cleaning nickel plated blocks. As mentioned in the reservoir section- be aware that PTNuke Cu solution and silver killcoils *may* cause some nickel corrosion on some EK block models.
Good video from DazMode on filling a Watercooling loop (link)
Just an example of what you can find...there are 100's more by many people.
#----------------------------------------------------------------------------------------------------------------------------------------#
Common Questions- And test-result-driven answers
Until now, we've discussed the basics of how a watercooling loop works and the main components. Below are some excellent links to answer many questions you might have:
How many radiators (and what kind?) do I need for my loop?
When it comes to figuring out how much radiator you need for your specific loop, you have to start doing some math. I know that we all have been building a loop and thought, ‘how many and what kind of radiators do I need for this loop to stay cool like I want?’
First tip: Google is your best friend.
Finding out what the TDP or your CPU or GPU is can be as simple as doing some searches by searching for ‘i7 2600k TDP, ‘GTX 580 TDP’, or ‘AMD 6970 TDP’. Remember to account for all components…if you run a multi-card graphics setup, you need to include the TDP values for all cards in the total. For example, our i7 2600k has a stock TDP of about 95 watts at 100% load (estimated). If we have a 2x SLI setup of GTX 580’s, we are looking at about 244 watts at 100% load, per card. Total? About 583 watts in heat that these three components can potentially produce when at 100% load, simultaneously. (This also translates very closely to wattage when you need to consider a power supply for your system, but you need to account for the remaining components: motherboard, fans, hard drives, DVD drives, etc. To help calculate a full system TDP, you can use a tool like the Extreme PSU Calculator (link)). In short, when calculating loop TDP, simply add up the total values for components being cooled in the loop...if you have more than one video card, make sure you add in TDP for each one.
Once you have calculated your total loop TDP potential, you need to consider radiators that dissipate heat in watts depending on flow rate of your loop and fans being used and their speeds/power. For this task, we almost always refer to Skinneelabs.com/radiators (link) for all of this crucial information, graphs and comparisons.
For example, I am going to reference the XSPC RX360 radiator for this loop. Given the total TDP of 583 watts, I want to know if this single radiator is enough for my loop, or if I should consider another radiator.
Skinnee Labs RX360 chart (link)
Looking at this chart, we can see that the maximum amount of heat this radiator can dissipate is around 555 watts using 2800 rpm fans (very fast, very loud). You could get better results in a push/pull scenario, but that’s even louder; you may be able to live with a 15-20° delta and loud fans if you went this route. Remember the link above on Delta-T? Basically, it’s a mathematical derivative of your ambient room temperature, flow rate, heat to be dissipated (in watts) and the ability of your radiator to dissipate heat (in watts) depending on fans used. You’ll notice this chart has a listing of different fans in the upper-left corner: this determines the angle of the graph and the temperature delta on the left side of the graph. Lower fan speeds correlate to a higher delta-T as you add more heat in watts to the loop. The more heat you produce, the more important it is to remove it from the loop; and fans help accomplish this goal. If you notice the actual temperatures on the lines of the graph at the determined points (around 300 watts of load and around 555 watts), you’ll see that the fan speed allows the heat dissipation to be rather normalized. However, the further to the right (and up the graph you go), you’ll also notice that your delta-T rises. Below a 5° is incredibly good, 10° is still very good and even 15° deltas are very much the norm. If we wanted to run this loop at a 10° delta, we would need to run two of these RX360 radiators to keep the heat load in watts below 300 watts dissipated per radiator with fans of 600-2800 rpm (in a single-fan setup; push/pull would allow some leniency here…perhaps a RX360 and an RX240, instead).
Granted, TDP and determining our delta-T isn’t an exact science, but it gets us pretty close. It’s somewhat more difficult when overclocking, but again…Google should be your first place to search. However, I’ve found a couple of great calculations to help CPU overclocking and estimated TDP:
OC Wattage = TDP * ( OC MHz / Stock MHz) * ( OC Vcore / Stock Vcore )^2 (Thanks to GL on the guru3d.com forums for this info) (link) It’s a few years old, but the concepts still apply.
Example:
Athlon XP Model 10 512k cache 2500+
1833 MHz
1.65v
53.7 watts TDP
For this example I will use a relatively high overclock with a high core voltage, 2.5 GHz with 1.95v.
OC Wattage = TDP * ( OC MHz / Stock MHz) * ( OC Vcore / Stock Vcore )^2
OC Wattage = 53.7 * (2500/1833) * (1.95/1.65)^2
OC Wattage = 53.7 * (1.36) * (1.18)^2
OC Wattage = 53.7 * 1.36 * 1.39
OC Wattage = 101
How do I know if I need watercooling or air cooler upgrade?
-or-
My temps seem to be hot on my CPU and/or GPU!!...I need a new cooler!
Not so fast. I’m not trying to discourage anyone from going out and contributing to the economy by spending their money on a new cooler or full-fledged watercooling loop. However, here is a simple way to test whether or not your cooler needs updating or if you simply have poor case airflow, in which a cooler upgrade would still have little effect (watercooling loop would still provide improvement, but still dependent upon ambient temps and radiator placement/airflow).
Remove the side panel of your case. Take a house or desk fan- turn on HIGH and blow air into your case. Run your benchmarks, game, Fold, encode video, etc…see what your temps are. Compare with the temps you get with your case side on, and no fan. If the temps drop 5C or more, you have a case airflow issue inside your case that should be addressed before ever replacing an air cooler with another air cooler. Watercooling might help, but depending on your desired temp ranges and budget, updating/adding fans might be the only thing you need to improve to get temps where you want them. If your temps remain the same or within 1-3C, you might have a minor airflow issue (or ambient temps are different than when you ran your baseline test without the fan). If you still are unhappy with your temps, this is when considering a cooling upgrade is a good decision.
Flow Rates- Pump/Radiator/Block flow and performance estimation tool from Martin of MartinsLiquidLab.org (link)
Martin's Liquid Lab Pump/Radiator Optimizer Worksheet
You'll need to download one of the linked Excel sheets to use and input your various watercooling loop components to help determine flow and performance expectations for your loop. While this is not 100% accurate or fool-proof, it does provide an excellent performance baseline of your loop in terms of flow rates and ultimately, calculating your delta-T based on radiators used, flow rates and ambient temps as well as other variables for your specific setup.
Using Universal GPU blocks instead of full-cover blocks
There are some important considerations when deciding to use universal blocks on GPUs. Lunaticwoda has written up some information that I have linked below in the sticky, available here:
Universal GPU blocks - Additional cooling considerations
What about fans? Good question. Below are a couple of fan comparisons and tests; I can/will add more as we find them. I know there are some out there by Martin and Skinnee that should also be considered and linked here as well.
Other FAQ's
Galvanic Corrosion Explored: Martin of MartinsLiquidLab.org
Do premixes/additives cool better than plain water? Skinnee does some research on this frequently asked question. Water wins.
PC Water Coolant Chemistry - Part 1 Thermal properties of water, various metals and various processes to purify water.
PC Water Coolant Chemistry - Part 2 Galvanic corrosion (in depth), additives and comparison.
Does loop order really matter? No, but read on if you'd like to see some excellent research to prove why.
Does tubing size really matter...3/8"ID vs. 1/2"ID Not really; incredibly small margain of difference...negligible.
Which pump should I choose? Most current pumps perform rather well, but if you aren't sure what you are looking at...ask.
Are dual loops better at cooling than single loops? No real benefit; better off running all in serial. Details and tests inside to support this finding.
Don't mix Copper and Aluminum: A Galvanic Corrosion nightmare
Can I put my radiator/PC into a refrigerator to keep it really cool? No...no...no. This article explains why...and also would include your typical basement deepfreeze.
...And many, many more.
#----------------------------------------------------------------------------------------------------------------------------------------#
Fan Tests, Comparisons and Reviews
Cooling Fan Roundup 2012 by 4ryan6
XtremeSystems fan roundup #1
XtremeSystems fan roundup #2
Xbit Labs 120mm Fan Roundup, Part 1 [< 1350 rpm]
Xbit Labs 120mm Fan Roundup, Part 2 [> 1350 rpm]
#----------------------------------------------------------------------------------------------------------------------------------------#
Information on commonly-used first-time LCS/Watercooling Solutions:
Things to know about using Corsair H20 coolers - by Tom's HW member Omi3D (info also applies to most LCS systems)
H50 vs. Air Coolers Comparison
H70 vs. Air Coolers Comparison
XSPC Rasa RS240 Review/Comparison
Corsair H-Series/Antec Kuhler/Cool-It Eco Round-up
#----------------------------------------------------------------------------------------------------------------------------------------#
E-tailers/Online Stores for Watercooling Gear
FrozenCPU.com
Jab-Tech.com
PetrasTechShop.com
Aquatuning.us
CrazyPC.com
Performance-PCs.com
SidewinderComputers.com
PCCaseGear.com
Many will ship internationally, check out their page or contact them directly before ordering.
#----------------------------------------------------------------------------------------------------------------------------------------#
Great Ideas, concepts and Build Logs
Tom's Hardware Watercooling Build Logs
Tom's Hardware Watercooling Gallery
XtremeSystems.com Watercooling case builds
TheBestCaseScenario.com Case mods
Million-Dollar-PC.com/
MountainMods.com
XtremeSystems WC Cases
Overclock.net Watercooling Forum Build-logs posted with threads
#----------------------------------------------------------------------------------------------------------------------------------------#
Stickies
Tom's HW Watercooling Sticky
Overclock.net Watercooling Sticky
Xtremesystems.com Watercooling Info
Great Beginner Guide to Watercooling
OverClockers.com Watercooling Sticky
ExtremeOverclocking Forum Water Cooling Sticky
ExtremeOverclocking Forum Water Cooling Parts Guide (2011)
Mineral Oil Cooling/Submersion Q/A Links