
- Jan 20, 2009
- 9,317
- 113
- 37,590


Step-by-Step Guide to Building a PC
Last Updated on February 12, 2012 - Updated Links
This thread is to provide a step-by-step guide to how to build a PC. These are the general steps required in building a PC, which can be performed what sequence you feel best fits your needs.
■Step One: Choosing your components:
■Step Two: Prepare your case:
■Step Three: Install components on motherboard (outside of case):
■Step Four: Install Motherboard into case:
■Step Five: Connect System Wires:
■Step Six: Install Video Card(s):
■Step Seven: Connect Power Supply:
■Step Eight: Boot System for First Time:
■Step Nine: Install Operating System / Drivers:
■Step Ten: Test System and Have FUN!!
Step One: Choosing your components:
Here are the components I have selected for this build: (First build since I decided to create this guide)
■CPU: AMD Athlon II X4 620 Propus 2.6GHz 4 x 512KB L2 Cache Socket AM3 95W Quad-Core Processor - Retail
■MOBO: GIGABYTE GA-MA785GMT-UD2H AM3 AMD 785G HDMI Micro ATX AMD Motherboard - Retail
■RAM: G.SKILL Ripjaws Series 4GB (2 x 2GB) 240-Pin DDR3 SDRAM DDR3 1333 (PC3 10666) Desktop Memory Model F3-10666CL7D-4GBRH - Retail
■HSF: COOLER MASTER Hyper 212 Plus Intel Core i5 & Intel Core i7 compatible RR-B10-212P-GP 120mm "heatpipe direct contact" Long ... - Retail
■HDD: Western Digital Caviar Black WD6401AALS 640GB 7200 RPM 32MB Cache SATA 3.0Gb/s 3.5" Internal Hard Drive -Bare Drive
■PSU: Antec earthwatts EA430 430W Continuous Power ATX12V v2.0 80 PLUS Certified Active PFC Power Supply - Retail
■GPU: XFX HD-465X-YAF2 Radeon HD 4650 512MB 128-bit DDR2 PCI Express 2.0 x16 HDCP Ready CrossFire Supported Video Card - Retail
■DVD: Sony Optiarc 24X DVD/CD Rewritable Drive Black SATA Model AD-7240S-0B - OEM
■Case: Antec Three Hundred Illusion Black Steel ATX Mid Tower Computer Case - Retail
■Thermal Compound: Arctic Silver 5 Thermal Compound - OEM
Other links to help with deciding on what components to get.
■Recommended Builds by Usage – This thread provides a very good guide of types of builds by usage at different price points.
■*How To Ask For New Build Advice* - This is the best thread to review how to ask for advice and is a required format to get the best answers.
■*Guide to Choosing Parts* - This thread provides a very good guide in choosing parts and provides many important links and ideas.
■Best Of Tom’s Hardware: Beginner’s Guide To Motherboard Selection - This is a great Tom's Hardware article on what to think about and look for when choosing a motherboard.
Remember from this point forward to ground yourself by touching the metal case before you handle any of your computer’s electronic components, it saves them from possible static discharge which can destroy hardware. Some people find it useful to use a Anti-static wrist band but I leave that to the individual, as I don't find them necessary, as long as you continue to touch the metal of your case.
Step Two: Prepare your case:
In this step you want to get your case ready for the install. Others may have different opinions on what should or shouldn’t be done at this stage but these are the steps I undertake when building a PC.
■Remove both side panels off of the case.
■Determine how to route your case wires to provide good cable management.
Ready your case for your motherboard
■Remove your motherboard from the box and protective covering.
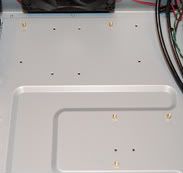
■Place the motherboard in the case to line up where the standoffs need to be placed.
■Place the standoffs on the case in the locations matching up with your motherboard
Install Power Supply
I choose to install the PSU during this phase of the process, so I can start planning in my mind how my cable management is going to flow for the build.
■Remove the PSU from the box.
■Place the PSU inside of the case and line up the with “PSU hole” on the case. Some cases have the PSU mounted at the top of the case, while others have it mounted at the bottom. For this build, the PSU is mounted at the bottom in the Antec 300
■Connect the proper screws through the case to securely mount the PSU to the case.
■Prepare the power supply cables for possible cable management. 1) For cases with room behind the MOBO tray, I recommend routing all of the wires through the opening in the top/bottom, so when you place the components inside the case, you can route them back inside the case for good cable management. 2) For cases with no room behind the MOBO tray, there isn’t much you can to prior with the cables to so just have them all setting outside of the case, as the case is laying on it’s side.

Install Hard Drive
■Remove the HDD from the box/protective covering.
■Remove HDD cage from case, if applicable.
■Place drive into the internal 3.5” slot, in the appropriate location on your case. For my build, I’m installing in the lower HDD cage in the Antec 300.
■Use the appropriate screws to screw the drive into the internal 3.5” slot. This isn’t required if you are using a tool less case or a “hot swaps” internal enclosure.
■Install the HDD cage back into the case, if applicable.

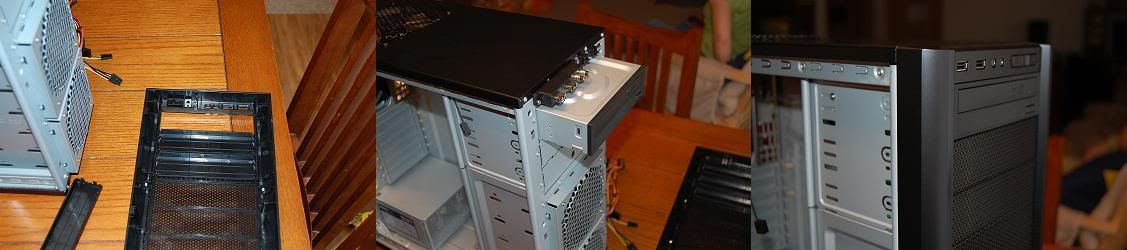
Install CD/DVD Drive
■Remove the drive from the box/protective covering.
■Remove the front of the case to gain access to the external 5.25" panels, if applicable
■Remove the appropriate bezel from the case in the location you want to install the drive.
■Place drive into the external 5.25" slot, in the appropriate location on your case. For my build, I’m installing in the third slot down from the top in the Antec 300.
■Use the appropriate screws to screw the drive into the external 5.25" slot. This isn’t required if you are using a tool less case.
■Install the front of the case back on, if applicable.
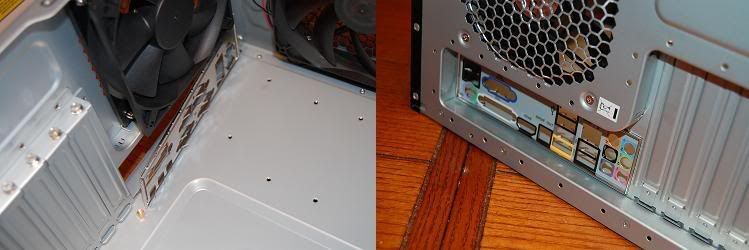
Install Rear I/O Panel
■Remove the generic I/O panel that comes to stock with your case. It may take a little more force than you think to remove.
■Install the Rear I/O panel that comes with your motherboard. Install it so you can read the text when the case is laying flat were the motherboard would be facing up. As with removing, it may take a little more force than you think to install it on to your case.
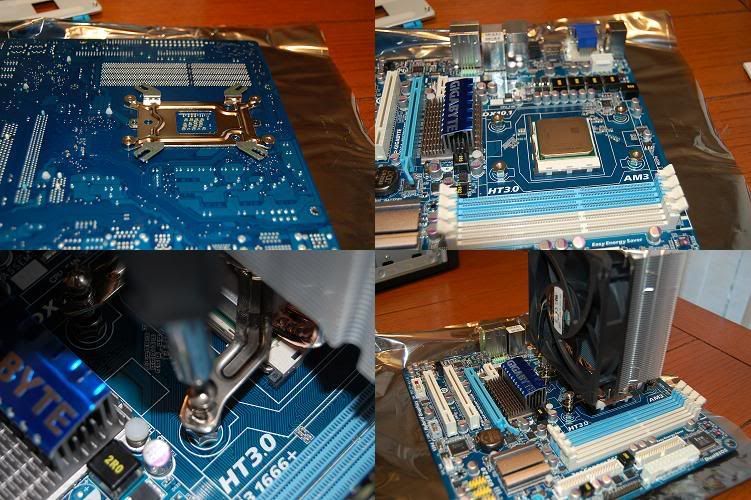
Step Three: Install components on motherboard (outside of case):
In this step you want to get your motherboard ready by installing components that are best install outside of the case; CPU, CPU Heatsink Fan and Memory.
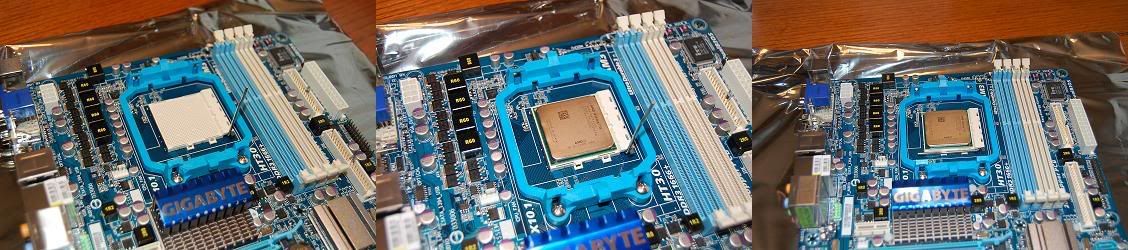
Install CPU
■Remove the CPU from the box/protective covering.
Intel
■Unlock the CPU socket arm. Generally there will be a small plastic or metal arm that lies on the side of the CPU socket. To unlock it, just push it out and then pull it up.
■Remove the CPU socket cover.
■Align the triangle on the top of the CPU to with the corresponding corner on your motherboard's CPU socket and gently lower the CPU into the socket. Be aware, there should be no pushing or snapping involved in this process. The CPU, if correctly aligned, should simply fall (gently!) into place.
■Lower and lock the socket arm, which in turn will lock your CPU into your motherboard.
AMD
■Unlock the CPU socket arm. Generally there will be a small plastic or metal arm that lies on the side of the CPU socket. To unlock it, just push it out and then pull it up.
■Align the triangle on the top of the CPU to with the corresponding corner on your motherboard's CPU socket and gently lower the CPU into the socket. Be aware, there should be no pushing or snapping involved in this process. The CPU, if correctly aligned, should simply fall (gently!) into place.
■Lower and lock the socket arm, which in turn will lock your CPU into your motherboard.
Install RAM – Review your motherboard manual for specifics on what slots to use.
Updated: Moved to recommend installing RAM before installing the heat sink to help with the large heat sinks blocking RAM slots close to the motherboard. (Thanks for the recommendation sevyr)
■Remove the RAM from the box/protective covering.
■Push back the memory clips on the specific slots you are installing them on
■Place the memory into the slots and push down on the RAM sticks. It may take a little more force than you think to push them fully into the slots. The memory clips should lock when you push the RAM in completely.

Install Heat Sink – Review your manual for specifics for your heat sink!
Here is a more detailed guide on installing the Cooler Master Hyper 212 Plus... Installing the Cooler Master Hyper 212+
■Remove the heat sink from the box/protective covering.
■Prepare the heat sink bracket and screws.
■Install the motherboard mounting bracket on the back of the motherboard.
■Apply proper amount of thermal compound to the bottom of the CPU/heat sink (remember to remove the protective covering on the heat sink first… ). Most common method is to apply a pea size dot to the center of the CPU. With newer HDT coolers, I recommend using this method… Proximon’s guide on to how to apply thermal past to Heatpipe Direct Touch (HDT) coolers
■Apply the heat sink to the top of the CPU.
■Attach the screws to the motherboard mounting bracket to secure the heat sink. Once you have the screws started, slightly twist the heat sink side to side to help with spreading out the thermal compound. I recommend tightening the heat sink down using a criss-cross tightening method (1-3-2-4). You want to repeat the tightening steps 4 or more times until the heat sink is firmly secured to the motherboard. Don't tighten one screw down at a time.
■Connect the fan(s) to the heat sink, if applicable.
■Connect the heat sink fan power connector to the appropriate CPU FAN slot on the motherboard.
Last Updated on February 12, 2012 - Updated Links
This thread is to provide a step-by-step guide to how to build a PC. These are the general steps required in building a PC, which can be performed what sequence you feel best fits your needs.
■Step One: Choosing your components:
■Step Two: Prepare your case:
■Step Three: Install components on motherboard (outside of case):
■Step Four: Install Motherboard into case:
■Step Five: Connect System Wires:
■Step Six: Install Video Card(s):
■Step Seven: Connect Power Supply:
■Step Eight: Boot System for First Time:
■Step Nine: Install Operating System / Drivers:
■Step Ten: Test System and Have FUN!!
Step One: Choosing your components:
Here are the components I have selected for this build: (First build since I decided to create this guide)
■CPU: AMD Athlon II X4 620 Propus 2.6GHz 4 x 512KB L2 Cache Socket AM3 95W Quad-Core Processor - Retail
■MOBO: GIGABYTE GA-MA785GMT-UD2H AM3 AMD 785G HDMI Micro ATX AMD Motherboard - Retail
■RAM: G.SKILL Ripjaws Series 4GB (2 x 2GB) 240-Pin DDR3 SDRAM DDR3 1333 (PC3 10666) Desktop Memory Model F3-10666CL7D-4GBRH - Retail
■HSF: COOLER MASTER Hyper 212 Plus Intel Core i5 & Intel Core i7 compatible RR-B10-212P-GP 120mm "heatpipe direct contact" Long ... - Retail
■HDD: Western Digital Caviar Black WD6401AALS 640GB 7200 RPM 32MB Cache SATA 3.0Gb/s 3.5" Internal Hard Drive -Bare Drive
■PSU: Antec earthwatts EA430 430W Continuous Power ATX12V v2.0 80 PLUS Certified Active PFC Power Supply - Retail
■GPU: XFX HD-465X-YAF2 Radeon HD 4650 512MB 128-bit DDR2 PCI Express 2.0 x16 HDCP Ready CrossFire Supported Video Card - Retail
■DVD: Sony Optiarc 24X DVD/CD Rewritable Drive Black SATA Model AD-7240S-0B - OEM
■Case: Antec Three Hundred Illusion Black Steel ATX Mid Tower Computer Case - Retail
■Thermal Compound: Arctic Silver 5 Thermal Compound - OEM
Other links to help with deciding on what components to get.
■Recommended Builds by Usage – This thread provides a very good guide of types of builds by usage at different price points.
■*How To Ask For New Build Advice* - This is the best thread to review how to ask for advice and is a required format to get the best answers.
■*Guide to Choosing Parts* - This thread provides a very good guide in choosing parts and provides many important links and ideas.
■Best Of Tom’s Hardware: Beginner’s Guide To Motherboard Selection - This is a great Tom's Hardware article on what to think about and look for when choosing a motherboard.
Remember from this point forward to ground yourself by touching the metal case before you handle any of your computer’s electronic components, it saves them from possible static discharge which can destroy hardware. Some people find it useful to use a Anti-static wrist band but I leave that to the individual, as I don't find them necessary, as long as you continue to touch the metal of your case.
Step Two: Prepare your case:
In this step you want to get your case ready for the install. Others may have different opinions on what should or shouldn’t be done at this stage but these are the steps I undertake when building a PC.
■Remove both side panels off of the case.
■Determine how to route your case wires to provide good cable management.
Ready your case for your motherboard
■Remove your motherboard from the box and protective covering.
■Place the motherboard in the case to line up where the standoffs need to be placed.
■Place the standoffs on the case in the locations matching up with your motherboard
Install Power Supply
I choose to install the PSU during this phase of the process, so I can start planning in my mind how my cable management is going to flow for the build.
■Remove the PSU from the box.
■Place the PSU inside of the case and line up the with “PSU hole” on the case. Some cases have the PSU mounted at the top of the case, while others have it mounted at the bottom. For this build, the PSU is mounted at the bottom in the Antec 300
■Connect the proper screws through the case to securely mount the PSU to the case.
■Prepare the power supply cables for possible cable management. 1) For cases with room behind the MOBO tray, I recommend routing all of the wires through the opening in the top/bottom, so when you place the components inside the case, you can route them back inside the case for good cable management. 2) For cases with no room behind the MOBO tray, there isn’t much you can to prior with the cables to so just have them all setting outside of the case, as the case is laying on it’s side.
Install Hard Drive
■Remove the HDD from the box/protective covering.
■Remove HDD cage from case, if applicable.
■Place drive into the internal 3.5” slot, in the appropriate location on your case. For my build, I’m installing in the lower HDD cage in the Antec 300.
■Use the appropriate screws to screw the drive into the internal 3.5” slot. This isn’t required if you are using a tool less case or a “hot swaps” internal enclosure.
■Install the HDD cage back into the case, if applicable.
Install CD/DVD Drive
■Remove the drive from the box/protective covering.
■Remove the front of the case to gain access to the external 5.25" panels, if applicable
■Remove the appropriate bezel from the case in the location you want to install the drive.
■Place drive into the external 5.25" slot, in the appropriate location on your case. For my build, I’m installing in the third slot down from the top in the Antec 300.
■Use the appropriate screws to screw the drive into the external 5.25" slot. This isn’t required if you are using a tool less case.
■Install the front of the case back on, if applicable.
Install Rear I/O Panel
■Remove the generic I/O panel that comes to stock with your case. It may take a little more force than you think to remove.
■Install the Rear I/O panel that comes with your motherboard. Install it so you can read the text when the case is laying flat were the motherboard would be facing up. As with removing, it may take a little more force than you think to install it on to your case.
Step Three: Install components on motherboard (outside of case):
In this step you want to get your motherboard ready by installing components that are best install outside of the case; CPU, CPU Heatsink Fan and Memory.
Install CPU
■Remove the CPU from the box/protective covering.
Intel
■Unlock the CPU socket arm. Generally there will be a small plastic or metal arm that lies on the side of the CPU socket. To unlock it, just push it out and then pull it up.
■Remove the CPU socket cover.
■Align the triangle on the top of the CPU to with the corresponding corner on your motherboard's CPU socket and gently lower the CPU into the socket. Be aware, there should be no pushing or snapping involved in this process. The CPU, if correctly aligned, should simply fall (gently!) into place.
■Lower and lock the socket arm, which in turn will lock your CPU into your motherboard.
AMD
■Unlock the CPU socket arm. Generally there will be a small plastic or metal arm that lies on the side of the CPU socket. To unlock it, just push it out and then pull it up.
■Align the triangle on the top of the CPU to with the corresponding corner on your motherboard's CPU socket and gently lower the CPU into the socket. Be aware, there should be no pushing or snapping involved in this process. The CPU, if correctly aligned, should simply fall (gently!) into place.
■Lower and lock the socket arm, which in turn will lock your CPU into your motherboard.
Install RAM – Review your motherboard manual for specifics on what slots to use.
Updated: Moved to recommend installing RAM before installing the heat sink to help with the large heat sinks blocking RAM slots close to the motherboard. (Thanks for the recommendation sevyr)
■Remove the RAM from the box/protective covering.
■Push back the memory clips on the specific slots you are installing them on
■Place the memory into the slots and push down on the RAM sticks. It may take a little more force than you think to push them fully into the slots. The memory clips should lock when you push the RAM in completely.
Install Heat Sink – Review your manual for specifics for your heat sink!
Here is a more detailed guide on installing the Cooler Master Hyper 212 Plus... Installing the Cooler Master Hyper 212+
■Remove the heat sink from the box/protective covering.
■Prepare the heat sink bracket and screws.
■Install the motherboard mounting bracket on the back of the motherboard.
■Apply proper amount of thermal compound to the bottom of the CPU/heat sink (remember to remove the protective covering on the heat sink first…
). Most common method is to apply a pea size dot to the center of the CPU. With newer HDT coolers, I recommend using this method… Proximon’s guide on to how to apply thermal past to Heatpipe Direct Touch (HDT) coolers■Apply the heat sink to the top of the CPU.
■Attach the screws to the motherboard mounting bracket to secure the heat sink. Once you have the screws started, slightly twist the heat sink side to side to help with spreading out the thermal compound. I recommend tightening the heat sink down using a criss-cross tightening method (1-3-2-4). You want to repeat the tightening steps 4 or more times until the heat sink is firmly secured to the motherboard. Don't tighten one screw down at a time.
■Connect the fan(s) to the heat sink, if applicable.
■Connect the heat sink fan power connector to the appropriate CPU FAN slot on the motherboard.


")
