- Oct 3, 2013
- 8,409
- 0
- 38,960


R9 2XX Graphics Card Installation and Removal thread
**This thread is a sublink to the original thread here.**
**The images used are not my own, I do not own the rights of any of these images. These are simply used to make the steps easier and so it is understood visually what you need to do. If you see these images and you own them, if you would prefer them taken down please let me know**
This thread aims to give users an understanding of how to remove graphics cards and also how to install new ones. Since many users who want to upgrade their cards have never installed a graphics card before, this is often the part which discourages them the most. However, don't let it be as the process is very simple and easy to do yourself. At this stage, It is presumed that you know your power supply is sufficient enough to support your graphics card as well as your case having enough room for the card to fit. This thread will tell you how to install your new Radeon R9 2XX graphics card along with removing your old one.
What you will need:
-Screwdriver
Before taking apart your computer you must:
-Disconnect your computer COMPLETELY from power and turn your power supply switch off.
-Ground yourself properly, DO NOT work on carpet or other static-building surfaces. Static discharge can damage components and in extreme cases kill them, though the chances of this happening are not very high you must always be on the safe side.
-Build on a sturdy, solid, flat surface. DO NOT build/take apart your computer on areas such as your bed.
Other Notes:
-Whilst upgrading/building a PC you should occasionally walk out of where you are building and touch something conductive to release any static buildup.
-If you have a static wrist band wear it, if you want to be on the absolute safest side purchase one.
-Only focus on ONE thing at a time if following this thread, don't skip steps or go do something else in your PC, just simply finish off the most important job (installing/removing your graphics card) then get to the minor jobs later so you remain focused and in-sighted for the entire time.
-Don't go changing around cables for neatness if you don't know what your doing, if you wish to do this do ONE cable at a time rather then pulling them all out.
-ALWAYS make sure that when you install your graphics card, you have it's PCI-E connector going INTO the slot, this is the only way it will work and be secured correctly. Only one side will have a large PCI-E connector, and it's very hard to miss. The rear of the cards bracket will prevent it being installed into the case if it's the wrong way round also.
How to Remove your old graphics card:
NOTE:
-If your having issues with your current step, DO NOT move onto the next step. Leave a comment and a reply should come within minutes.
1)

Remove both of the side panels of your case. If have never done so before simply see what screws are holding the side on, the screws should be located at the back and there are often two of them (some cases have more). The screws holding the side panel in place will be in line with the metal sheet overlapping the cases backing, unscrew those screws (both sides). If your case does not use screws simply check how it is opened in the manual.
**Put your case on it's side, this will make the following steps easier and safer**
2)
![url]](/proxy.php?image=http%3A%2F%2F%5Burl%3Dhttp%3A%2F%2Fimages.pcworld.com%2Fimages%2Farticle%2F2011%2F04%2Fgraphics_card_power_connectors-5166534.jpg%5Dhttp%3A%2F%2Fimages.pcworld.com%2Fimages%2Farticle%2F2011%2F04%2Fgraphics_card_power_connectors-5166534.jpg%5B%2Furl%5D&hash=faea08381754dfab1ab0b60b679f132b)
Remove your graphics cards power cables (if your old card has any) The cables will be located at the far right hand side if there is any. To take the cables out simply push the clip in and pull out (force is required). Always have one hand on the card so you don't cause damage to the slot and/or the card.
3)
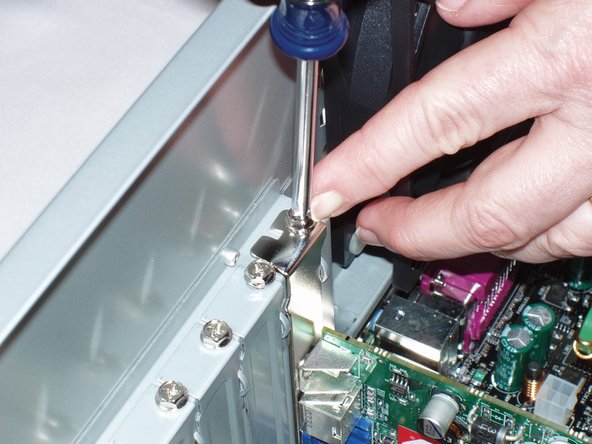
Take out the screws holding your graphics card in place. These screws are located towards the back of your case. At the end of your card there will be screws tightening it to the rear PCI brackets, simply unscrew them and take them out. If your case does not use screws but a lever mechanism, simply pull the lever out to release your graphics card from the rear brackets.
4) NOTE: Levers have the ability to move up and down, some slots may have ends that look like levers when they aren't. *Levers are found at the far right of the slot*. If you aren't sure check step 4c.
Examples: NOTE: Yours may look different to these;
A Motherboard slot with a lever: (orange slot in 1st and yellow slot in 2nd)


A motherboard slot without a lever:

a) If your motherboard slot has a lever:

Push down on the lever FIRST before pulling the card out. If the lever is hard to reach use the screwdriver head and use that to push down the leaver. Once the lever is pushed down your card should be easy to remove without much force required.
b) If your motherboard slot doesn't have a lever:
Simply pull your graphics card out, make sure you try to pull it out as level as possible. A reasonable amount of force is often required to remove a card this way.
c) If you don't know:
Test yourself if it has a lever or not, push down on the end of the slot with a bit of force and; if it moves down go to step 4a, if it does not move go to step 4b.
Your graphics card is removed! If you are now ready to install your R9 2XX series graphics card see the below;
How to install your AMD R9 2XX Graphics card:
NOTE:
-If you are following on from the above skip step(s): 1
-If you are only starting on from here, do all steps EXCEPT 2b.
-If your having issues with your current step, DO NOT move onto the next step. Leave a comment and a reply should come within minutes.
-'Chosen motherboard slot' / 'Chosen slot' is the slot in which you have chosen to install your graphics card in. Make sure you install your R9 2XX GPU in a motherboard slot that runs in X16 mode to take maximum advantage of the card.
1)
Remove both of the side panels of your case. If have never done so before simply see what screws are holding the side on, the screws should be located at the back and there are often two of them (some cases have more). The screws holding the side panel in place will be in line with the metal sheet overlapping the cases backing, unscrew those screws (both sides). If your case does not use screws simply check how it is opened in the manual.
**Put your case on it's side, this will make the following steps easier and safer**
2)

a) With the motherboard slot you are using, check how many slots high the graphics card is then check what bracket the slot is in line with, then how many below you need to remove. Remove these brackets by taking out the screw holding them in place. If your case does not use screws but a lever mechanism, simply pull the lever out to release the bracket. **If a card is 2.5 slots high you only need to remove 2 brackets**
b) With your previously removed graphics card, are enough PCI Brackets removed or are there too many? With the motherboard slot you are using, check how many slots high the graphics card is then check what bracket the slot is in line with, then how many below you need to remove. The bracket in line with the slot and the accordance below that you must remove, any other brackets other then these that aren't being used which are taken out, you can put back in. **If a card is 2.5 slots high you only need to remove 2 brackets**
3)
Examples: NOTE: Yours may look different to these;
A Motherboard slot with a lever: (orange slot in 1st and yellow slot in 2nd)
A motherboard slot without a lever:
-------------The below is step 3 - the above was an example to void confusion--------------
![url]](/proxy.php?image=http%3A%2F%2F%5Burl%3Dhttp%3A%2F%2Fwww.game-debate.com%2Fblog%2Fimages%2Fgraphics_card_PCI_lever_id1387882566_1.jpg%5Dhttp%3A%2F%2Fwww.game-debate.com%2Fblog%2Fimages%2Fgraphics_card_PCI_lever_id1387882566_1.jpg%5B%2Furl%5D&hash=12f5965512a2eae3628ae134f6989435)
If your chosen slot has a lever which has the ability to be pushed down, this is the time to do so if it is not down already. *Levers are found at the far right of the slot*.
4)
a) If your chosen motherboard slot has a lever:

Line up the Graphics card PCI-E connector to the slot, have the rear of the card (side with video outputs) nicely pushed up against the rear of the case where the removed brackets were, push down with the card level until you hear/see/both the slot click shut. If the card is pushed in as far as it can go but the lever is not clicked shut, push in the lever yourself which will lock the card into place. **Only do this if the cards rear bracket is flush with the top of the rest of the brackets when the case is on it's side.**
b) If your chosen motherboard slot doesn't have a lever:
Have the rear of the card (side with video outputs) nicely pushed up against the rear of the case where the removed brackets were, then push down until you see the graphics card bracket is flush with the top of the rest of the brackets when the case is on it's side.
5)
a) If your case uses screws to secure cards in place:
Simply put the screws in the places where the old bracket screws were (removed bracket locations).
b) if your case uses levers to secure cards in place:

Push down the levers which are currently in the open position which your card is inserted in. If you cannot push down the lever the whole way but the graphics card is secure, leave it at that. I have used this type of mechanism before and they do not always go down the whole way.
6)

Connect the appropriate power connectors. A graphics cards power connectors are found on the far right hand side of your graphics card. All R9 2XX series graphics cards have power connectors so you must occupy them if you wish to use your graphics card. Because both side panels should be open, route the appropriate cables needed through your case. Depending on the amount of power connectors your card has, utilize ALL of these ports and connect them with the 6/6+2/8 pin power cables that are with your power supply. If you do not have enough power cables but your power supply can handle the card, use molex adapters. Push in the connectors all the way, until the clip on the side goes OVER the lip on the graphics card's power connectors. Don't stress about the orientation of the connectors, they can ONLY go in one way. If you do not have a radeon R9 2XX card and have no power connectors found on the card itself, you simply don't need them. 6+2 power cables are similar to that of 8-Pin power cables for reference, the only difference is a 6+2 cable is universal between 6 and 8-pin power connectors whereas 8-pin can only be put in an 8-pin connector.
7)
Re-attach your side panels (both) then use the screws you previously took out and put them back in the same position they were in before. Screw to a reasonable tightness but not too tight. If your case does not use screws simply recall to yourself how you opened it.
Your R9 2XX series card was successfully installed!
NOTE: Make sure you plug in the monitor cable into the graphics card video outputs, and NOT into the motherboard video outputs if there is any. The Graphics card outputs are visible at the back of the case where the other brackets are found. Common mistake made, hence the reason why I have noted this.
If your aim was to install a second card in crossfire then all you need to do differently is:
-Install a Crossfire bridge once finished if your card has a connector (ALL of these cards need to use the crossfire bridge: 270/270X/280/280X)
Apart from that you can follow the graphics card installation guide, and ignore the removal guide.
Driver Installation:
When you install any card you must download the appropriate driver once finished. Go to AMD directly and install their latest driver, Which can be found here. If your wanting to know more about drivers check out the R9 2XX Driver Updates thread. **Under development**
Having troubles or need help?
Feel free to leave a comment in this thread or send me a private message through Toms Hardware.
Feedback and suggestions:
If you would like to share your experiences or have a suggestion, please feel free to leave a comment or send me a message through Toms Hardware.
*Rules in this thread apply to any other, please avoid arguments and also joining in when one occurs. It is fine to debate, but please only attack their ideas and not them as a person. I will not tolerate abuse on this forum, especially in a thread I have created. Thank you.
**This thread is a sublink to the original thread here.**
**The images used are not my own, I do not own the rights of any of these images. These are simply used to make the steps easier and so it is understood visually what you need to do. If you see these images and you own them, if you would prefer them taken down please let me know**
This thread aims to give users an understanding of how to remove graphics cards and also how to install new ones. Since many users who want to upgrade their cards have never installed a graphics card before, this is often the part which discourages them the most. However, don't let it be as the process is very simple and easy to do yourself. At this stage, It is presumed that you know your power supply is sufficient enough to support your graphics card as well as your case having enough room for the card to fit. This thread will tell you how to install your new Radeon R9 2XX graphics card along with removing your old one.
What you will need:
-Screwdriver
Before taking apart your computer you must:
-Disconnect your computer COMPLETELY from power and turn your power supply switch off.
-Ground yourself properly, DO NOT work on carpet or other static-building surfaces. Static discharge can damage components and in extreme cases kill them, though the chances of this happening are not very high you must always be on the safe side.
-Build on a sturdy, solid, flat surface. DO NOT build/take apart your computer on areas such as your bed.
Other Notes:
-Whilst upgrading/building a PC you should occasionally walk out of where you are building and touch something conductive to release any static buildup.
-If you have a static wrist band wear it, if you want to be on the absolute safest side purchase one.
-Only focus on ONE thing at a time if following this thread, don't skip steps or go do something else in your PC, just simply finish off the most important job (installing/removing your graphics card) then get to the minor jobs later so you remain focused and in-sighted for the entire time.
-Don't go changing around cables for neatness if you don't know what your doing, if you wish to do this do ONE cable at a time rather then pulling them all out.
-ALWAYS make sure that when you install your graphics card, you have it's PCI-E connector going INTO the slot, this is the only way it will work and be secured correctly. Only one side will have a large PCI-E connector, and it's very hard to miss. The rear of the cards bracket will prevent it being installed into the case if it's the wrong way round also.
How to Remove your old graphics card:
NOTE:
-If your having issues with your current step, DO NOT move onto the next step. Leave a comment and a reply should come within minutes.
1)
Remove both of the side panels of your case. If have never done so before simply see what screws are holding the side on, the screws should be located at the back and there are often two of them (some cases have more). The screws holding the side panel in place will be in line with the metal sheet overlapping the cases backing, unscrew those screws (both sides). If your case does not use screws simply check how it is opened in the manual.
**Put your case on it's side, this will make the following steps easier and safer**
2)
Remove your graphics cards power cables (if your old card has any) The cables will be located at the far right hand side if there is any. To take the cables out simply push the clip in and pull out (force is required). Always have one hand on the card so you don't cause damage to the slot and/or the card.
3)
Take out the screws holding your graphics card in place. These screws are located towards the back of your case. At the end of your card there will be screws tightening it to the rear PCI brackets, simply unscrew them and take them out. If your case does not use screws but a lever mechanism, simply pull the lever out to release your graphics card from the rear brackets.
4) NOTE: Levers have the ability to move up and down, some slots may have ends that look like levers when they aren't. *Levers are found at the far right of the slot*. If you aren't sure check step 4c.
Examples: NOTE: Yours may look different to these;
A Motherboard slot with a lever: (orange slot in 1st and yellow slot in 2nd)
A motherboard slot without a lever:
a) If your motherboard slot has a lever:
Push down on the lever FIRST before pulling the card out. If the lever is hard to reach use the screwdriver head and use that to push down the leaver. Once the lever is pushed down your card should be easy to remove without much force required.
b) If your motherboard slot doesn't have a lever:
Simply pull your graphics card out, make sure you try to pull it out as level as possible. A reasonable amount of force is often required to remove a card this way.
c) If you don't know:
Test yourself if it has a lever or not, push down on the end of the slot with a bit of force and; if it moves down go to step 4a, if it does not move go to step 4b.
Your graphics card is removed! If you are now ready to install your R9 2XX series graphics card see the below;
How to install your AMD R9 2XX Graphics card:
NOTE:
-If you are following on from the above skip step(s): 1
-If you are only starting on from here, do all steps EXCEPT 2b.
-If your having issues with your current step, DO NOT move onto the next step. Leave a comment and a reply should come within minutes.
-'Chosen motherboard slot' / 'Chosen slot' is the slot in which you have chosen to install your graphics card in. Make sure you install your R9 2XX GPU in a motherboard slot that runs in X16 mode to take maximum advantage of the card.
1)
Remove both of the side panels of your case. If have never done so before simply see what screws are holding the side on, the screws should be located at the back and there are often two of them (some cases have more). The screws holding the side panel in place will be in line with the metal sheet overlapping the cases backing, unscrew those screws (both sides). If your case does not use screws simply check how it is opened in the manual.
**Put your case on it's side, this will make the following steps easier and safer**
2)
a) With the motherboard slot you are using, check how many slots high the graphics card is then check what bracket the slot is in line with, then how many below you need to remove. Remove these brackets by taking out the screw holding them in place. If your case does not use screws but a lever mechanism, simply pull the lever out to release the bracket. **If a card is 2.5 slots high you only need to remove 2 brackets**
b) With your previously removed graphics card, are enough PCI Brackets removed or are there too many? With the motherboard slot you are using, check how many slots high the graphics card is then check what bracket the slot is in line with, then how many below you need to remove. The bracket in line with the slot and the accordance below that you must remove, any other brackets other then these that aren't being used which are taken out, you can put back in. **If a card is 2.5 slots high you only need to remove 2 brackets**
3)
Examples: NOTE: Yours may look different to these;
A Motherboard slot with a lever: (orange slot in 1st and yellow slot in 2nd)
A motherboard slot without a lever:
-------------The below is step 3 - the above was an example to void confusion--------------
If your chosen slot has a lever which has the ability to be pushed down, this is the time to do so if it is not down already. *Levers are found at the far right of the slot*.
4)
a) If your chosen motherboard slot has a lever:
Line up the Graphics card PCI-E connector to the slot, have the rear of the card (side with video outputs) nicely pushed up against the rear of the case where the removed brackets were, push down with the card level until you hear/see/both the slot click shut. If the card is pushed in as far as it can go but the lever is not clicked shut, push in the lever yourself which will lock the card into place. **Only do this if the cards rear bracket is flush with the top of the rest of the brackets when the case is on it's side.**
b) If your chosen motherboard slot doesn't have a lever:
Have the rear of the card (side with video outputs) nicely pushed up against the rear of the case where the removed brackets were, then push down until you see the graphics card bracket is flush with the top of the rest of the brackets when the case is on it's side.
5)
a) If your case uses screws to secure cards in place:
Simply put the screws in the places where the old bracket screws were (removed bracket locations).
b) if your case uses levers to secure cards in place:
Push down the levers which are currently in the open position which your card is inserted in. If you cannot push down the lever the whole way but the graphics card is secure, leave it at that. I have used this type of mechanism before and they do not always go down the whole way.
6)
Connect the appropriate power connectors. A graphics cards power connectors are found on the far right hand side of your graphics card. All R9 2XX series graphics cards have power connectors so you must occupy them if you wish to use your graphics card. Because both side panels should be open, route the appropriate cables needed through your case. Depending on the amount of power connectors your card has, utilize ALL of these ports and connect them with the 6/6+2/8 pin power cables that are with your power supply. If you do not have enough power cables but your power supply can handle the card, use molex adapters. Push in the connectors all the way, until the clip on the side goes OVER the lip on the graphics card's power connectors. Don't stress about the orientation of the connectors, they can ONLY go in one way. If you do not have a radeon R9 2XX card and have no power connectors found on the card itself, you simply don't need them. 6+2 power cables are similar to that of 8-Pin power cables for reference, the only difference is a 6+2 cable is universal between 6 and 8-pin power connectors whereas 8-pin can only be put in an 8-pin connector.
7)
Re-attach your side panels (both) then use the screws you previously took out and put them back in the same position they were in before. Screw to a reasonable tightness but not too tight. If your case does not use screws simply recall to yourself how you opened it.
Your R9 2XX series card was successfully installed!
NOTE: Make sure you plug in the monitor cable into the graphics card video outputs, and NOT into the motherboard video outputs if there is any. The Graphics card outputs are visible at the back of the case where the other brackets are found. Common mistake made, hence the reason why I have noted this.
If your aim was to install a second card in crossfire then all you need to do differently is:
-Install a Crossfire bridge once finished if your card has a connector (ALL of these cards need to use the crossfire bridge: 270/270X/280/280X)
Apart from that you can follow the graphics card installation guide, and ignore the removal guide.
Driver Installation:
When you install any card you must download the appropriate driver once finished. Go to AMD directly and install their latest driver, Which can be found here. If your wanting to know more about drivers check out the R9 2XX Driver Updates thread. **Under development**
Having troubles or need help?
Feel free to leave a comment in this thread or send me a private message through Toms Hardware.
Feedback and suggestions:
If you would like to share your experiences or have a suggestion, please feel free to leave a comment or send me a message through Toms Hardware.
*Rules in this thread apply to any other, please avoid arguments and also joining in when one occurs. It is fine to debate, but please only attack their ideas and not them as a person. I will not tolerate abuse on this forum, especially in a thread I have created. Thank you.
 Twitter