Question Trying to convert to Windows 11 (mbr to gpt, enable secure boot, etc)

Jun 11, 2023
2
0
10
Hey guys, first time posting here

In my research I've discovered I can't enable secure boot for Windows 11 because my BIOS is set to legacy. My MOBO is a Gigabyte b450m with wifi. Apparently in order for it to be set to UEFI thereby allowing me to enable secure boot, my disk drive needs to be gpt and not mbr. So I followed these instructions:
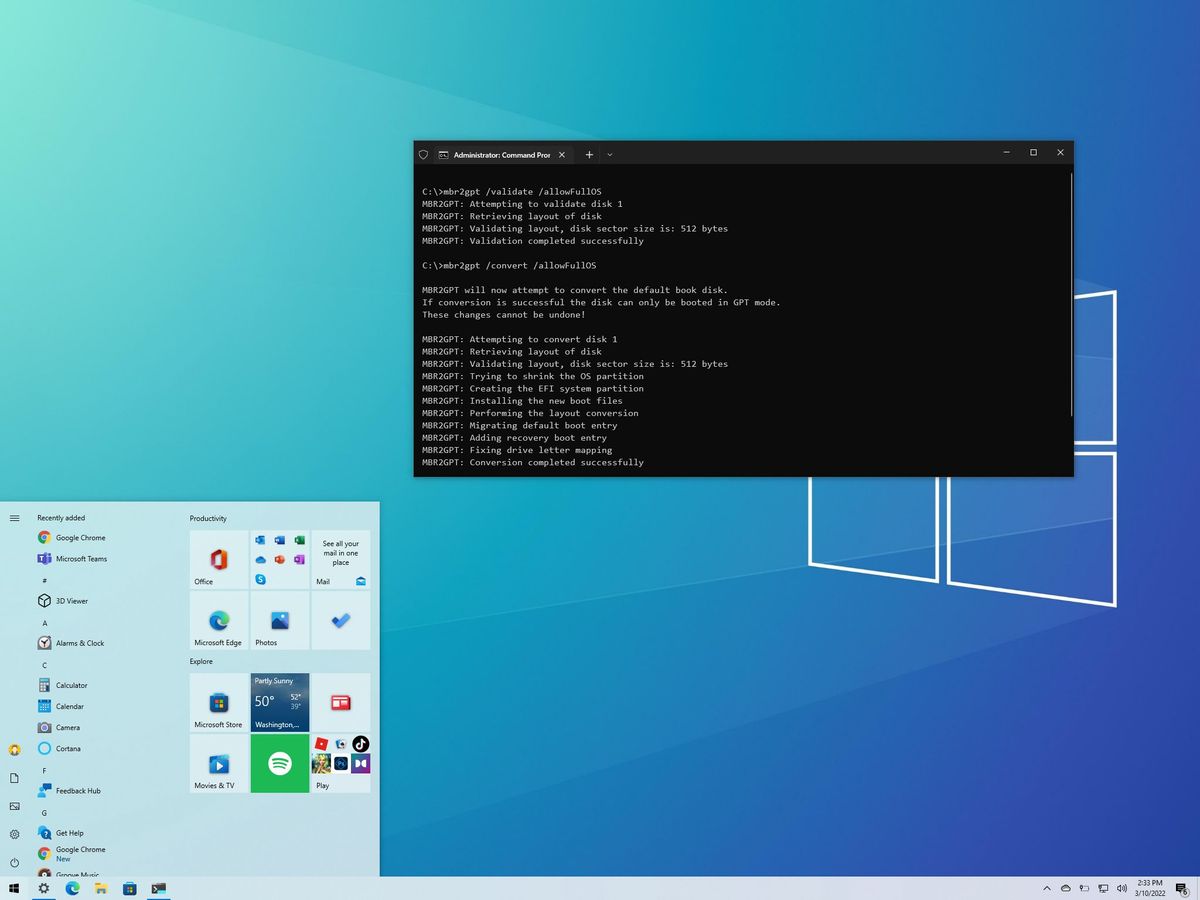
When I did that validate option it said everything was fine. So I went ahead and executed the command. Then the conversion itself failed. I wish I had taken a photo of what exactly it said, but I don't remember getting an error code. Just some lines saying it failed.

Long story short when I'd boot up windows it wouldn't boot from that drive anymore so I just did a fresh install of windows from a USB drive. Luckily I backed up the stuff I care about. Reinstalling my apps will be a pain in the ass but oh well...
So while I'm on this fresh install of Windows, before I go ahead and redownload all my apps and such I use for work, I figure I may as well try again to meet the requirements to upgrade to windows 11. Does anyone know what might have gone wrong in this conversion process?

Let me also add I had made a Windows restore point, but when I booted via the USB and went to advanced and tried to use the restore point, it also gave me an error. Saying I would need to restart and boot with the c drive basically... Which wasn't possible. Some good that restore point did. Any tips on making that process smoother for the future?
 
Last edited:
So basically, you need to start over. First, I'd do a clear CMOS as follows.

BIOS Hard Reset procedure

Power off the unit, switch the PSU off and unplug the PSU cord from either the wall or the power supply.

Remove the motherboard CMOS battery for about three to five minutes. In some cases it may be necessary to remove the graphics card to access the CMOS battery.

During that five minutes while the CMOS battery is out of the motherboard, press the power button on the case, continuously, for 15-30 seconds, in order to deplete any residual charge that might be present in the CMOS circuit. After the five minutes is up, reinstall the CMOS battery making sure to insert it with the correct side up just as it came out.

If you had to remove the graphics card you can now reinstall it, but remember to reconnect your power cables if there were any attached to it as well as your display cable.

Now, plug the power supply cable back in, switch the PSU back on and power up the system. It should display the POST screen and the options to enter CMOS/BIOS setup. Enter the bios setup program and reconfigure the boot settings for either the Windows boot manager or for legacy systems, the drive your OS is installed on if necessary.

Save settings and exit. If the system will POST and boot then you can move forward from there including going back into the bios and configuring any other custom settings you may need to configure such as Memory XMP, A-XMP or D.O.C.P profile settings, custom fan profile settings or other specific settings you may have previously had configured that were wiped out by resetting the CMOS.

In some cases it may be necessary when you go into the BIOS after a reset, to load the Optimal default or Default values and then save settings, to actually get the BIOS to fully reset and force recreation of the hardware tables.


Then, after making sure that ALL drives except the drive you are installing TO and the drive you are installing FROM (Generally a flash drive but in some cases perhaps a DVD) are disconnected, go into the BIOS and find the fTPM setting and enable it. Also enable secure boot and any other "UEFI" settings. DISABLE CSM (Compatibility support module).

Next, boot to your installation media and when you get to that point choose the "Custom" option. Select and delete ALL of the existing partitions on the Drive 0 or whatever your OS drive is being designated as until there are no partitions left and only unpartitioned space. Then select next. Windows will automatically create any required partitions and perform all necessary formatting, and with fTPM and Secure boot enabled, and CSM disabled, it should automatically create those as GPT partitions and then automatically continue on with your Windows 11 installation. You do not need to install Windows 10 and then "upgrade". Simply create Windows 11 installation media by downloading the Windows 11 media creation tool and running it, and creating the required installation media on an 8GB or larger flash drive, then during the installation when it asks for your product key either select "I don't have one" and it SHOULD automatically activate based on the existing Windows 10 activation on record for your motherboard OR enter your Windows 10 product key if you know it.

That should get you where you want to be. While I haven't created a Windows 11 clean installation guide yet, 95% of my Windows 10 clean install guide should be nearly the same and get you though the correct process you want to follow.

 
  • Like
Reactions: PEnns
Jun 11, 2023
2
0
10
So basically, you need to start over. First, I'd do a clear CMOS as follows.

BIOS Hard Reset procedure

Power off the unit, switch the PSU off and unplug the PSU cord from either the wall or the power supply.

Remove the motherboard CMOS battery for about three to five minutes. In some cases it may be necessary to remove the graphics card to access the CMOS battery.

During that five minutes while the CMOS battery is out of the motherboard, press the power button on the case, continuously, for 15-30 seconds, in order to deplete any residual charge that might be present in the CMOS circuit. After the five minutes is up, reinstall the CMOS battery making sure to insert it with the correct side up just as it came out.

If you had to remove the graphics card you can now reinstall it, but remember to reconnect your power cables if there were any attached to it as well as your display cable.

Now, plug the power supply cable back in, switch the PSU back on and power up the system. It should display the POST screen and the options to enter CMOS/BIOS setup. Enter the bios setup program and reconfigure the boot settings for either the Windows boot manager or for legacy systems, the drive your OS is installed on if necessary.

Save settings and exit. If the system will POST and boot then you can move forward from there including going back into the bios and configuring any other custom settings you may need to configure such as Memory XMP, A-XMP or D.O.C.P profile settings, custom fan profile settings or other specific settings you may have previously had configured that were wiped out by resetting the CMOS.

In some cases it may be necessary when you go into the BIOS after a reset, to load the Optimal default or Default values and then save settings, to actually get the BIOS to fully reset and force recreation of the hardware tables.


Then, after making sure that ALL drives except the drive you are installing TO and the drive you are installing FROM (Generally a flash drive but in some cases perhaps a DVD) are disconnected, go into the BIOS and find the fTPM setting and enable it. Also enable secure boot and any other "UEFI" settings. DISABLE CSM (Compatibility support module).

Next, boot to your installation media and when you get to that point choose the "Custom" option. Select and delete ALL of the existing partitions on the Drive 0 or whatever your OS drive is being designated as until there are no partitions left and only unpartitioned space. Then select next. Windows will automatically create any required partitions and perform all necessary formatting, and with fTPM and Secure boot enabled, and CSM disabled, it should automatically create those as GPT partitions and then automatically continue on with your Windows 11 installation. You do not need to install Windows 10 and then "upgrade". Simply create Windows 11 installation media by downloading the Windows 11 media creation tool and running it, and creating the required installation media on an 8GB or larger flash drive, then during the installation when it asks for your product key either select "I don't have one" and it SHOULD automatically activate based on the existing Windows 10 activation on record for your motherboard OR enter your Windows 10 product key if you know it.

That should get you where you want to be. While I haven't created a Windows 11 clean installation guide yet, 95% of my Windows 10 clean install guide should be nearly the same and get you though the correct process you want to follow.

hey, thanks for the help! I ended up just putting windows 11 on a USB drive, booting from there, deleting my C drive completely, and it took the install just fine. fTPM was already enabled in my BIOS and I guess my BIOS was smart enough to go ahead and boot my C drive with the fresh Windows 11 (which installed as a GPT) with UEFI boot or whatever. I didn't do all those extra steps you mentioned at the beginning. But everything is running great!
 
Perfect. As long as it worked, but keep the Hard reset procedure in mind for future problems especially anytime you add new hardware, because the whole reason I suggested doing that first is that sometimes the BIOS refuses to forget old configurations and the hardware tables have to be reset in order for there to be a "clean slate" to work with. Usually this isn't a necessary step but sometimes it's the only thing that will allow you to start from scratch if there are problems recognizing new hardware or configuration changes.

Regardless, nice job and glad the clean install worked out for you. Good luck.
 
Jun 12, 2023
6
1
15
What you do for a GPT UEFI Windows 11 USB boot drive is, 1) download the ISO file from MS, 2) download the latest Rufus tool, 3)put in a blank USB, 4) right click Rufus and select “Run as Administrator”. 5) close all file explorer windows. 6) make sure correct drive is selected for USB, 7) select the windows 11 .ISO file, 8) turn type to non-CSM if you don’t need CSM ( should not) 9) select NTFS as format type 10 ) start, choose your options 11) when it’s done boot from that USB & install windows 11 UEFI, when complete turn ON secure boot in BIOS. Ok?