You are wise to ask questions BEFORE you buy.
1. Probably all is compatible. But if there are issues with ryzen, it is in the ram compatibility area.
Take the time to check the motherboard ram support list to verify that your ram kit is explicitly on the list.
Or... go to the silicon power site and verify that the selected ram is supported on your motherboard and cpu combo.
If you can't verify compatibility, pick another vendor. Not all seemingly compatible ram works with ryzen.
2. Your bios will be current at time of manufacture. likely, no action needed.
You will need internet access to do a lot of work.
Do you plan on lan or wifi?
You will need a wifi driver or a lan driver. If you are lucky, windows will load something suitable.
3. Thermal paste will come with the cooler. nothing special is needed. Buy a bottle of 92% alcohol to clean off the cpu if you should need to repaste.
4. Buy parts from a shop with a good return policy and reputation.
if you have a microcenter nearby, they have good prices.
If you buy from newegg or Amazon, buy only products sold and shipped directly. Not from affiliated vendors.
5. I think newegg has tutorial videos.
6. Buy a long #2 magnetic tip philips head screw driver.
A small flashlight can be helpful.
7. Nothing wrong with multiple m.2 drives.
8. I prefer to have just one large m.2 C drive for everything.
It makes space management easier. Do not chase impressive synthetic benchmarks, we mostly do small random i/o and that differs little.
9. Nobody knows what you might want in the future.
Likely cpu or gpu upgrade. Looks like you can handle either.
850w is a reasonable wattage, but, I would prefer to buy a higher quality psu with a 10 year warranty.
Perhaps, even 950w. Modern graphics cards can have some very high peak demands that only a really good psu can handle.
Over provisioning a psu is good, it will only draw the power demanded of it, regardless of the max capability.
Here is
MY build process:
Before anything, while waiting for your parts to be delivered, download
and read, cover to cover your case and motherboard manual.
Buy a long #2 magnetic tip philips screwdriver.
A small led flashlight is also useful.
I find it handy to buy a power switch like this for testing.
https://www.newegg.com/p/N82E168121..._switch-_-12-119-009-_-Product&quicklink=true
1. I assemble the critical parts outside of the case.
That lets me test them for functionality easily.
A wood table or cardboard is fine.
2. Plug in only the necessary parts at first. Ram, cpu, cooler, psu.
Do not force anything. Parts fit only one way.
Attach a monitor to the integrated motherboard adapter if you have one, otherwise to the graphics card.
3. If your motherboard does not have a PWR button, momentarily touch the two pwr front panel pins with a flat blade screwdriver.
4. Repeatedly hit F2 or DEL, and that should get you into the bios display.
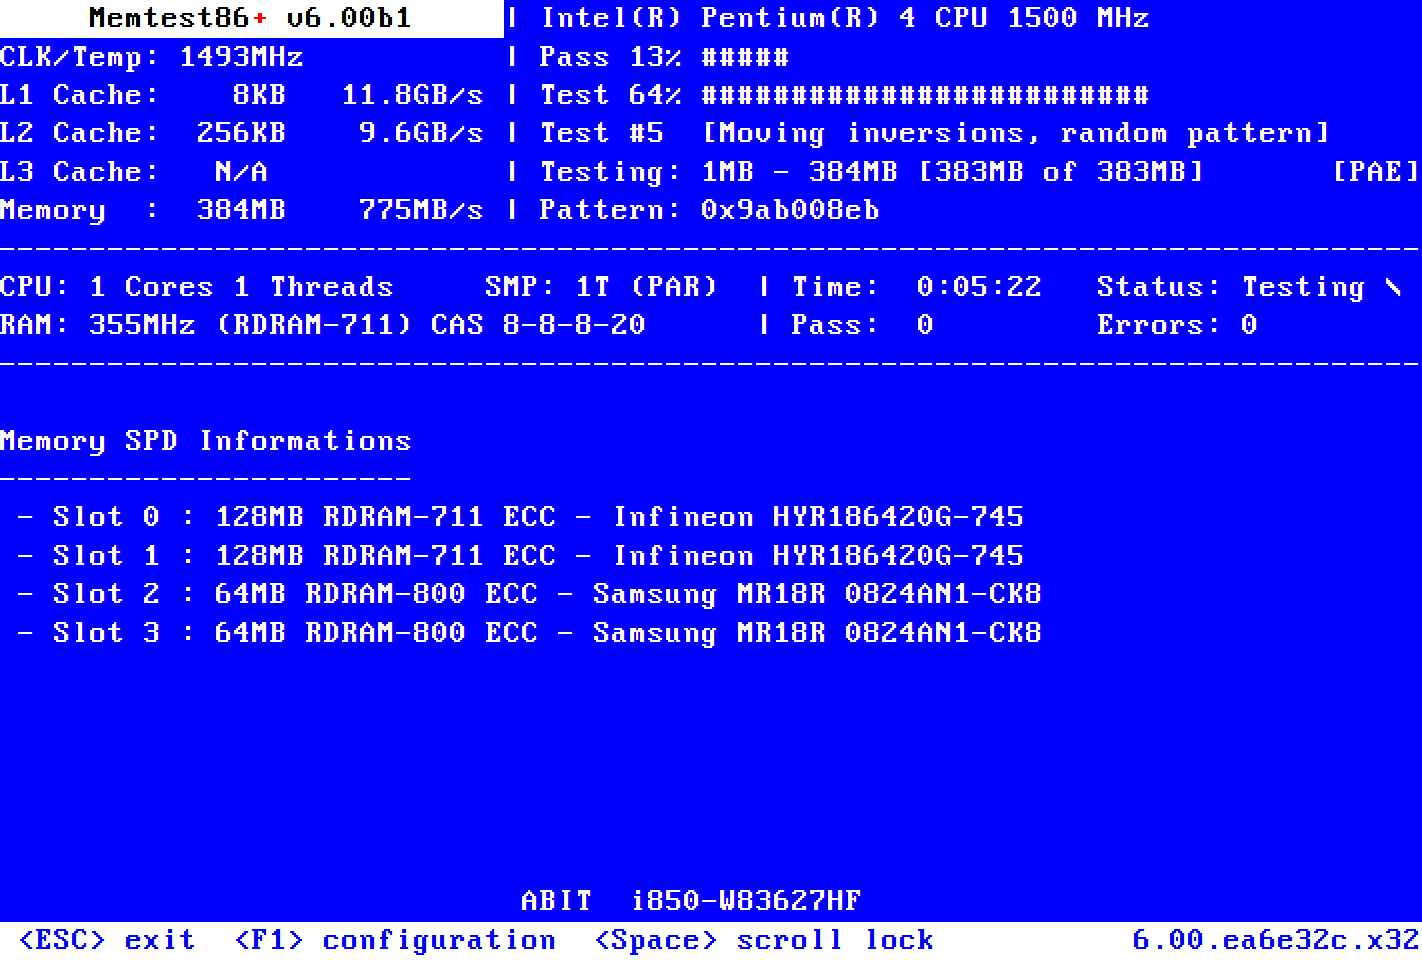
5. Boot from a cd or usb stick with memtest86 on it. memtest will exercise your ram and cpu functionality.
They boot from a usb stick and do not use windows.
You can download them here:
MemTest86 is the original self booting memory testing software for x86 and ARM computers. Supporting both BIOS and UEFI, with options to boot from USB.
www.memtest86.com
Memtest86+ is an advanced, free, open-source, stand-alone memory tester for 32- and 64-bit computers (UEFI & BIOS supported)

www.memtest.org
If you can run a full pass with NO errors, your ram should be ok.
Running several more passes will sometimes uncover an issue, but it takes more time.
Probably not worth it unless you really suspect a ram issue.
Opinions vary on updating the bios.
Normally, one does not update a bios unless there is a fix for something that is impacting you. I violate this rule on a new build and will update to currency up front.
Use the usb option, not the windows option.
If there is a severe problem, the impact is small.
6. Install windows.
7. Install the motherboard cd drivers. Particularly the lan drivers so you can access the internet.
Do not select the easy install option, or you will get a bunch of utilities and trialware that you don't want. Drivers only.
7. Connect to the internet and install an antivirus program. Microsoft defender is free, easy, and unobtrusive.
8. Install your graphics card and driver if you tested with integrated graphics.
You will need to remove the graphics card later to install your motherboard in the case.
As a tip when screwing the motherboard into the posts, give the screw a small counterclockwise turn until you feel a click.
That lets you know that the screw will engage properly.
Make a note of how the graphics card latches into the pcie slot.
The mechanism will be hidden under the card and may be difficult to work if you have not previously checked how.
9. Update windows to currency.
10. Only now do I take apart what I need to and install it in the case.
11. Now is the time to reinstall your graphics card.