***READ FIRST*** Tom's HW Watercooling Sticky v2.0

Status
Not open for further replies.

rubix_1011

Contributing Writer
Moderator
Introduction

ZrEipDG.jpg


Welcome to the world of watercooling.

This guide is meant for those looking to get into watercooling or considering it as a cooling option and hobby. There is an incredible amount of information around the web and I am going to make an effort to consolidate as much as I can to help provide an encompassing guide to help as much as possible. This guide is updated as needed; please reference the update notes (link) for additional details.

Watercooling isn't simply just a cooling solution; it's just as much of a hobby for most of us. The concept of adding water into a box full of electronics seems foolish for most, very uncertain for many, and for the rest of us who do watercool... we wouldn't consider any other cooling solution. Watercooling works very similar to the cooling system in your car; the water pump circulates the water through the channels to various components that are producing heat. Water absorbs heat from a CPU block, video card block and other components, continues through connected tubing and moves to the radiator where air is forced through, cooling the water as it passes through multiple, narrow channels. The water continuously circulated throughout the loop for the process to continue. The main difference is that the water in your waterloop is typically running only 10-12C higher than ambient air temperatures and low pressure vs. near boiling and high pressures present in a car cooling system.

Watercoolers typically classify water or liquid cooling into 2 major subcategories of watercooling solutions:

1) 'Real' watercooling; consisting of a pump, waterblocks, tubing, radiator and often a reservoir; all of which can be mixed and matched with any other components to create a loop for your specific application. The pump is the metaphorical heart of your loop and typically all other components are chosen around this single component. We will cover pump info a bit later.

2) The introduction of the all-in-one or closed loop coolers over the past few years like the Corsair H50/H60/H70/H80/H100, Antec Kuhler H2O 620/920 products and other similarly designed pump/block/rad combos are products aimed at the novice who simply wants a simple, decent performing compact cooler with the added benefit of containing liquid coolant. Most of these coolers employ concepts used in full watercooling loops, but often with the cooling performance of moderate to high-end air coolers. Please see the section later in the sticky for more information on closed loop coolers.

Before you read much further, you'll need to determine your budget; this is one of the biggest factors in determining the right watercooling solution for you. It would also be incredibly wise to consider reading through 4ryan6's thread for air & watercooling initial questions:

Air Cooling vs Water Cooling : Things You Need To Know.

####################################################

Caution: When replacing the stock CPU air cooler with a water block you are removing the provided cooling to the motherboards voltage regulators, that air flow needs to be substituted with either a direct downdraft cooling fan, or increasing airflow over the entire area.

Neither the stand alone water block, nor the Pump/Block of a closed loop cooler replaces this needed airflow to cool the motherboards voltage regulators, neglecting to do this will shorten the life of your motherboard and in the overclocker's case, could shorten it significantly.

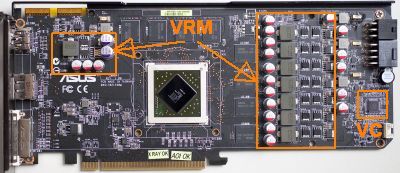
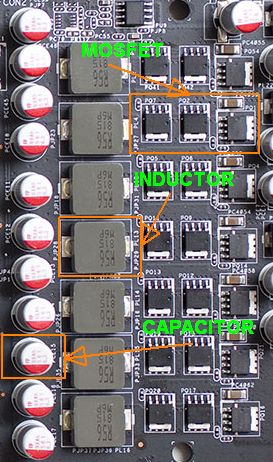
This is also true for using universal video card blocks as well. These cards rely on the stock air cooler to also cool vRAM, VRMs and MOSFETs on the PCB. When removed, they no longer have the heatsink to provide cooling they need and the addition of heatsinks will be needed to account for this. Also, good airflow is needed to adequately cool the added heatsinks, as well.

####################################################

Deciding on watercooling appeals to many people, but most aren't aware of the costs of getting started. Depending on expectations, you might determine it's not something that is needed. Here is how we typically determine budget/performance needs for a CPU-only cooling solution:

Less than $100 budget- Your best bet will likely be a good air cooler for your CPU. You can often find several closed loop coolers (LCS -liquid cooling system) in this price range. As mentioned before, most perform on-par with good to very good air coolers.

More than $100, less that $200- The XSPC and EK kits are some of the best values for the cost for a novice watercooler. They start in the $130 price range on most e-tailer sites and offer considerable performance for the cost. Swiftech Drive and Edge kits also can fall into this price range. Newcomer additions like the Swiftech H220/240-X and the EK Predator combine great, compact pumps with a solid radiator in a closed loop cooler package that is also expandable. In many kits, often there are price premiums for radiator or pump upgrades. It is also quite possible to piece together a custom loop for under $200. Recommended watercooling kits are linked below and discussed later in the sticky.
 

rubix_1011

Contributing Writer
Moderator

rubix_1011

Contributing Writer
Moderator
Generalized Watercooling Theory


Watercooling is based on the set of principles that water is proportionally better than air to conduct heat away from a heat source based on conduction, or the direct contact of a heated source and a cooling source to transfer heat energy rather than convection, otherwise known as thermal conductivity. The ability of a substance to directly absorb heat energy is considered it's specific heat; in this case, the ability of heat directly absorbed by water and the required energy to raise overall temperatures by 1°C. While convection takes place with normal air coolers to provide the ability for air to absorb dissipated heat from the cooler, watercooling also employs this concept to some degree. Once the water absorbs heat energy via conduction from the blocks, it then transfers that through tubing to radiators cooled by fans. The difference is that a larger amount of heat energy is able to be absorbed and moved at any given time with a water loop due to pump flow forcing turbulent water through the radiator tubes while the radiator provides greater surface area to conduct heat energy from the water to the radiator and then into the air. The process is more efficient at transferring, displacing and dissipating excess heat energy based on the delta-T of the loop design. In short, the ability of water's excellent specific heat allow it to absorb heat much more quickly and efficiently from a source of heat (as well as also dissipating that heat back to a cooling source for dissipation) so it can also transport far more of that absorbed energy due to the thermal capacity of it as a medium away from heat sources to be expelled elsewhere.


Thermal Conductivity of Common Cooling Mediums (@~20°C; W/mK)
Higher values are better

Water...............................................0.610
Mineral Oil........................................0.162
Alcohol(Ethyl, Isopropyl, Buytl)...........0.161-0.200
Ethylene Glycol..................................0.258
Air...................................................0.0257


Specific Heat of Common Cooling Mediums (@~20°C;kJ/kg.K)
Higher values are better

Water...............................................4.19
Air...................................................1.00
Mineral Oil........................................1.67
Copper.............................................0.093
Ethylene glycol..................................2.36


There are a lot of discussions around mineral oil submersion cooling, and while this is a watercooling forum, it often gets brought up as a topic. That being said, here is a link to a maintained index of mineral oil discussions that either have originated in this forum or referenced as one of those discussions.

Mineral Oil Q/A Links


Return to Link Index
 
  • Like
Reactions: Ertrius

rubix_1011

Contributing Writer
Moderator
TDP & Calculating Delta-T


When it comes to figuring out how much radiator you need for your specific loop, you have to start doing some math. I know that we all have been building a loop and thought, ‘how many, what size and what kind of radiators do I need for this loop to stay cool like I want?’ The first thing to remember is that delta-T in a watercooling is the direct relationship of load temperature of the water in your loop when compared to ambient air temps. If your room ambient air temperature is 27°C, and load water temp is 34°C, this gives you an approximate Delta of 7°C - assuming you are running 100% load on all components being cooled by the loop. Basically, delta-T is a mathematical derivative of your ambient room temperature, flow rate, heat to be dissipated (in watts - loop TDP x 85% at load) and the ability of your radiator to dissipate heat (in watts) depending on fans used to produce the cooling impact by the loop as a whole. While this sounds complicated, let me say that yes, it can be if you make it, but it doesn't have to be overly difficult if you keep it simple. We're going to attempt to do both for explanation and comparison.

First tip: Google is your best friend to help find TDP (Thermal Design Power) of your components to be cooled in your loop.

Finding out what the TDP or your CPU or GPU is can be as simple as doing some web searches by; ex. Google for ‘i7 2600k TDP', ‘GTX 580 TDP’, or ‘AMD 6970 TDP’. Remember to account for all components…if you run a multi-card graphics setup, you need to include the TDP values for all cards in the total. For example, our i7 2600k has a stock TDP of about 95 watts at 100% load (estimated). If we have a 2x SLI setup of GTX 580’s, we are looking at about 244 watts at 100% load, per card. Total? About 583 watts in heat that these three components can potentially produce when at 100% load, simultaneously; it's also safe to consider that heat dissipation can never be 100% efficient of power consumption, so even calculating 85-90% of your TDP total is pretty safe. (This also translates very closely to wattage when you need to consider a power supply for your system, but you need to account for the remaining components: motherboard, fans, hard drives, DVD drives, etc.

To help calculate a full system TDP, you can download the interactive TDP and radiator estimation sheet (link) I put together to help you.

pG2LO7e.jpg


In short, when calculating loop TDP, simply add up the total values for components being cooled in the loop...if you have more than one video card, make sure you add in TDP for each one. If you want to simply calculate the overclocked TDP wattage of your CPU, just adjust the CPU section of the calculator or utilize the calculation listed a bit later. Also, don't forget that your pump also pulls power and since it is essentially watercooled by the loop, you need to account for 15-30 watts for it when calculating your TDP total. You also need to account for any other component in the loop, like RAM or motherboard chipset blocks. If your CPU is overclocked, you can find your 'new' TDP by the simple math example listed further below in this section.

(CPU watts @load + GPU watts @load + GPU watts @load+ pump watts) x 0.85 = Loop TDP watt estimate

Once you have calculated your total loop TDP potential, you need to consider radiators that dissipate heat in watts depending on flow rate of your loop and fans being used and their speeds/power.

Granted, TDP and determining our delta-T isn’t an exact science, but learning what it is and how to understand it, gets us pretty close. Overclocked GPUs are difficult to calculate 'new' TDP, but many people estimate an additional 50-100 watts per GPU, depending on how aggressively it is overclocked and the voltage required to reach those clock speeds. It’s a bit tedious to calculate CPU overclocked wattage; however, here is a great calculation to help CPU overclocking and estimated TDP:

OC Wattage = TDP * ( OC MHz / Stock MHz) * ( OC Vcore / Stock Vcore )^2

Example:
Intel i7 2600k
3.4ghz (3400mhz)
1.25v
95 watts TDP

For this example I will use a relatively average overclock voltage of 1.35v to reach 4.5ghz (4500mhz)

OC Wattage = TDP x ( OC MHz / Stock MHz) x ( OC Vcore / Stock Vcore )^2

OC Wattage = 95 x (4500/3400) x (1.35/1.25)^2

OC Wattage = 95 x (1.3235) x (1.08)^2

OC Wattage = 95 x 1.3235 x 1.1664

OC Wattage = 147 (which is exactly what was calculated by the PSU calculator for overclocked CPU watts on this chip)

Now, calculating Delta-T is nothing without understanding flow rate and how loop restriction impacts your flow. A watercooling pump always has specs (or should always have specs) about unrestricted flow rate and maximum head pressure. Flow rate being the maximum rate of water (usually in gallons per minute or hour (GPM/GPH) or liters per minute or hour (LPM/LPH). If you aren't familiar with either metric or imperial measurements, there are plenty of converters that can be found on Google on how to calculate them - or see the simplified equations below to calculate for the desired volume/time. Also remember that if your flows are listed in 'hours' but you'd rather hone that into the more familiar 'minutes', make sure you are converting on the correct time value.

LPM to GPM:
Liters per minute x 0.1642

GPM to LPM
Gallons per minute x 3.7854

LPH to LPM
Liters per hour / 60

GPH to GPM
Gallons per hour / 60

GPH to LPM
(Gallons per hour / 60) x 3.7854

LPH to GPM
(Liters per hour / 60) x 0.1642

Pressure drop in components happens any time flow takes place outside the confines of the inlet/outlet of your pump. In short, anytime you add tubing, fittings, blocks, radiators, etc to your loop, you introduce restriction which leads to pressure drop. Just how much depends on the pressure drop that is incurred by each component at a specific flow rate, but can be calculated by the difference in inlet pressure and outlet pressure of each component, if you were to measure it. For example, if your loop runs at 1.5 GPM, your overall pressure drop per component will be higher for each component than if your loop were to run at 0.75 GPM. Remember, pressure and flow are directly related to one another. Many benchmarking and testing charts show pressure drops for components being tested: radiators, blocks and even fittings and reservoirs in some instances.

[video="https://www.youtube.com/watch?v=qgSRg5vF4EM"][/video]


Return to Link Index
 
  • Like
Reactions: Ertrius

rubix_1011

Contributing Writer
Moderator
XFYPgbu.jpg

Radiators & Fans


The radiator is the heat exchanger for your water loop; water passes into its thin channels which run parallel down and back with small fins to help dissipate the heat. They are typically rectangular and match fan sizes commonly for 120mm and 140mm fans, but there are others to match 200mm fans sizes as well. Most radiators used are the 2x, 3x or 4x of these 120-140mm versions, but there are large radiators that also use 4, 6 or 9x 120mm fan-size in a grid pattern for a very large rad. There are also 180mm and 200mm rad sizes out there for several different fan placements and mounts for newer cases with larger footprint fans.

Radiators are typically listed and classified with FPI or 'Fins Per Inch'; this means that for every 1", there are 'X amount' of heat dissipating fins. Common low FPI rads are 7-11 FPI, while high FPI models are 20-30 FPI. This is important to understand as it directly relates to the radiator's performance (more FPI = higher cooling potential), but take note: this also means higher CFM fans with very good static pressure to move air over the densely packed fins. Higher CFM and static pressure fans are often more costly than lower speed fans that can be used for lower FPI rads. While the FPI-to-expensive-loud-fast-fan concept is a good rule of thumb to maximize performance of a 30 FPI rad, there isn't anything that says you have to run these kinds of fans on them, as normal, mid-range fans also perform quite well despite the extra FPI restriction. Expand the image below for an example of low vs. high FPI.

xzWOKWL.png

(Images from SkinneeLabs.com)

Again, Skinneelabs.com has a very good radiator comparison and benchmark; triples are the most commonly implemented radiators, but they are also mainly used to keep an apples-to-apples comparison among the tested radiators. Once you start talking radiators, you start talking Deltas; or the difference in temperatures in comparison to ambient room temperatures and the water inside your loop. Most folks run a modest 10-12°C delta or even slightly more. Once you get below 10-8°C of Delta, you are getting your water temps closer to ambient. While I'm not a thermodynamic fluid engineer, there are some fairly easy-to-read explanations on Deltas around the web and you likely have already read my short description earlier in the sticky.

Also, be aware that there are two main radiator designs: dual pass (more common) and cross flow. The image below should provide enough description to give you an idea of how each works. Dual pass radiators are typically a bit more efficient due to the added turbulent flow and speed due to only running each direction in half of the radiator tubes whereas a cross flow rad has all flow in all tubes going in the same direction...the result is lower restriction but at a cost of less turbulent flow. Turbulent flow = increased water surface contact with the radiator tube metal which is wicked out by the fins and ultimately moved into the ambient air via airflow from fans.

VAZlC0m.png


I've put together a chart that defines some different cooling properties of common radiators and their cooling potential based on total volume in cubic millimeters (mm^3). The list below is ranked based on thermal coefficient; essentially a product of a radiator's heat in watts for a 10°C delta-T with 2000rpm fans divided by total radiator volume to achieve the average cooling potential of all 15 radiators listed and reviewed by skinneelabs.com/water-cooling-radiators.

This can also be used for a very quick cooling performance estimate for total volume of a radiator based on the average thermal coefficient:

[volume LxWxH in mm]
(LxWxH) x 0.00023129193 = Watts dissipated for 10°C delta-T (estimated)


0wruplP.png


SBRBgmy.jpg

Fans


When it comes to deciding on fans to use on your radiators, there are several sources around the web with comprehensive testing; including from one of our own, 4ryan6, who has a great fan guide. Be sure to read through the links below for questions and comparisons on many fan manufacturers.

Tom's Hardware, Cooling Fan Roundup 2012 -by 4ryan6

xTremeSystems.org Fan Roundup #1 -by vapor

XS-Fan-Review-Part-2 -by vapor

Xbit Labs 120mm Fan Roundup, Part 1 [< 1350 rpm]

Xbit Labs 120mm Fan Roundup, Part 2 [> 1350 rpm]

When considering radiators, fans and mounting of both, be sure to check the correct screw and thread size (as well as length, depending on application) for the radiator(s) you are using in your loop:
rad_thread2.jpg


Overclockers.com, Guide to Delta-T in Watercooling by Conumdrum

Skinneelabs.com/Radiators]


Return to Link Index
 
  • Like
Reactions: Ertrius

rubix_1011

Contributing Writer
Moderator
NwvSTmE.jpg

CPU Blocks


The CPU block is milled chunk of copper with inner channels and pin matricies to allow heat to pass from the block into the water loop as effeciently as possible. The most comprehensive testing and comparison is being done by Martin of Martin's Liquid Labs (semi-retrired) and Skinnee of Skinneelabs. Each has several comparisons, reviews and benchmarks on many different CPU blocks including current and older models. Take time read through tests and comparison reviews for blocks you might be considering as this will give you some understanding of how they perform compared to others.

In general, most CPU blocks are good performers, with some doing margainally better than others. Revisions typically improve minor features which then, in turn improve temperatures which include flow rate, impingement jets, matrix pins, convex/concavity to match blocks and even base thickness.

####################################################

Caution: When replacing the stock CPU air cooler with a water block you are removing the provided cooling to the motherboards voltage regulators, that air flow needs to be substituted with either a direct downdraft cooling fan, or increasing airflow over the entire area.

Neither the stand alone water block, nor the Pump/Block of a closed loop cooler replaces this needed airflow to cool the motherboards voltage regulators, neglecting to do this will shorten the life of your motherboard and in the overclocker's case, could shorten it significantly.

####################################################

Skinneelabs.com CPU Blocks

MartinsLiquidLab.org CPU Blocks

Overclock.net 22 CPU Waterblock Test/Roundup - by Bundymania


Return to Link Index
 

rubix_1011

Contributing Writer
Moderator
GPU Blocks


Whether you are looking for a full-cover GPU block or a universal block to use on several cards for future builds, the GPU block is one of the best ways to keep your graphic cards cool and quiet at the same time. Most nVidia and AMD cards these days run incredibly hot and this in turn requires louder fans; watercooling can easily drop your temps by a very large margin and eliminate GPU fan noise. Most graphic cards are designed to run at temps up to 100C, but most typically see load temps of 65-85C depending on chip and case airflow. With watercooling, it's typical to see these cards often run 30-40C cooler at load. If you go the route of a universal block, you'll definitely want to consider RAMsinks to affix to your vRAM modules since they will be sitting naked, without the ability to dissipate heat very well. If you opt for full cover blocks, be absolutely sure that your card follows reference design or ensure the block you are buying is milled for the exact PCB layout for your card. Many graphic card manufacturers do not always follow nVidia or AMD reference PCB when producing their own versions of cards- typically, these are cards that have different cooling solutions, different listed TDP, higher vRAM capacity and other notable board layout differences.

One thing to note is whether your GPU may or may not have an IHS (Integrated Heat Spreader) over the GPU. Some EVGA GTX 580 models were produced as refernce PCB cards, but some had an IHS, some were no-IHS design. It is extremely important for you to know which model of card you have before attempting to fit a water block to your card (especially EVGA of this model). Blocks that are not matched correctly for IHS/no-IHS cards will not seat on the GPU correctly and will likely cause permanent damage to the card.

The following images and link are courtesy of 4ryan6; he outlines his experience with two GTX 580's; one IHS card, one no-IHS card.

(images broken, removed)

Permalink to 4ryan6's Sub-Ambient Watercooling Thread - GPU/IHS section

Universal GPU blocks - Additional cooling considerations

(written and contributed by forum member, lunaticwoda)
To cool a GPU with a universal block, we need to talk a little about Mosfet/VRM cooling in relation to water cooling GPU's with universal blocks that do not cover these chips. First Will talk very briefly about what these things are and what they look like and why they are important to you.

VRM (Voltage regulator module)
The simple expanation of VRM is simple, it is a device that is a DC-DC converter it basically takes the higher voltages that are sent to our video cards and lowers it so the cards can use it properly.

Now VRM typically is composed of three parts.
  1. Logic Device (the thing that controls the things that give us the correct voltages/amperages)
  2. Power device (the things that give us power)
  3. Filtering device (filters the power)

Now that we know what VRM basically is lets talk about what is physically is. Below is a picture of a Asus EAH 5830 showing what is actually what.

asus_eah_5830_pcb.jpg


Now to the very far right we have the VC thats that logical controller that is dealing with our power. For cooling purposes this is typically something that is not in need of specialized cooling, granted if you can do it more power to you. Now you will also see the VRM area and this is the area of focus.

asus_eah_5830_vrm_details.jpg


Above you see we have our Transistors/inductors these are the (filtering device) that are used for smoothing out the proper power to our MOSFETS. You will also see the mosfets these are the things that actually send the proper filtered current/amperage to the GPU. (Side note a inductor/transitor/mosfet set are consider a phasepower so when you read like a mobo or card has a x number of phases its referring to this stuff!

Now the reason you want to cool these...
Naturally the inductors and mosfets tend to generate ALOT of heat when they are dealing with such high amps and changing them into fun useful power so its critical we keep these components as cool as possible especially in high end video cards that are very high amperage. If overclocking your cards I would strongly reccommend a full water cooler solution as most of these water blocks are designed to cool the VRM of the cards. But in instances where you need to use a universal I would STRONGLY recommend using cooper heatsinks and applying them to the mosfets and inductors, and it is highly advisable to also ensure adequate airflow over these components to replace the airflow otherwise supplied by the stock air cooler. If it isn't cooled by water, make sure it's cooled with air!

Potentially when these components overheat it translates to articles on a video card or a system crash because the wrong voltage was going to the GPU.

Thanks to geek3d for the images
And if interested in a far more detailed look into mosfets and VRM here is a link to a very good article

geeks3d.com - Graphics Cards Voltage Regulator Modules (VRM) Explained


Return to Link Index
 

rubix_1011

Contributing Writer
Moderator
REeLEct.jpg

Pumps


The heart of your loop; it's what makes everything move and is a requirement in every watercooling or liquid cooling loop. The most comprehensive testing is done by Skinnee and Martin and each have dedicated material on their sites for pump testing and reviews. Consider (strongly) to giving the links below a lot of reading to determine the performance of many common brands of pumps. Also, make sure to read up as much as possible on Skinnee's pump breakdown and reviews Skinneelabs.com Pump reviews, linked below.

A large number of people use Laing rebranded pumps: the Swiftech MCP350, MCP355, and MCP35x (link) are all different versions of the Laing DDC line of pumps. The Swiftech MCP655 is the Laing D5 or D5 vario (variable speed). The same pumps are also resold by Koolance, Aquacomputer and Danger Den as well.

Jingway pumps are often used in the EK kits as well as some of the DangerDen kits; they are typically a square 'box' looking pump.

There other pumps as well; this is only a short list of most commonly used pumps.

Depending on flow rates, loop restriction, loop complexity, desired delta-T and calculating pressure drop, you can use the following thread to help identify considerations when choosing the right pump for your loop;

xTremeSystems.org, [Skineelabs] The Pump Thread -by Skinnee

Skinneelabs.com/Pumps

MartinsLiquidLab.org - Pumps

'What can my pump handle? A guide.' - by charliehorse55 of Overclock.net

Martin's Liquid Lab Pump/Radiator Optimizer Worksheethttp://martinsliquidlab.org/pump-and-radiator-optimizer-spreadsheet/ Flow Rates- Pump/Radiator/Block flow and performance estimation tool from Martin's Liquid Lab

'Watercooling Pumps' - Excellent pump breakdown by ricecrispi of ExtremeOverclocking.com

'Choosing The Best Pump for Your WaterCooling System' - by MaxxRacer of xTremeSystems.org

You'll need to download one of the linked Excel sheets to use and input your various watercooling loop components to help determine flow and performance expectations for your loop. While this is not 100% accurate or fool-proof, it does provide an excellent performance baseline of your loop in terms of flow rates and ultimately, calculating your delta-T based on radiators used, flow rates and ambient temps as well as other variables for your specific setup.

Common Pumps

Laing DDC variants
GQatzrn.jpg


Swiftech MCP350 (outdated)
Swiftech MCP355/Koolance PMP-400


Laing DDC pumps are rebranded by several vendors but all essentially are the same pump depending on PCB and rotor being used.
Laing DDC (DDC2-2.5)

Max Flowrate:..........2.3 GPM
Max Head:...............16.5-23’
Stock fitting size:.....3/8” Hose Barb (aftermarket tops typically allow G1/4 fittings of any size)

Swiftech MCP35x
kxstdck.jpg


The MCP35x is a Swiftech-only pump that introduces PWM into a watercooling pump using a customized PCB and controller and top for improved flow and head pressure.

Swiftech MCP35x:

Max Flowrate:..........4.5 gpm (17.03 lpm)
Max Head:...............15-17’ (4.6m -5.2m)
Stock fitting size:.....G1/4 fittings

Laing D5 variants
yIUR64A.jpg


Swiftech MCP655/Koolance PMP-450

Like the Laing DDC, D5's are sold under various names, usually with a '655' naming convention. There are two main types, Vario (speed control 1-5) and non-Vario (set speed of approx. 3.5.-4).
Laing D5:

Max Flowrate:........5.25 gpm (19.87 lpm)
Max Head:............13.5-19' (4.11m - 5.8m)
Stock fitting size:...1/2” Hose Barb (aftermarket tops typically allow G1/4 fittings of any size)

Jingway
pRWIyYv.jpg


Jingway pumps are often re-sold as Danger Den or EK with their kits as their primary pump line. There are often two different models of this pump offered; a 10 lpm and 15 lpm version. Listed below are specs for the 15 lpm model.

Jingway DP-1200:

Max Flowrate:........3.52-3.96 gpm (13.32 -15 lpm)
Max Head:............13.12' (4m)
Stock fitting size:...G1/4 fittings

5xyacY7.jpg

Iwaki

Often considered the king of watercooling pumps, Iwaki has some of the highest flowing and strongest pumps you can buy. They are often reserved to the extreme class of watercooling loops as they are typically rather expensive by comparison to other pumps listed here.

Iwaki model RD-30:

Max Flowrate:........5.3 GPM (20 LPM)
Max Head:............33 FT (10m)
Stock fitting size:...G1/4 fittings


Kpw8llw.jpg

Eheim

Eheim pumps were once widely used by enthusiasts prior to the D5 and DDC's becoming mainstream. They are a robust pump, although they offer less in the way of head pressure of other commonly used pumps, so they aren't suited well for restrictive loops. Many models are also A/C powered, meaning you will need a relay switch to trigger the pump with your power supply on/off cycle...this also means they draw more power to run; more power draw means more heat dump into your loop to account for.

Eheim model 1248:

Max Flowrate:........2.64 GPM (10 LPM)
Max Head:............6.56 FT (2m)
Stock fitting size:...G3/8 & G1/4 fittings

Eheim model 1260:

Max Flowrate:........10.57 GPM (40 LPM)
Max Head:............12.7 FT (3.7m)
Stock fitting size:...G1/4 fittings


Return to Link Index
 

rubix_1011

Contributing Writer
Moderator
e3bRsKX.jpg

Tubing and Fittings


Tubing can be as generic as the hardware store vinyl tubing at your local Ace Hardware, Home Depot or Lowes or as complex as the Feser, Primochill, Masterkleer or Tygon brands you find online among other watercooling components. Your average hardware store vinyl tubing is typically thin walled and does not make tight radius bends well, while your premium brands are very flexible and come in most commonly used ID and OD tubing sizes for watercooling as well as in many colors. If you are needing some good bends made, consider getting good tubing, but understand most is upwards of $1.50-$2.50 per linear foot.

Fittings are one that cause a lot of confusion for most newcomers. Here is a simple way to understand the terminology that accompanys each:
HpvEk82.jpg

I.D. - Inside diameter, most commonly referring to the ID of the tubing to be used. 1/2"ID means that wall to wall, the inside of the tubing measures 1/2" (metric is also used and is measured in millimeters or mm)

O.D.- Outside diameter, similar to the ID, the OD simply is the measurement of the tubing through the cross-section from one side of the outer wall to the other.

G1/4 - This is the one that confuses the most people. This refers to the threaded fitting standard that is used by almost all waterblocks and radiators. It is the end of the fitting that gets screwed into the block or rad; the other end of this same fitting is measured with the I.D. standard for tubing size. If you are unsure if the threaded fitting size is G1/4 double check before threading the fitting as you can easily cross thread a fitting that isn't using this standard.

Barbs- Barbs are very common and have been used as the primary fitting type in watercooling for many, many years. It offers a threaded end for connection to radiators, blocks and reservoirs and are typically G1/4, but other standard sizes have been used as well. Once the barb is threaded into the applicable port and secured, the tubing slides over the 'barbed' end which help secure the tubing, usually with some kind of clamp for extra precaution. You can also use a slightly larger barb size than tubing size for a more snug fit; ex. 7/16"ID tubing over a 1/2"ID barb. This will require you to dip the tubing ends in hot water to soften in order to slide them easily over the fitting end.

el7I26a.jpg


Compression Fittings - These fittings are actually the combination of a barb and a clamp into a fitting that secures the compression ring onto the fitting by threading it down. The threaded end of the fitting is installed as it is with a normal barb, and prior to pushing the tubing over the barb, ensure the threaded compression ring is slid over the tubing with the threads facing the correct way. Push the tubing over the barb and then slide the compression ring down over the barb and thread/secure to the fitting itself. This clamps and seals the tubing in place.

U5BFSax.png


Return to Link Index
 

rubix_1011

Contributing Writer
Moderator
okoBZAu.jpg

Reservoirs


A reservoir or 'res', as it is commonly called, really does a couple of things. First, it holds excess water for your loop which can make it easier for you to fill your loop. Typically we recommend that the reservoir feed into your pump for this purpose; it keeps air from entering the pump which can damage the bearings as well as keep air from collecting in your blocks and radiators further along in the loop. Secondly, it allows a place for air bubbles to collect and disperse out of the loop. This is important when filling and priming your loop; you don't want air hiding out in your radiator or getting sucked in large masses back through your pump. Remember, air is a poor conductor of heat compared to water and air in your radiators can cause you to lose the cooling ability for the volume of air trapped in your radiators.

Some reservoirs are tube-shaped, some are rectangular...some are 5.25" bay mounts (with/without pump) and some are integrated into tops as attachments for pumps. Take time to consider the type and placement of your reservoir and whether or not it will also house your pump to save space and give a clean look.

A reservoir is not a requirement and can be substituted by integrating a fill port or 'T' line. A T-line is basically a separate line of tubing that is split from a main segment of tubing via a 'Y' or 'T' fitting and typically is just prior to the pump inlet in the loop order to allow for easy filling and priming of the pump. It also doubles as a location for air to collect, but can be more difficult to bleed air as it tends to miss the general flow of water and air bubbles as they are pushed through the loop due to high flow rate.


Return to Link Index
 

rubix_1011

Contributing Writer
Moderator
Building & Filling a Loop


When you get all your new components, take some time to inspect and rinse all components; you'd be surprised how much debris, flux, gunk, etc that gets left inside components. A little time now can save you headaches later due to a piece of plastic or metal that might get lodged somewhere it shouldn't. Hot water and soap can help clean all your goodies; rinse VERY well with clean tap water- final rinse (or 2) with distilled. Hot water and vinegar can be used, but typically vinegar soaks are reserved for your teardown and inspections to remove oxidation or any other gunk that might be present.

You'll need to install your blocks by following the directions that came with each component. For the most part, if you've come this far, you already have an idea of your loop layout, understanding of how to install and where. If not, ask or Google your case with watercooling...you'll find a lot of examples. Also, YouTube is an excellent place to see step-by-step videos on how to do stuff. Give it a few minutes and see what you find. Most CPU and GPU blocks have a walkthru on how to remove the stock cooler and install the waterblock.

When installing fittings- do not over-tighten! Almost all fittings use O-rings, so you should only need to get them finger tight. No tools, or you might end up with some micro-fissure cracks...not good, especially in acrylic reservoirs.

Assemble your blocks with fittings and then begin to route your tubing. Give yourself some room and don't sell yourself short. It's better to trim a couple inches of tubing than have to order all new tubing because you cut it all too short. You want easy bends, if at all possible. If that isn't possible, you have a few options. 1. Rotary fittings or different connector fittings to make bends. 2. You can get the bends to stay at permanent tighter bends by filling the tubing with something that doesn't allow it to kink or flatten when making the bend. Salt, a large spring, smaller diameter tubing...these all work. Simply insert into your tubing and bend...then dip into boiling water for several seconds. Then dip into ice water and repeat a handful of times. Once done, your tubing should be set in a tighter bend without a kink. This takes a little practice.

Once tubing is routed, make sure all fittings and clamps are tight. Begin filling your reservoir with water and cycle the pump via power. Most people unplug the ATX plug from their board (highly recommended) and jumper any green to black wire with a paperclip. You can also buy some specialized power supplies that provide minimal power to a single molex, these also work great. Regardless, you don't want any power going to anything other than your pump, if possible. Your fans might spin up, but that's fine. Cycle power on until the pump sucks the water almost all the way down, power off. Refill the res, repeat as necessary.

Make sure to note the location of the ATX tab in relation to each wire. Jumper the green wire (ATX tab up, 4th from the left) with any black wire. Personally, I jumper the adjacent black wire (ATX tab up, 3rd from the left) since it's closest, but green to any black will work:

LwiV3MB.png


Once you have the loop filled, you'll want to let it run in the above manner for several hours, checking every 15 minutes or so for the first hour. Overnight running would be good for the first time user, but only once you are sure there are no immediate leaks. Keep paper towels handy and around fitting areas...check for dampness. If none and you've leak tested for at least a few hours, you are likely good to go.

Below is a good example video of filling a watercooling loop:
[flash=480,360]http://www.youtube.com/v/777JcqPVgLU[/flash]

------------------------------------------------------------------------


ZPImVvA.jpg


Additives, Corrosion and the Unknown

Almost all seasoned watercooling veterans will tell you to use only distilled water and either a biocide (such as PTNuke or similar) or a KillCoil...or both. A killcoil is a coil of .9999 pure silver that you drop into your reservoir to inhibit growth of algae and other critters. Most will highly advise against using premixes; some of these even precipitate out and can clog your blocks (FeserOne has a nasty reputation of doing just this).

First, a few things we need to add as a disclaimer, specifically aimed toward owners of EK nickel plated blocks; be aware that PTNuke Cu solution and silver killcoils *may* cause some nickel corrosion on some EK block models and will likely void the end-user warranty for repair or replacement. (per EK's customer support)

All blocks bases are made of electrolytic copper.
Nickel plated blocks are milled of copper and then plated with fine thin layer of nickel.

When cleaning blocks please do not use any aggressive chemicals (neither vinegar) or rough materials as you may damage block and void warranty.

Using corrosion inhibitors is highly recommended as nickel plating does not prevent corrosion of metals when environment for galvanic effect is created (mixed metal,...).
Please note also that due to presence of UV additives and other chemicals nickel layer may also become discolored/stained over time period.

This also is loosely applied to using a killcoil and PTNuke (copper sulfate solution)- these can cause unwanted chipping, staining or corrosion when used with EK nickel plated blocks. While this typically infers the older versions (newer versions 'shouldn't' have the corrosion problems), they generally have been concluding that silver killcoils and PTNuke Cu solution in distilled is causing some of these issues. This, however, cannot be completely confirmed. Just a bit of info for everyone.

While on the topic of corrosion and mixed metals, there are a lot of questions that arise from 'what mixed metals in my loop warrant corrosion protection'? In the simplest terms, as long as you avoid components that are constructed with aluminum (cheaper radiators and fittings, typically) you should be just fine. There have been issues with nickel plating from some manufacturers, but that is more from the actual plating process than from the actual nickel.

For reference, the following metals are generally accepted as being fine for use in the same loop together:

Copper, Nickel, Brass, Gold, Silver.

Avoid Aluminum with any of the above (aluminum that comes in contact with the water/coolant - copper or brass radiator tubes & tanks are fine with aluminum fins as the fins do not contact water/coolant).


Return to Link Index
 

rubix_1011

Contributing Writer
Moderator
Closed Loop Coolers
contributed by Lutfij

G09pEN7.jpg


Closed Loop Coolers
All-In-One coolers
All-in-One Closed Loop Coolers
Prebuilt Watercoolers

we know what all the above mean... As of late 2008 Corsair managed to take a design only available in Alienware hardware provided by Asetek and made it available to the public via their Hydro series of coolers. On paper it was a breakthrough, but for seasoned vets this made the line between custom/kit loops blur with pre-built units that offered the advantage of no maintenance and only needed to blow compressed air through the fins of the radiator if temps went a lil bad(possible during scheduled rig cleaning).

Since then others have joined on the prebuilt bandwagon: Antec, Coolermaster, CoolIt , Thermaltake to name a few. Asetek were the bulk manufacturer of coolers until a few mergers took place. Corsair now are in joint venture with CoolIt while Antec are in line with Asetek solutions.

Some brands (and their units) to consider while shopping for C.L.C's are:

Antec's Kühler H2O series come in with their 620/920 units respectively
Corsair's Hydro (also referred to as the Hxx) series units - H40/50/60/70/80/100
CoolerMaster have one in the pipelines dubbed Eisberg 120/240
Thermaltake have their Bigwater/Water 2.0 (Performance/Pro/Extreme) lineups

Tubing
Previous versions of Asetek ventures have units made with a corrugated plastic tube with anti-kink measures. They may look aesthetically displeasing but they function to prevent flow restrictions. Corsair units come in this flavor except for the H40, which has smooth rubber tubing similar to that available from Norprene. Antec also come in rubber tubing and their advantage is that they are easily maneuverable in tight spaces such as a Silverstone SG07/08 case scenario. Both forms of tubing are of low permeability.

Radiator
the real question with most people investing in these ALC's are "what fans should I buy?"
answer:
the fans should be chosen according to their fin spacing.

here are a few specs
H50/60/70/80 = 16~17 FPI (Fins Per Inch)
H100 = 20~21 FPI

Fans
Recommended fans to go with the units are
Scythe AP-15
Noiseblocker 2000RPM PWM fans
Noctua NF F-12
Corsair SP120
Yate Loons
* the stock fans provided by Corsair are 50cfm fans, static pressure and bearing type aren't known.

preferably high static pressured fans will do the job.

Configuration
From experience, Push/Pull setups are the best route to go:

fan|rad|fan

1jbrlEB.jpg


however the "Ideal" setup will be to have a shroud between both fans and rad like so:

fan|shroud|rad|shroud|fan

p217CY9.png


The shroud in effect elliminates the dead spot located behind the fan motor. I mentioned "Ideal" because not everyone will be working with full tower, goliath cases. Only push or pull with one shroud will still yield good results.

Orientation

For those having the 'single 120 rad' designed unit will require you to run the unit in intake so the rad is fed with fresh cool air from the outside. The downside to this is the the unit dumps the heat back into the case further adding to system temps.

Its possible to run the unit in exhaust but there will be a slight temp increase on the cpu's notably about a degree more (which isn't much)

there are other possibilites as well:
1| having the unit mounted up front and have it as intake - provided the case+hardware layout allow for the tubing to reach the front panel/mesh
2| having the rad mounted uptop and exhausting the air to the outside
3| having the rad mounted on the bottom and have it intake

* if you have the unit as intake please remember to flip one of your case fans to compensate for the air coming in so it is exhausted.
** case airflow - intake should equal exhaust + hot air rises
*** there is a risk of having the unit suck warm air from a PSU back into chassis if the unit is mounted below a top mounted PSU.


Mounting

To attach the rad to the case, all that is needed is an available/empty 120mm fan spacing. With the help of the screws that come with the unit you can attach it securely to the case/mesh. If in a rare case, you've lsot the screws - fret not! Just pop by your hardware store(or online) and pick up 6/32 screws. It is the exact threadeing for all C.L.C rads. Mind you - you'll need to calculate how long a screw you'll need for your setup.

Example:
rad thickness+fans (if used, +shroud)

More on mounting/orientation/configuring the unit here : Corsair Hydro Series H50/H70 CPU Cooler — Supplemental Mounting Information @ Corsair Blog, Corsair.com


Installation demo of H50

[flash=480,360]http://www.youtube.com/v/PUxoFiFuS_g[/flash]

Benchmarks

gyChyid.png

3CasLEu.png

UOenFdr.png

images courtesy of Tom's Hardware

U7nwTlU.jpg

S1VAFDo.jpg

images courtesty of Hexus


Maintenance:
1| You don't need to tear down the loop as conventional watercooling setups need to but if you'd like to know tearing down the unit to inspect for damage/improper internal installation will void your warranty.
2| Tubes don't need replacement and neither does the fluid contained inside the unit
3| You don't need to clean the pump/copper plate nor flush/rinse the rad or the unit
4| During the period of service of the unit - one only needs to blow compressed air through the rad fins.

|*| If the unit is found leaking out of the box, please contact the respective CLC's manufacturer and proceed towards RMA. DO NOT perform any DIY repair work!

Here's how you can care for your unit:
i] Get a can of compressed air and blow through the rads during the scheduled weekly or (bi-)monthly cleanup of your system internals
ii] If you want, you can remove the rad from its mounted position and clean the rad thoroughly with a 1/2"~1" paint brush.

Yeap, its that simple!

Special Mention:
If you experience an airlock in your unit, please remove the entire unit from your system and hold the radiator above with the cpu block dangling below. Shake the cpu block until you hear a slight pop/swish of air travelling to the top/rad.


Mounting and Orientation

Rv3E8YF.jpg


Most closed loop coolers function in the same manner as normal watercooling loops. This also means that the pump can become inactive moving coolant if an air pocket happens to block flow at the pump. This can be avoided by orienting the cooler so the tubing is 'downward' so that air will not likely be not pulled into the pump, causing an air lock. If your cooler pump appears to be running normally but temperatures climb, especially when there is not CPU load, you may need to unmount the radiator from the case and rotate to remove trapped air. While closed loop coolers are factory sealed and filled, they still often have small air gaps. If you can hear sloshing when shaking the radiator - there is a presence of air.

Yet deciding?

Pro's:
Eliminates the clearance issue found on mobo's that have tightly spaced/packed cpu mosfet coolers and tall ramsinks.
Light weight block/contact plate module reduces stress on the mobo compared to heavy ended air coolers.
Good for space constrained cases/rigs.
Like conventional Watercooling, the unit can move and dump heat away from heat-source.
They are the same as a good air cooler.

Con's:
For the price of an H100 an end user can purchase an entry level watercooling kit such as the XSPC Rasa RS/RX 240 kit and expect to see further temp drops as far as a cpu only loop is concerned, but the entry level kit gives the user the ability to venture into GPU and/or chipset cooling.
Price of a C.L.C coupled with custom selection of fans can weigh heavy on a budgeted wallet.
Pump is weak and is prone to failure or airlocks as seen in the past.
Fins are tightly spaced and thus need high rpm+high static pressured fans to get the desired cooling and at a much higher acoustical note.
Unlocking the full potential of the units will require one to be setup with the shrouds and fans in push+pull which in reality isn't possible for everyone using vintage cases.
They perform about the same as a good air cooler.

Useful Links
Official Corsair Hydro Series Club - info about the series and mods
Antec Kühler H2O 620/920 Club

Antec Kuhler H2O 620 Review - @ overclocker.com
Corsair H80 vs Antec Kuhler H2O 920 Review - @ hardwareheaven.com
Corsair H100 Liquid CPU Cooler vs H80 and Antec 920 Review - @ hardwareheaven.com

Corsair H40 Hydro Series Review - @ conversense.net
Corsair Hydro H60 CPU Water Cooler Review - @ legitreviews.com
Corsair Hydro H70 CPU Cooler Review - @ hardwarecanucks.com
Corsair Hydro Series H80 Liquid CPU Cooler Review - @ legitreviews.com
Corsair Hydro Series H100 CPU Water Cooling Kit Review - @ legitreviews.com
Corsair Hydro H100 Watercooling System - @ frostytech.com

Antec Kühler Vs. Corsair Hydro: Sealed Liquid CPU Coolers Compared @ tomshardware.com

Corsair H100 Pics, Review, Benchmark! - by dade_kash_xD on OCN


Return to Link Index
 

rubix_1011

Contributing Writer
Moderator
Maintenance

As for draining and refilling your loop on a maintenance schedule; it depends. Most people will say every 6-9 months you should drain and refill your loop, but this really is where you should have a solid grasp of what you have running in your loop. Many people run the same distilled and biocide/killcoil for a year or more without issues. Some even 2-3, so this can easily be debatable. If you decide to run a premix solution, consider sticking to the 6 to 9 month interval to make sure you aren't getting gunked up blocks or any precipitate matter floating around. When you decide to drain your loop, give yourself a Saturday or Sunday...or both to do so. Take your blocks out, remove fittings, inspect for corrosion, etc....but take your time and pay attention to details. Take your CPU block apart and clean it with a toothbrush (especially if running a coolant or you notice corrosion). If it looks gunked up, scrub with a toothbrush and ketchup. The acidicy in the ketchup does wonders...trust me on this. Even if they don't need to be scrubbed, a soak in a distilled water + vinegar solution (80/20) should help clean up the rest. Rinse out your radiators in the same manner as when you first got them. Reassemble and refill your loop as before, and don't forget to leak test upon assembly.

Remember, any time that you reassemble your loop, you'll need to leak test.


Return to Link Index
 

rubix_1011

Contributing Writer
Moderator
Recommended Watercooling Kits


The following are common recommendations for entry-level watercooling. Most are aimed at the beginner, but all offer very good to exceptional performance for the price. They include everything you'll need in a single box...just add water. Most, if not all, have the ability to expand into larger, custom loops capable of supporting multiple radiators and the addition of one or more GPU blocks.

See the list of online retailers for availability and pricing.

XSPC Rasa RS/RX 240/360
Older XSPC CPU-only kit utilizing their RS and RX series radiators in 240/360 versions coupled with their X20 750 (750 l/h [12.5 lpm]) bay/pump/res combo. There are also 120 versions, but they utilize the weaker X20 200 (200 l/h [3.33 lpm]) and aren't typically recommended except in very SFF cases. The X20 750 is a decent flowing pump and good for a CPU only loop, or even with a video card block and additional radiator, but once you start to consider multiple video card blocks, you should likely consider a better pump.

These kits are easy to setup and maintain and have used 7/16" ID tubing and fittings out of the box. The Rasa block is a very good performer in terms of CPU blocks, and the RX radiator series is excellent for price and performance. The RS rad series has since been replaced with the EX series rads, but do offer good performance for the price. It should be noted that there are updated versions to these kits that utilize an XSPC bay res combo with either a D5 or DDC pump (for additional cost).
Rasa RX360 (link)

XSPC Raystorm EX/RX 240/360 & EX240/420
The successor to the Rasa kits, the Raystorm kits use the XSPC Raystorm CPU block which currently is one of the best price/peformance/flow blocks on the market. They use the same X20 750 pump as the Rasa kits, but only are available with the EX or RX radiators. Like the Rasa kit upgrades, there are alsoD5 and DDC combo res/pump configurations for these as well (for additional cost).
Raystorm EX280 w/D5 (link)


EK H30 LTX 240/260
The EK LTX kits offer a very good performing LTX water block, Jingway/EK-rebranded pump with mounted cylinder reservoir and EK Coolstream XT rads (240 or 360) which are very good performers.
EK H30 LTX (link)

EK H30 HFX 240/260
The HFX kits utilize the Supreme HF block and the same Jingway/EK-rebrand pump/res components as well as the XTX series Coolstream rads which are EK's top performing rad series.
EK H30 HFX (link)

Swiftech 220/320 Edge
The Edge kits are based on the the Apogee CPU blocks and DDC built-in pump to the MCR radiator/res combo (MCP35x pump w/native PWM). While the Apogee is a bit older, yet still very capable block, the MCP35x is a very solid performing pump. The MCR radiators are on-par with XSPC RS series rads; good performance and decent price.
Swiftech Edge (link)

Swiftech 220/320 Drive
The Swiftech Drive is a CPU block/pump unit that combines an Apogee CPU block and MCP35x pump into a small package combo that is typically sold separately but can also be bundled with an MCR radiator.
Swiftech Apogee Drive (link)

Swiftech 220/320 Ultima
Swiftech Ultima kits feature the Apogee CPU block, MCR radiator series, Swiftech micro res and a D5 pump.
Swiftech Ultima (link)

Asetek WaterChill (mostly outdated)


Return to Link Index
 

rubix_1011

Contributing Writer
Moderator
FAQ's & Random Bits and Pieces


How do I know if I need watercooling or air cooler upgrade?
-aka-
My temps seem to be hot on my CPU and/or GPU!!
-aka-
Do I need watercooling?!

Not so fast. I’m not trying to discourage anyone from going out and contributing to the economy by spending their money on a new cooler or full-fledged watercooling loop. However, here is a simple way to test whether or not your cooler needs updating or if you simply have poor case airflow, in which a cooler upgrade would still have little effect (watercooling loop would still provide improvement, but still dependent upon ambient temps and radiator placement/airflow).

Remove the side panel of your case. Take a house or desk fan- turn on HIGH and blow air into your case. Run your benchmarks, game, Fold, encode video, etc…see what your temps are. Compare with the temps you get with your case side on, and no fan. If the temps drop 5°C or more, you have a case airflow issue inside your case that should be addressed before ever replacing an air cooler with another air cooler. Watercooling might help, but depending on your desired temp ranges and budget, updating/adding fans might be the only thing you need to improve to get temps where you want them. If your temps remain the same or within 1-3°C, you might have a minor airflow issue (or ambient temps are different than when you ran your baseline test without the fan). If you still are unhappy with your temps, this is when considering a cooling upgrade is a good decision.


Do premixes, coolants or additives cooler better than plain, distilled water?

In short, no. Coolants and premixes mean there are additional additives present in the water, based on what we discussed about thermal conductivity and specific heat of water is that not many off-the-shelf items can beat it for the price. Therefore, these additives lower both of these properties below normal distilled, making them slightly less effective. The higher the concentration of additive/coolant, the less effective at cooling it becomes compared with plain distilled. Read more below:
Skinnee Labs Coolant/Fluid Roundup-Thermal Performance


Does the order of components in your watercooling loop matter concerning temps and performance?

Not really. A watercooling loop is exactly what it says it is; a closed loop, so the water is being pushed just as much as it is being pulled. Most advice is to have the reservoir outlet feeding the pump inlet, but this is primarily for simplicity in filling and priming the loop. It also is very effective when purging air from the loop as the air collects in the reservoir (with the understanding that it is at least equal to or higher than the pump inlet) which prevents air from being re-circulated.
xTremeSystems.org, Test Report: Loop Order, does it make a difference?


The Impact of Tubing Size

There have been countless discussions on whether 3/8"ID (9.5mm) tubing is more restrictive than 1/2"ID (13mm) tubing. While technically you would immediately see the smaller diameter and assume it would create a significant drop in flow due smaller diameter restricting flow. Not so. While there are some very, very minor differences in flow as they are calculated, there is very little difference in flow rates and therefore little impact on your Delta and temps. Tubing smaller than 3/8"ID (9.5mm) does tend to cause more restriction than benefit, but those tubing sizes are rarely used on custom loops.
xTremeSystems.org, The impact of tubing sizes


The Debate: Are Dual Loops Better at Cooling than Single Loops?

Another short answer; in almost every case, no. Having two dedicated loops that are completely segregated not only requires a pump for each, they also lack the overall cooling potential of the total radiators being implemented. If you were to comprise two setups- one single loop, one dual loop, and use the exact same watercooling hardware, you'd find that the single loop (even if using both pumps) would cool better due to the combined dissipation potential of the radiators from the dual loop setup. You would be able to take advantage of the extra radiator space from the dual loop's CPU loop to help cool the GPUs when running a single, overall loop.
xTremeSystems.org, Dual Loop vs. Single, the Facts (Gabe of Swiftech)

Choosing The Best Pump for Your WaterCooling System

Overclock.net, Why you shouldn't mix Alu+Copper. Another Horror History

Martin's Liquid Lab, Galvanic Corrosion Explored

Overclock.net, Using a Fridge as a PC Cooler -Please read this as it has links and explictily outlines the shortcomings of the common refrigerator and freezer for cooling a PC.

OverClockers.com, PC Watercooling Chemistry Pt. 1 -Thermal properties of water, various metals and various processes to purify water.

OverClockers.com, PC Watercooling Chemistry Pt. 2 -Galvanic corrosion (in depth), additives and comparison.


Return to Link Index
 

rubix_1011

Contributing Writer
Moderator
E-tailers/Online Stores for Watercooling Gear


[strike]FrozenCPU.com[/strike] - Note: It as of Q1 2015, FrozenCPU has been in and out of business due to some financial issues. Use caution as it is uncertain as to their current retailer status.

Jab-Tech.com

PetrasTechShop.com

Aquatuning.us

CrazyPC.com

Performance-PCs.com

SidewinderComputers.com

PCCaseGear.com

CaseLabs-store.com


UK Online Retailers


XSPC.co.uk

SpecialTech.co.uk

WatercoolingUK.co.uk

Aquatuning.co.uk

CandCCentral.co.uk

Overclockers.co.uk


Many will ship internationally, check out their page or contact them directly before ordering.


Return to Link Index
 

rubix_1011

Contributing Writer
Moderator
Watercooling Sticky v2.0 Change Log

Created 7.6.12
--Initial posting
--Minor edits

Update 7.8.12
--Added description to 'Tubing and Fittings' to discuss function and installation of barbs and compression fittings

Update 7.14.12
--Added detailed description and links for beginner watercooling kits

Update 7.20.12
--Swapped sticky posts/permalinks for topics, 'Pumps' and 'Radiators & Fans'.

Update 7.24.12
--Added ExtremeForums 'Watercooling Pumps' sticky by ricecrispi to topic, 'Pumps'
--Added xTremeSystems 'Choosing the Best Pump for your Watercooling System' sticky by MaxxRacer to topic, 'Pumps'
(courtesy of Lutfij on the URL finds)

Update 7.27.12
--Added new section 'Closed Loop Coolers' - all content written, accumulated and submitted by Lutfij

Update 7.30.12
--Added Thermal Coefficient table for radiator performance comparison

Update 8.16.12
--Added several UK retail sites and CaseLabs to the retailer's links

Update 2.12.13
--Added airflow considerations for universal GPU block w/RAMsinks & heatsinks over non-WC components
(credit to 4ryan6 on finding this airflow omission)

Update 2.22.13
--Added additional tubing/barb/clamp diagram to illustrate ID/OD of each and how they relate

Update 3.15.13
--Added 'Maintenance' subsection to Closed Loop Coolers; contributed by Lutfij

Update 5.28.13
--Added CPU/MB cooling considerations and warnings to CPU Blocks section; Contributed by 4ryan6.

Update 4.09.15
--Added update in retailers section in reference to FrozenCPU; Contributed by 4ryan6.

Update 4.23.15
--Corrected Thread Index Link Jumps.
--Corrected Link/Section Order on some items.
--Updated Thread Index formatting.
--Added dual pass vs. crossflow content and image to 'Radiators'.

Update 7.6.15
--Added image of compression fitting in section 'Fittings and Tubing'

Update 7.30.15
--Added Corrosion and Metals content to 'Building & Filling a Loop'

Update 8.7.15
--Added Flow, Restriction and Pressure drop content to 'TDP & Calculating Delta-T'
--Added YouTube video by Alex Venz for detailed content

Update 8.20.15
--Added Caution content to introduction on the need for motherboard airflow
--Added color to the content in the blocks section

Update 9.9.15
--Updated Delta-T section with more detail and description

Update 9.12.15
--Updated TDP and Delta-T section with download to Estimator sheet.
--Minor edits of content in Delta-T section.
--Updated TDP and Delta-T section with image of the Estimator sheet.

Update 7.27.17
--Updated all images with Imgur hosting links.
--Minor edits of content in all sections.
--Removal of some items no longer relevant.
--Future edits/rewrite will follow with updates.

Return to Link Index
 
Status
Not open for further replies.